
✍️ Note
Some codes and contents are sourced from Udemy. This post is for personal notes where I summarize the original contents to grasp the key concepts (🎨 some images I draw it)
Bit Manipulations
There are 6 types of bit manipulations
- OR
- 1 | 0 -> 1
- 1 | 1 -> 1
- 0 | 0 -> 0
- And
- 1 & 0 -> 0
- 1 & 1 -> 1
- 0 & 0 -> 0
- XOR (if there is only 1 then It’s result will be 1)
- 1 ^ 0 -> 1
- 1 ^ 1 -> 0
- 0 ^ 0 -> 0
- Not
- ~1 -> 0
- ~0 -> 1
- Left Shift
- 1 << 1 -> 0000 0010
- Right Shift (See Apple’s document)
- 1 >> 1 -> 000 0000
If you want to learn more details, visit Apple official documents
Example 1. Find if the N-th bit of a byte is 1

To check N-th bit, use checkBit.
func is1Bit(number: Int, at: Int) -> Bool {
    var checkBit = 1
    checkBit <<= at
    var result = number & checkBit
    return result == checkBit

}
let number = 789
String(number, radix: 2)

//index 0, 2, 4, 8, 9 bit is 1
is1Bit(number: number, at: 0)
is1Bit(number: number, at: 2)
is1Bit(number: number, at: 4)
is1Bit(number: number, at: 8)
is1Bit(number: number, at: 9)

//index 1, bit is 0
is1Bit(number: number, at: 1)
Example 2. Set N-th bit as 1

var number = 789
func set1Bit(number: inout Int, at: Int) {
    var checkBit = 1
    checkBit <<= at
    String(number, radix: 2)
    String(checkBit, radix: 2)
    number |= checkBit
    String(number, radix: 2)
}
print("Before: \(number)")
set1Bit(number: &number, at: 1)
print("After: \(number)")
Set N-th bit as 1 is very easy.
- Create checkBit
- Apply OR bit operation to the number
Input number is 789
When you set bit 1 at index 1, the result will be +2
Example 3. Print and count 1’s bits

In Swift, There is convenient API to print binary from Int
- String(789, radix: 2)
Alternative way, we can print all the bit information from right to left using checkBit
func printBitsAndReturn1sBits(_ number: UInt) -> Int {
    var input = number
    //Use unsinged Int, because signed int hold right most bit as signed information
    var checkBit: UInt = 1
    //MemoryLayout returns byte size of Int. It depends on architecture. 4 byte(32 bit) or 8 byte (64 bit)
    //To get bits we need to multiply 8 and -1 (because index starts from 0)
    let bits = MemoryLayout<UInt>.size * 8 - 1
    checkBit <<= bits

    var count = 0
    while checkBit != 0 {
        let rightBit = number & checkBit
        if rightBit == checkBit {
            print("1", terminator: " ")
            count += 1
        }
        else {
            print("0", terminator: " ")
        }
        //Right shift
        checkBit >>= 1
    }
    return count
}
printBitsAndReturn1sBits(789)
Above approach, The time complexity is O(Number of Bit)
We can optimize it by using subtract by 1. It’s time complexity will be O(number of 1’s) -> Assume we ignore print all the bit information. Just focusing on get 1’s count.
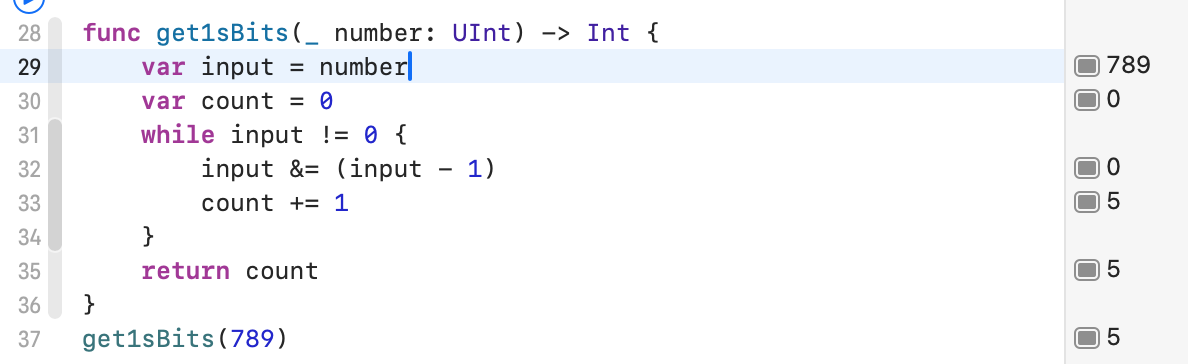

func get1sBits(_ number: UInt) -> Int {
    var input = number
    var count = 0
    while input != 0 {
        input &= (input - 1)
        count += 1
    }
    return count
}
get1sBits(789)
Example 4. Reverse the bits an Integer

func reversedBit(_ number: UInt) -> UInt {
    var number = number
    print("Input: \(number), Bits: \(String(number, radix: 2))")
    var reversedNumber: UInt = 0
    //Count: Get count of bit of the number, 789 has 10 bit
    var count = String(number, radix: 2).count - 1
    while number != 0 {
        let leftMostBit = number & 1
        reversedNumber = reversedNumber | leftMostBit
        reversedNumber <<= 1
        number >>= 1
        count -= 1
    }
    reversedNumber <<= count
    return reversedNumber
}

let result = reversedBit(789)
print("Ourput: \(result), Bits: \(String(result, radix: 2))")


댓글 남기기