
This post is for whom want to use AWS Lambda with OpenAPI Generator. Official guide is useful but I felt there are some missing information. So I wrote this post. You can successfully run AWS Lambda function on your local machine and debug your code.
Let’s start from very simple example. You only need 4 files. I’ll explain details. (Ignore Tests folder, no need it in this tutorial)
- Package.swift
- NativeMobileServer.swift
- openapi.yaml
- openapi-generator-config.yaml

Step 1. Define OpenAPI Spec
This OpenAPI spec is for tutorial.
Please check folder and file structure. Create an openapi.yaml
openapi: 3.1.0
info:
  title: MobileJobService
  version: 1.0.0

paths:
  /jobs/fetch:
    post:
      summary: Fetch job data from external source
      description: >
        This endpoint is called by a scheduled Lambda or backend service.
        It fetches job data from the given URL and processes it using the provided prompt.
      operationId: fetchJobs
      tags:
        - jobs
      requestBody:
        required: true
        content:
          application/json:
            schema:
              $ref: '#/components/schemas/FetchJobsRequest'
      responses:
        '200':
          description: Successfully fetched and processed job data
          content:
            application/json:
              schema:
                $ref: '#/components/schemas/JobListResponse'
        '400':
          description: Invalid input parameters
        '500':
          description: Internal error during job fetch or processing

components:
  schemas:
    FetchJobsRequest:
      type: object
      required:
        - url
        - prompt
      properties:
        url:
          type: string
          format: uri
          description: Target URL to scrape or fetch job data from
        prompt:
          type: string
          description: Instruction / extraction prompt used to parse the fetched page

    JobListResponse:
      type: array
      items:
        $ref: '#/components/schemas/Job'

    Job:
      type: object
      required:
        - id
        - title
      properties:
        id:
          type: string
          description: Unique identifier for the job
        title:
          type: string
          description: Job title
        country:
          type: string
          description: Country code (e.g. SG, US, TW)
        city:
          type: string
          description: City name (e.g. Singapore)
        postedAt:
          type: string
          format: date-time
          description: When this job was posted, if known
        company:
          type: string
          description: Company name
        team:
          type: string
          description: Team / department (e.g. Mobile, Backend, Growth)
        jobDescriptionLink:
          type: string
          format: uri
          description: Public link to full job description
        jobApplyLink:
          type: string
          format: uri
          description: Public link to apply
        salary:
          $ref: '#/components/schemas/Salary'
        description:
          type: string
          description: Cleaned / extracted full-text description for the role

    Salary:
      type: object
      properties:
        min:
          type: number
          description: Minimum compensation
        max:
          type: number
          description: Maximum compensation
        basis:
          type: string
          enum: [year, month]
          description: Salary period basis (yearly or monthly)
And then create openapi-generator-config.yaml
generate:
  - types
  - server
Step 2. Create Swift Package Manger
Package.swift
// swift-tools-version: 6.2
// The swift-tools-version declares the minimum version of Swift required to build this package.

import PackageDescription

let package = Package(
    name: "NativeMobileServer",
    platforms: [
        .macOS(.v15)
    ],
    products: [
        .executable(name: "NativeMobileServer", targets: ["NativeMobileServer"])
    ],
    dependencies: [
        .package(url: "https://github.com/apple/swift-openapi-generator.git", from: "1.10.3"),
        .package(url: "https://github.com/apple/swift-openapi-runtime.git", from: "1.8.2"),

        .package(url: "https://github.com/awslabs/swift-aws-lambda-runtime.git", from: "2.0.0"),
        .package(url: "https://github.com/awslabs/swift-aws-lambda-events.git", from: "1.2.0"),
        .package(url: "https://github.com/awslabs/swift-openapi-lambda.git", from: "2.0.0"),

        .package(url: "https://github.com/swift-server/swift-service-lifecycle.git", from: "2.0.0"),
    ],
    targets: [
        .executableTarget(
            name: "NativeMobileServer",
            dependencies: [
                .product(name: "OpenAPIRuntime", package: "swift-openapi-runtime"),

                .product(name: "AWSLambdaRuntime", package: "swift-aws-lambda-runtime"),
                .product(name: "AWSLambdaEvents", package: "swift-aws-lambda-events"),

                .product(name: "OpenAPILambda", package: "swift-openapi-lambda"),
                .product(name: "ServiceLifecycle", package: "swift-service-lifecycle"),
            ],
            path: "Sources/NativeMobileServer",
            resources: [
                .copy("openapi.yaml"),
                .copy("openapi-generator-config.yaml")
            ],
            plugins: [
                .plugin(name: "OpenAPIGenerator", package: "swift-openapi-generator")
            ]
        ),
        .testTarget(
            name: "NativeMobileServerTests",
            dependencies: ["NativeMobileServer"]
        ),
    ]
)
You can remove .testTarget if you don’t need to write test cases.
Step 3. Write a main function
//
//  NativeMobileServer.swift
//  NativeMobileServer
//
//  Created by Shawn Sungwook Baek on 10/26/25.
//

import Foundation
import Logging
import OpenAPILambda
import OpenAPIRuntime

@main
struct JobServiceImpl: APIProtocol, OpenAPILambdaHttpApi {
    func fetchJobs(_ input: Operations.fetchJobs.Input) async throws -> Operations.fetchJobs.Output
    {
        logger.info("fetchJobs invoked")
        let requestBody = input

        if case let .json(request) = requestBody.body {
            logger.info("Fetching jobs from \(request.url) with prompt: \(request.prompt)")
        }

        let mockJobs: [Components.Schemas.Job] = [
            .init(
                id: "job-001",
                title: "iOS Developer",
                country: "SG",
                postedAt: Date(),
                company: "Apple",
                team: "Mobile",
                jobDescriptionLink: "https://example.com/job/1",
                jobApplyLink: "https://example.com/apply/1",
                salary: .init(min: 6000, max: 9000, basis: .month),
                description: "Develop and maintain the iOS application."
            ),
            .init(
                id: "job-002",
                title: "Backend Engineer",
                country: "TW",
                postedAt: Date(),
                company: "Uber",
                team: "Server",
                jobDescriptionLink: "https://example.com/job/2",
                jobApplyLink: "https://example.com/apply/2",
                salary: .init(min: 7000, max: 10000, basis: .month),
                description: "Build API services and integrations."
            ),
        ]
        return .ok(.init(body: .json(mockJobs)))
    }

    let logger: Logger

    func register(transport: OpenAPILambdaTransport) throws {
        try transport.router.get("/health") { _, _ in
            "OK"
        }
        logger.trace("Available Routes\n\(transport.router)")
        // to log all requests and their responses, add a logging middleware
        let loggingMiddleware = LoggingMiddleware(logger: logger)

        // MANDATORY (middlewares are optional)
        try self.registerHandlers(on: transport, middlewares: [loggingMiddleware])
    }

    static func main() async throws {
        let openAPIService = JobServiceImpl(loggerLabel: "JobService")
        try await openAPIService.run()

    }

    init(loggerLabel: String) {
        var logger = Logger(label: loggerLabel)
        logger.logLevel = .trace
        self.logger = logger
    }
}
Step 4. Check Scheme in Xcode
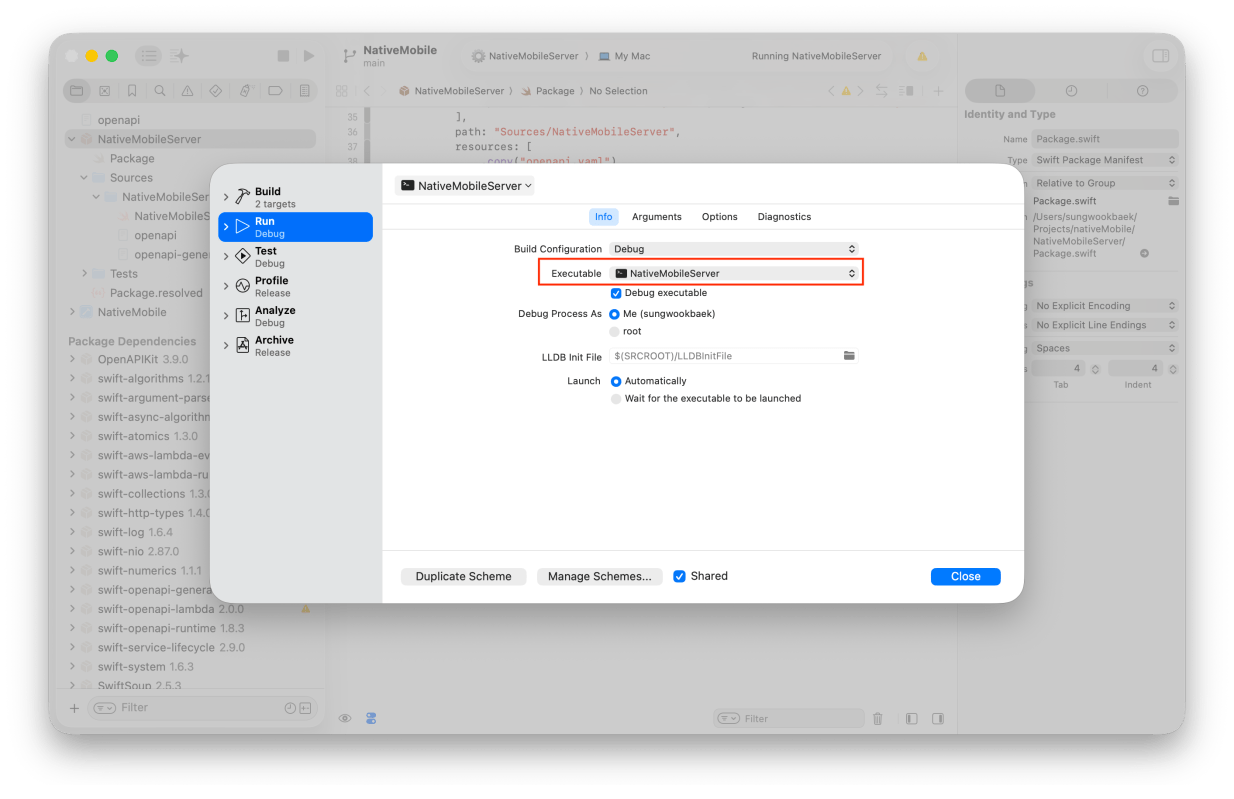
Check Executable Target.

Important!
You need to set Environment Variables
- LOCAL_LAMBDA_SERVER_ENABLED
- LOCAL_LAMBDA_PORT <- Optional! Default port is 7000
Try build and run and check which pid is using 7000 port.
lsof -i :7000
If other program uses that port, you can change default port by setting LOCAL_LAMBDA_PORT
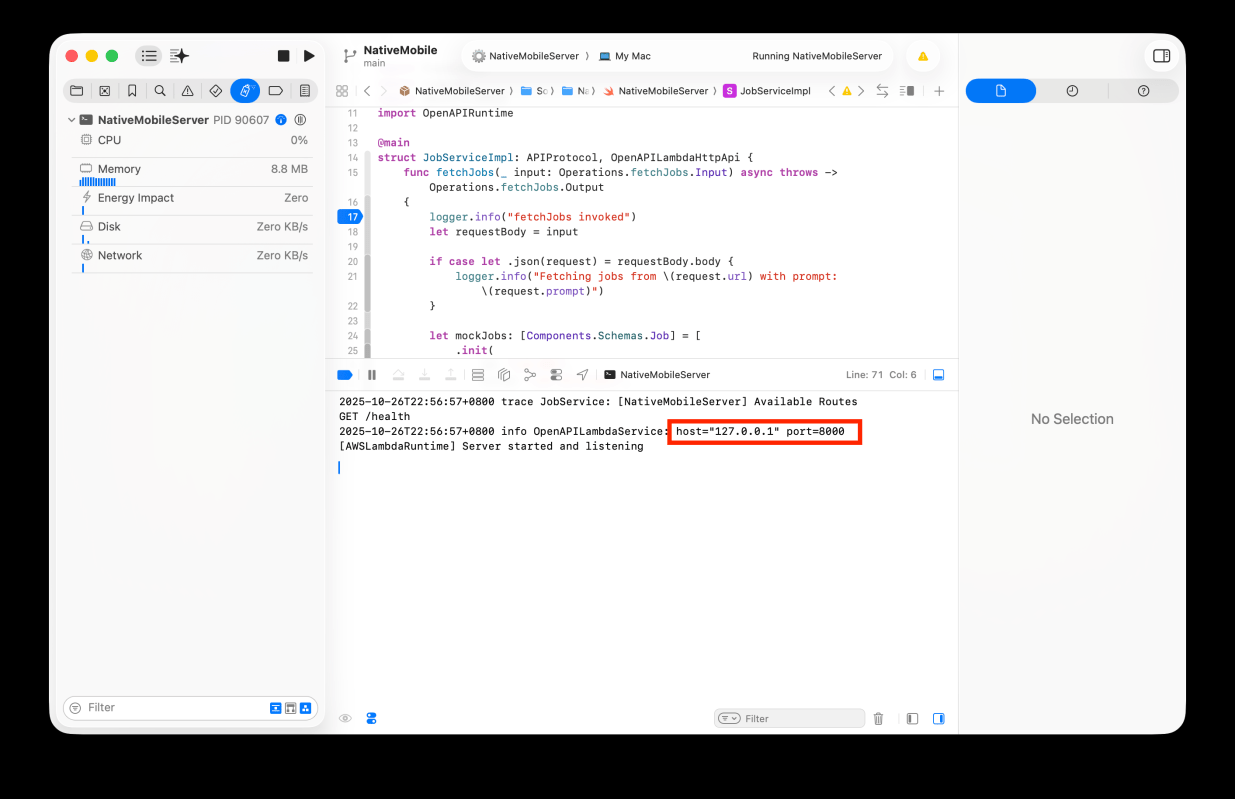
When you run it, you will see the message. (In my case, I changed the default port 8000)
Step 5. Invoke Lambda function
This part you may confusing because you can’t call lambda like
curl -v -X POST http://127.0.0.1:8000/jobs/fetch \
  -H "Content-Type: application/json" \
  -d '{
    "url": "https://example.com/jobs",
    "prompt": "Extract latest mobile job listings"
  }'

If you want to see more detail information, check this out
To invoke and debug our code, we should invoke function like this.
If you want to learn more about this payload structure v2.0 in API Gateway check here
curl -X "POST" "http://127.0.0.1:8000/invoke" \
     -H 'Content-Type: application/json; charset=utf-8' \
     -d $'{
  "requestContext": {
    "accountId": "",
    "time": "",
    "http": {
      "path": "/jobs/fetch",
      "userAgent": "",
      "method": "POST",
      "protocol": "HTTP/1.1",
      "sourceIp": "127.0.0.1"
    },
    "domainName": "",
    "timeEpoch": 0,
    "domainPrefix": "",
    "apiId": "",
    "requestId": "",
    "stage": "$default"
  },
  "rawPath": "/jobs/fetch",
  "rawQueryString": "",
  "version": "2.0",
  "routeKey": "$default",
  "isBase64Encoded": true,
  "body": "{\\"url\\":\\"https://jobs.apple.com/en-sg/search\\", \\"prompt\\":\\"Extract latest mobile job listings\\"}"
}'
I’ve set breakpoint at here.

Let’s invoke function.
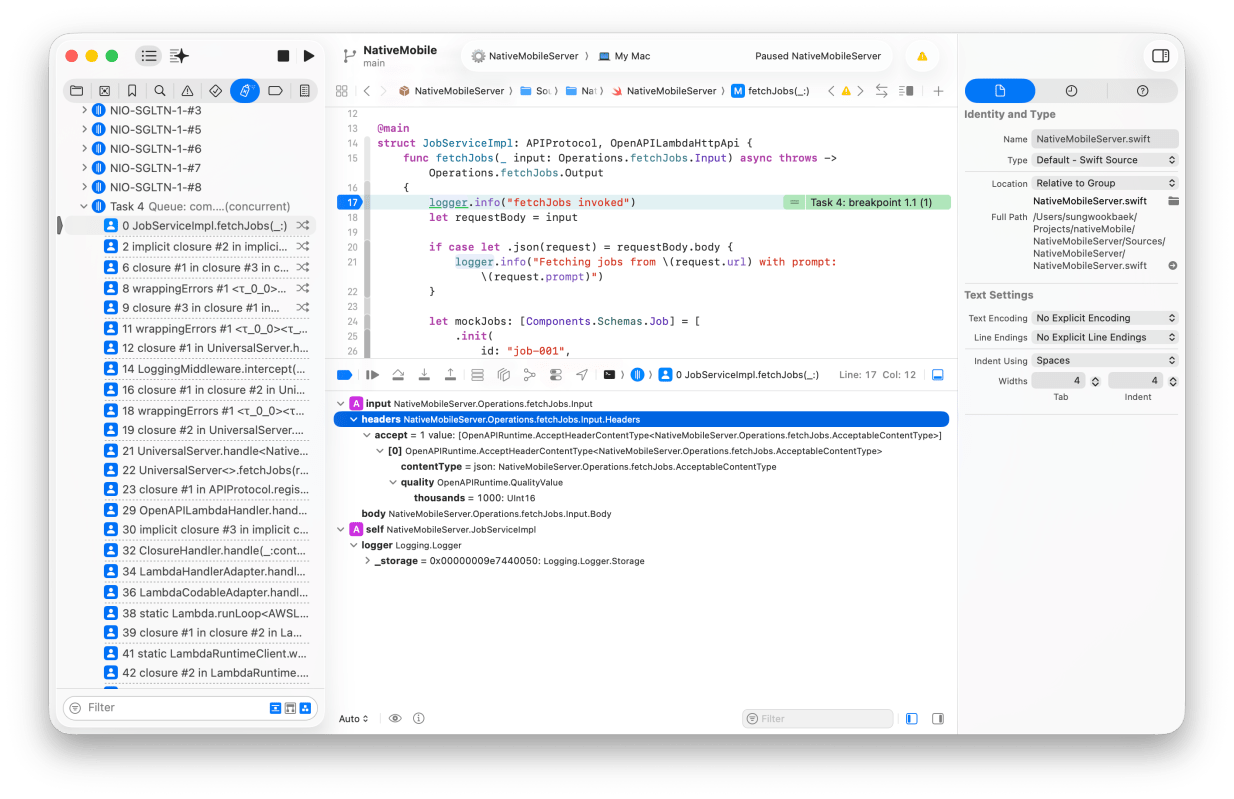
Ok, breakpoint is working.
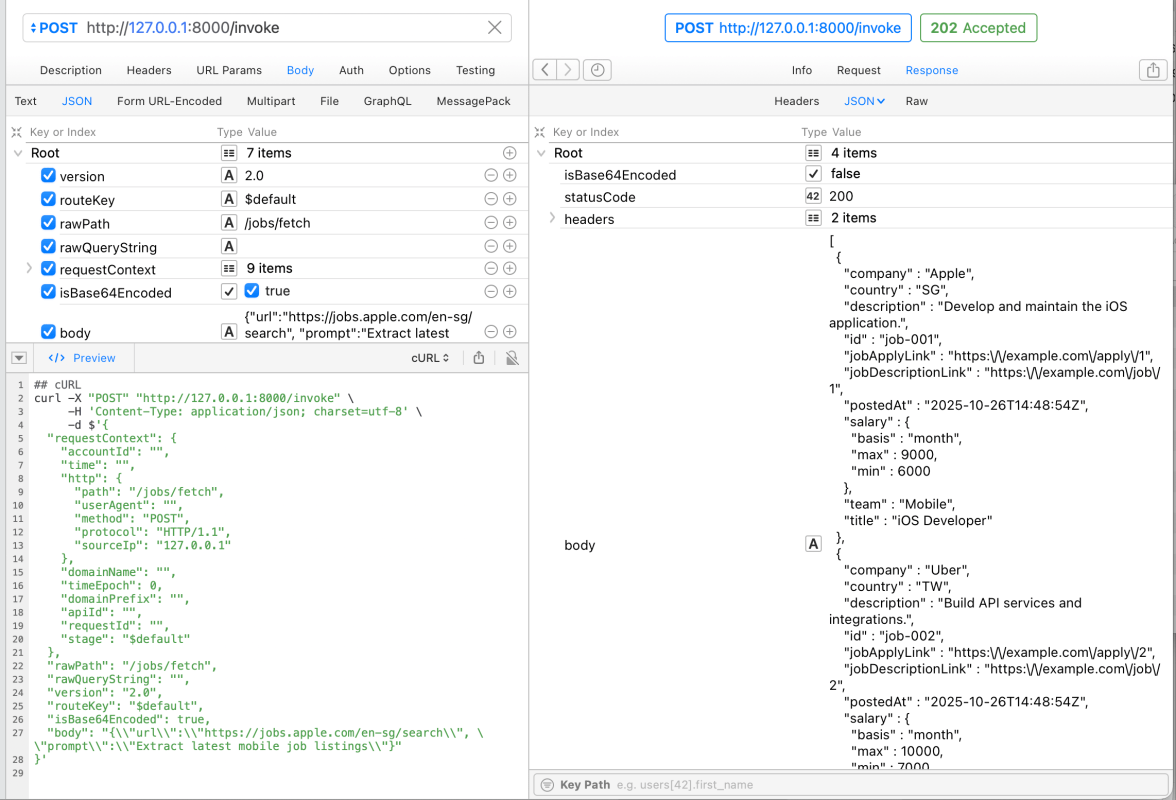
And I can see the results from AWS Lambda function
Conclusion
Swift is very powerful for developing server-side applications. There a lot of great open source projects. In Part 2, I’ll explain how to deploy AWS Lambda Swift function to the AWS using SAM CLI.

Leave a comment