Blog

  • iOS, Stack and Queue

    iOS, Stack and Queue

    ✍️ Note

    Some codes and contents are sourced from Udemy. This post is for personal notes where I summarize the original contents to grasp the key concepts (🎨 some images I draw it)

    Introduction

    You may think Stack and Queue is very basic structure and It’s very easy. Yes that’s true but utilizing them together is bit tricky. That’s why I summarized these data structure. (As I mentioned earlier, all the contents are sourced from Udemy lecture, I rewrite sample code in Swift)
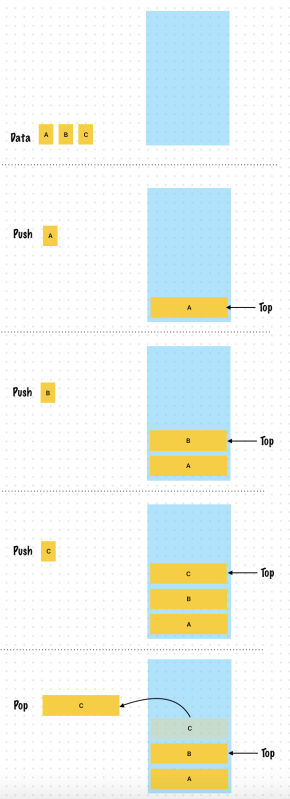
    Stack

    A stack is a data structure to hold elements such that the last element you add to the stack is the first one you access

    LIFO: Last In First Out

    Always focused on the end of the stack, called the POP

    Push – Push an element to the top of a stack

    Pop – Pop an element from the top of a stack

    Peek – Peet at the top element of a stack (Don’t remove an element!) You access the top element in the stack without actually changing the data structure

    Other operations which are useful

    IsEmpty, IsFull, Size

    Exception case

    • When you try to pop from an empty stack -> throw an exception
    • Push into a full stack -> throw an exception, Yes It is stack overflow!

    Summary

    • The most common operations on a stack involve pushing and popping elements from the top.
    • The operations are confined to one end of the stack
    • A linked list lends itself perfectly to build a stack

    Performance and Complexity

    • Push and Pop (Using Linked List or Array) is O(1)
    • isEmpty, isFull also O(1)
    • check size -> O(1)

    Space Complexity

    • O(N)

    Where can stacks be used?

    • Implementing undo in an application
    • Implementing the back button on the web browser
    • Holding the memory for recursive calls in a programming language
    • Translating infix notation (a+b) for expressions to postfix (ab+)
      • programming languages converts infix to postfix
    https://www.udemy.com/course/break-away-coding-interviews-1/learn/lecture/8463684#overview

    Example 1. Use a Single Linked List

    //A Single Element in the linked list
    class Element<T> {
        var data: T
        var next: Element?
        
        init(data: T, next: Element?) {
            self.data = data
            self.next = next
        }
    }
    
    enum StackError: Error {
        //Pushing into a full stack
        case stackOverflow
        //Popping from or peeking into an empty stack
        case stackUnderflow
    }
    
    class Stack<T> {
        private let maxSize: Int
        //Topmost element in the stack
        private var top: Element<T>?
        //Track the size of the stack at every push, pop
        //This means the stack size operation can be constant time
        private var size = 0
        
        init(maxSize: Int) {
            self.maxSize = maxSize
        }
        
        func push(data: T) throws {
            if size == maxSize {
                throw StackError.stackOverflow
            }
            //Create a new element to hold the data and point top to it. Make sure you increment the size of the stack
            var newElement = Element(data: data, next: top)
            top = newElement
            size += 1
        }
        
        func pop() throws -> T {
            if size == 0 {
                throw StackError.stackUnderflow
            }
            guard let topElement = top else {
                throw StackError.stackUnderflow
            }
            let data = topElement.data
            //Remove the top element from the stack and return it's data
            top = topElement.next
            size -= 1
            return data
        }
        
        func peek() throws -> T {
            if size == 0 {
                throw StackError.stackUnderflow
            }
            guard let topElement = top else {
                throw StackError.stackUnderflow
            }
            //Just return the data of the top element, do not remove it
            return topElement.data
        }
        
        var isEmpty: Bool {
            size == 0
        }
        
        var isFull: Bool {
            size == maxSize
        }
    }


    Example 2. Use an Array (It’s more simple, In swift array can increased the size at runtime)

    Growing the Size of an Array

    Every array reserves a specific amount of memory to hold its contents. When you add elements to an array and that array begins to exceed its reserved capacity, the array allocates a larger region of memory and copies its elements into the new storage. The new storage is a multiple of the old storage’s size. This exponential growth strategy means that appending an element happens in constant time, averaging the performance of many append operations. Append operations that trigger reallocation have a performance cost, but they occur less and less often as the array grows larger.

    If you know approximately how many elements you will need to store, use the reserveCapacity(_:)method before appending to the array to avoid intermediate reallocations. Use the capacity and countproperties to determine how many more elements the array can store without allocating larger storage.

    For arrays of most Element types, this storage is a contiguous block of memory. For arrays with an Element type that is a class or @objc protocol type, this storage can be a contiguous block of memory or an instance of NSArray. Because any arbitrary subclass of NSArray can become an Array, there are no guarantees about representation or efficiency in this case.

    https://developer.apple.com/documentation/swift/array
    enum StackError: Error {
        //Pushing into a full stack
        case stackOverflow
        //Popping from or peeking into an empty stack
        case stackUnderflow
    }
    
    class Stack<T> {
        private let maxSize: Int
        private(set) var array = Array<T>()
        //Topmost element in the stack
        private var top: T?
        //Track the size of the stack at every push, pop
        //This means the stack size operation can be constant time
        private var size = 0
        
        init(maxSize: Int) {
            self.maxSize = maxSize
        }
        
        func push(data: T) throws {
            if size == maxSize {
                throw StackError.stackOverflow
            }
            array.append(data)
            top = data
            size += 1
        }
        
        func pop() throws -> T {
            if size == 0 {
                throw StackError.stackUnderflow
            }
            //Remove the top element from the stack and return it's data
            let topElement = array.removeLast()
            top = array.last
            size -= 1
            return topElement
        }
        
        func peek() throws -> T {
            if size == 0 {
                throw StackError.stackUnderflow
            }
            guard let topElement = top else {
                throw StackError.stackUnderflow
            }
            //Just return the data of the top element, do not remove it
            return topElement
        }
        
        var isEmpty: Bool {
            size == 0
        }
        
        var isFull: Bool {
            size == maxSize
        }
    }
    
    let stack = Stack<Int>(maxSize: 10)
    
    try? stack.push(data: 1)
    try? stack.push(data: 2)
    try? stack.push(data: 3)
    
    try? stack.pop()
    try? stack.pop()
    try? stack.pop()
    

    Exercise 1. Match parenthesis in an expression

    Check whether an expression has well-formed parenthesis I.E The opening and the closing brackets match

    Use a Stack to store the opening brackets each time you encounter one

    For every closing bracket compare to the last element pushed onto the stack

    https://www.udemy.com/course/break-away-coding-interviews-1/learn/lecture/8463688#overview

    Example

    • (ABC){DEF}[XYZ(LMN)] -> Match
    • (ABC{DEF}[XYZ(LMN)] -> Mismatch
    • (ABC){DEF}[XYZ(LMN)]} -> Mismatch
    //Key is closed brackets, value is open brackets
    var brackets = [")": "(", "]": "[", "}": "{"]
    var openBrackets = Set(brackets.values)
    
    print(openBrackets)
    func matchingParenthesis(input: String) -> Bool {
        let stack = Stack<String>(maxSize: input.count)
        var inputStringArray = input.compactMap { String($0)}
        for c in inputStringArray {
            if openBrackets.contains(c) {
                try? stack.push(data: c)
            }
            //Check close bracket
            if brackets.keys.contains(c) {
                //Pop open brackets
                let poppedValue = try? stack.pop()
                //Check Is poppedValue openBracket or not
                if poppedValue != brackets[c] {
                    return false
                }
            }
        }
        return stack.isEmpty
    }
    
    matchingParenthesis(input: "(ABC){DEF}[XYZ(LMN)]")
    matchingParenthesis(input: "(ABC{DEF}[XYZ(LMN)]")
    matchingParenthesis(input: "(ABC){DEF}[XYZ(LMN)]}")
    

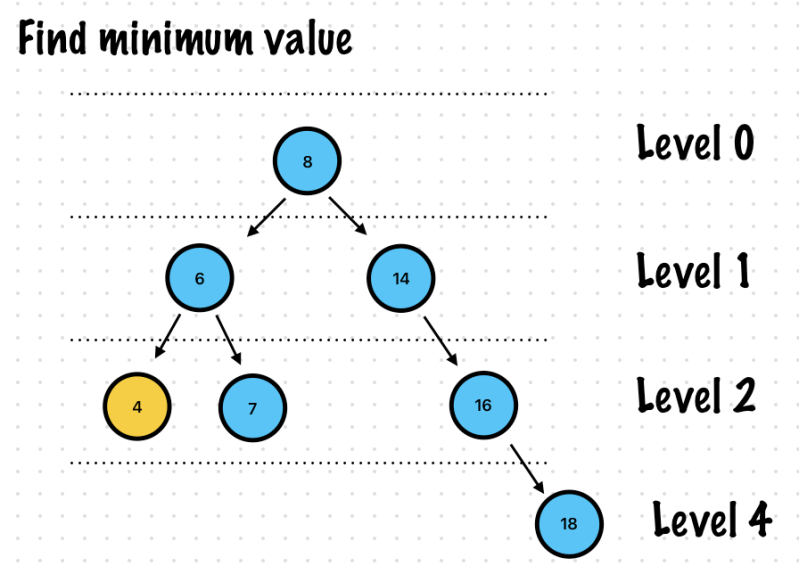
    Exercise 2. Find the minimum element in a stack in constant time

    Keep track of the minimum element for each element pushed on to the stack

    Have 2 stacks, one to hold the actual elements, and another to hold the minimum element corresponding to every element added to the stack

    When each element is pushed onto the stack compare it with the last minimum element and push both the main stack and the minimum element stack together

    Do the same when popping an element from the stack

    https://www.udemy.com/course/break-away-coding-interviews-1/learn/lecture/8463690#overview
    func findMinValue(input: [Int]) -> Int? {
        let stack = Stack<Int>(maxSize: input.count)
        let minStack = Stack<Int>(maxSize: input.count)
        
        for n in input {
            try? stack.push(data: n)
            if minStack.isEmpty == true {
                try? minStack.push(data: n)
            }
            else {
                if let peekMinValue = try? minStack.peek() {
                    //Compare peekValue from MinStack and current value in input
                    let currentMinValue = n < peekMinValue ? n : peekMinValue
                    try? minStack.push(data: currentMinValue)
                }
            }
        }
        return try? minStack.peek()
    }
    
    findMinValue(input: [4, 5, 3, 2, 9])
    

    Or you can create a MinimumStack class like below

    enum StackError: Error {
        //Pushing into a full stack
        case stackOverflow
        //Popping from or peeking into an empty stack
        case stackUnderflow
    }
    
    class Stack<T> {
        private let maxSize: Int
        private(set) var array = Array<T>()
        //Topmost element in the stack
        private var top: T?
        //Track the size of the stack at every push, pop
        //This means the stack size operation can be constant time
        private var size = 0
        
        init(maxSize: Int) {
            self.maxSize = maxSize
        }
        
        func push(data: T) throws {
            if size == maxSize {
                throw StackError.stackOverflow
            }
            array.append(data)
            top = data
            size += 1
        }
        
        func pop() throws -> T {
            if size == 0 {
                throw StackError.stackUnderflow
            }
            //Remove the top element from the stack and return it's data
            let topElement = array.removeLast()
            top = array.last
            size -= 1
            return topElement
        }
        
        func peek() throws -> T {
            if size == 0 {
                throw StackError.stackUnderflow
            }
            guard let topElement = top else {
                throw StackError.stackUnderflow
            }
            //Just return the data of the top element, do not remove it
            return topElement
        }
        
        var isEmpty: Bool {
            size == 0
        }
        
        var isFull: Bool {
            size == maxSize
        }
    }
    
    
    class MinimumStack<T: Comparable> {
        private let maxSize: Int
        private let stack: Stack<T>
        private let minimumStack: Stack<T>
        
        init(maxSize: Int) {
            self.maxSize = maxSize
            self.stack = Stack<T>(maxSize: maxSize)
            self.minimumStack = Stack<T>(maxSize: maxSize)
        }
        
        func push(data: T) throws {
            var min = data
            if !minimumStack.isEmpty {
                let peekMinValue = try minimumStack.peek()
                if min > peekMinValue {
                    min = peekMinValue
                }
            }
            try stack.push(data: data)
            try minimumStack.push(data: min)
        }
        
        func pop() throws -> T {
            try minimumStack.pop()
            return try stack.pop()
        }
        
        func minimumValue() throws -> T {
            return try minimumStack.peek()
        }
    }
    
    let input = [4, 5, 3, 2, 9]
    let minimumStack = MinimumStack<Int>(maxSize: input.count)
    for n in input {
        try? minimumStack.push(data: n)
    }
    try? minimumStack.minimumValue()
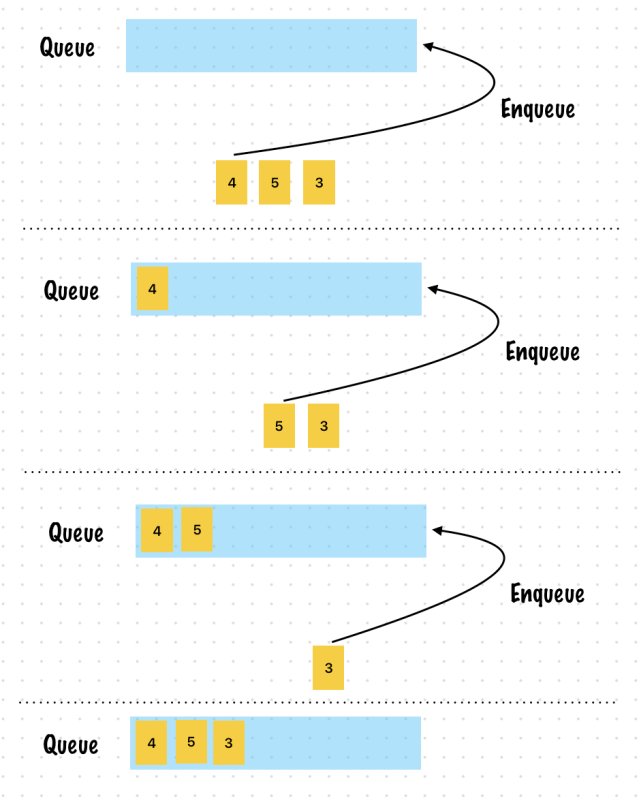
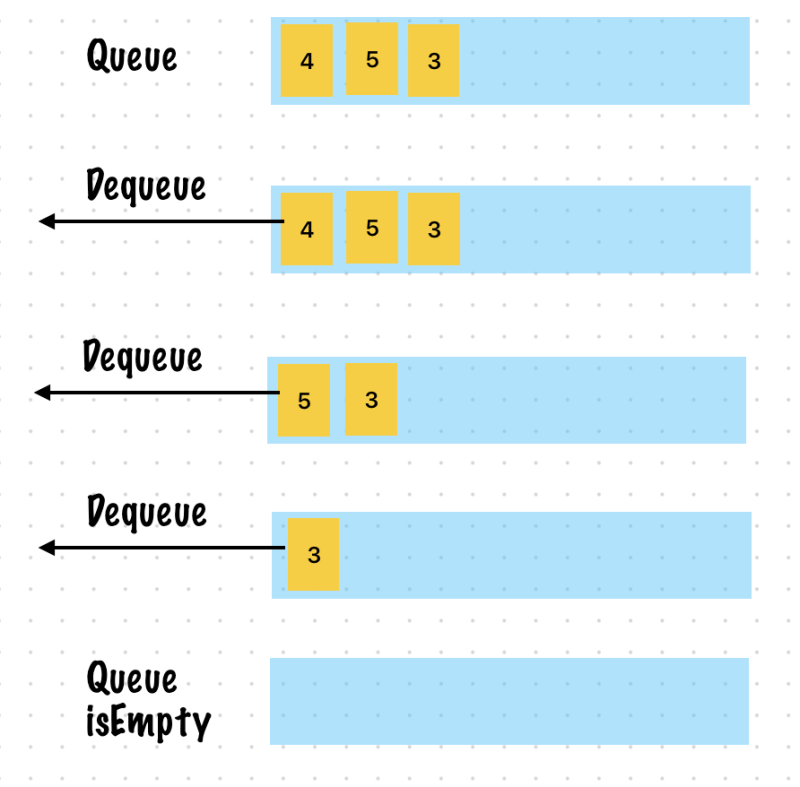


    Queue

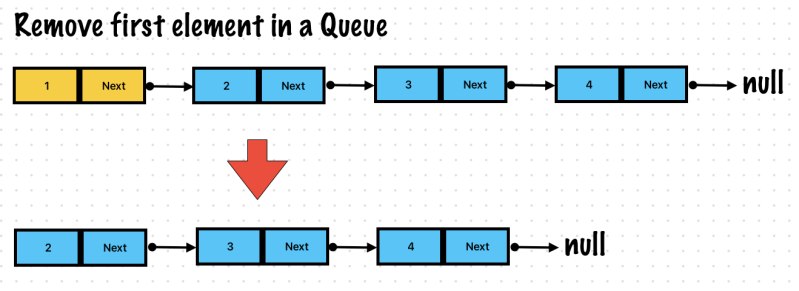
    A queue is a data structure where you add elements to the end of the queue and remove elements from the beginning of the queue

    FIFO: First In First Out == LILO: List In Last Out

    The operations on a Queue are performed at two ends, removal is at the beginning and addition is at the end of the Queue.

    Operations

    • Enqueue
      • Adding a new element to the end of the queue is called
      • Enqueue an element from the queue
    • Dequeue
      • Removing an element from the beginning of a queue is called
      • Dequeue an element from the queue
    • Peek
      • Similar to a stack you might just want to see what the first element in a queue is without removing it
      • Peek at the first element in a queue
    • Offer
      • The queue implementation in Java has another useful method
      • Add to a queue if space is available

    Edge case

    • What if you try to dequeue from an empty queue?
    • Or Enqueue into a full queue?
    • -> Throw an exception!

    Underlying Data Structure

    • Linked List is commonly used
    • The most common operations on a queue involve enqueuing and dequeuing elements
    • The operations are on both ends of the queue
    • A linked list with a pointer to head and the tail works well
    • A common data structure used is a circular queue with pointers to the head and to the tail
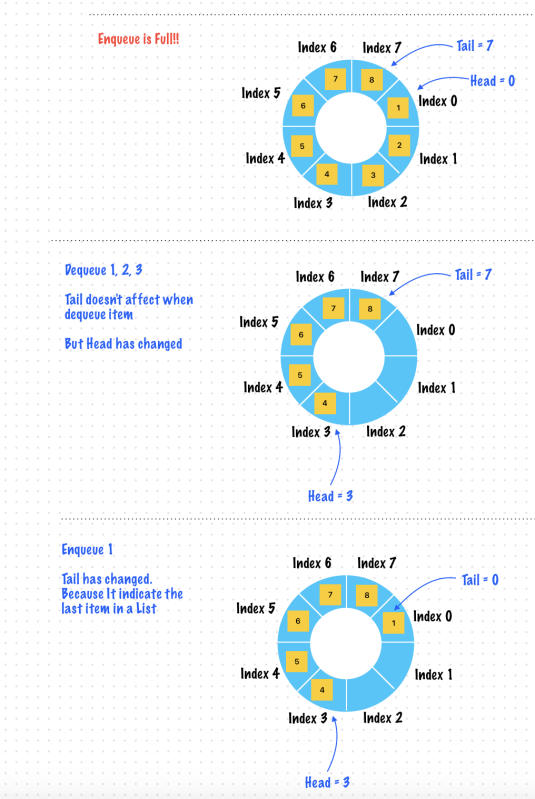
    https://www.udemy.com/course/break-away-coding-interviews-1/learn/lecture/8463696#overview

    Enqueue

    Dequeue

    Exercise 1. Circular Queue

    It can be implemented using an array where the last element wraps around to the first element

    Implementation

    • Head = -1
      • A special value to denote an empty list
    • Tail
      • Always indicates last index
    https://www.udemy.com/course/break-away-coding-interviews-1/learn/lecture/8463698#overview

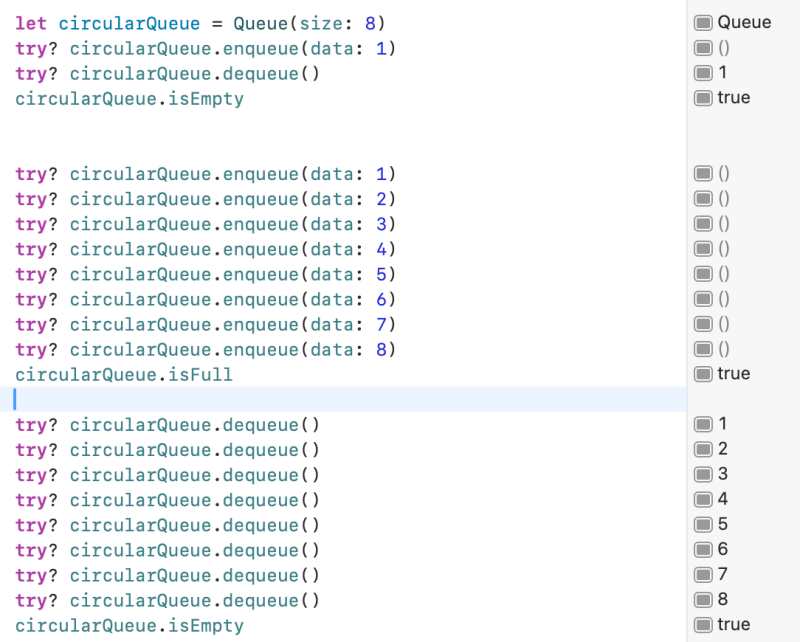
    Enqueue datas until It is full
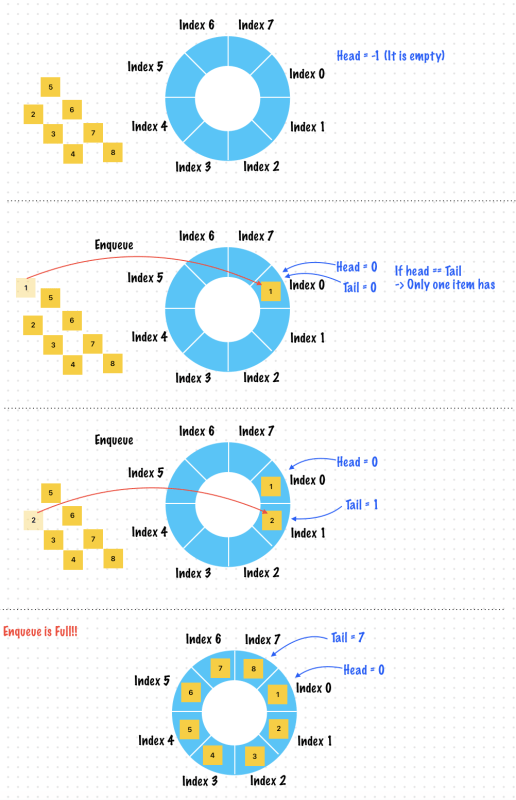
    Dequeue n items

    enum QueueError: Error {
        case queueOverflow
        case queueUnderflow
    }
    
    class Queue {
        private let specialEmptyValue = -1
        private let size: Int
        private var items = Array<Int?>()
        
        
        //Initialize both the head and the tail indices to the special value
        private var headIndex: Int
        private var tailIndex: Int
        
        init(size: Int) {
            headIndex = specialEmptyValue
            tailIndex = specialEmptyValue
            self.size = size
            //Create an array with fixed size
            self.items = Array(repeating: nil, count: size)
        }
        
        //Enqueue doesn't affect headIndex except for empty case
        func enqueue(data: Int) throws {
            if isFull {
                throw QueueError.queueOverflow
            }
            //Get the next tail index and insert the new element there
            tailIndex = (tailIndex + 1) % items.count
            items[tailIndex] = data
            
            //This is the first element enqueued, set the head index to the tail index
            if headIndex == specialEmptyValue {
                headIndex = tailIndex
            }
        }
        
        func dequeue() throws -> Int {
            if isEmpty {
                throw QueueError.queueUnderflow
            }
            guard let firstElement = items[headIndex] else {
                throw QueueError.queueUnderflow
            }
            //Edge case - This element is the last item in a queue (It means there is only one item in a queue)
            if headIndex == tailIndex {
                headIndex = specialEmptyValue
            }
            else {
                headIndex = (headIndex + 1) % items.count
            }
            return firstElement
        }
        
        //Headindex is always set to special marker value when the queue is empty
        var isEmpty: Bool {
            headIndex == specialEmptyValue
        }
        
        //WHen the queue is full this means that the head index and tail index are right next to one another
        var isFull: Bool {
            let nextIndex = (tailIndex + 1) % items.count
            //Check whether the next position of the tail is the head index
            return nextIndex == headIndex
        }
    }


    The Queue – Performance and Complexity

    • Enqueuing and Dequeuing implemented in this way is O(1)
    • IsEmpty and IsFull is also O(1)
    • Space complexity is O(N)
    https://www.udemy.com/course/break-away-coding-interviews-1/learn/lecture/8463698#overview

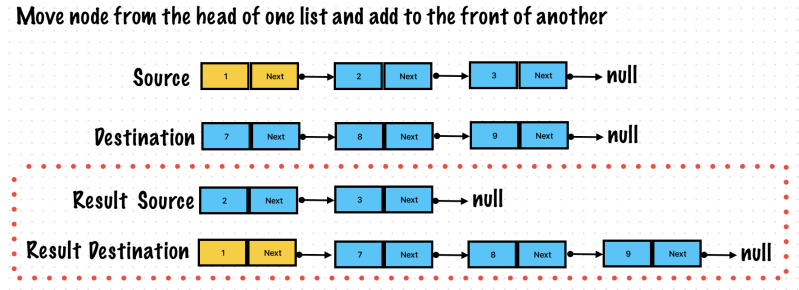
    Exercise 2. Build a Queue with Two Stack

    Where can a queue be used?

    • Customer service hotline, calls are assigned to representatives in the order that they are received
    • Queueing jobs to be printed
    • Any order processing systems like in e-commerce websites or bank transaction systems

    Implement a Queue using two stacks

    • Forward Stack
      • It used to push the enqueued elements
      • Enqueue operations are always performed on the forward stack
      • Enqueue requires moving all elements to the forward stack and pushing the last element in I.E. The top
    • Reverse Stack
      • Holds the elements in reverse order from the forward stack
      • Dequeue operations are always performed on the reverse stack
      • Dequeue requires moving all elements to the reverse track and popping the last element in I.E the Top
    https://www.udemy.com/course/break-away-coding-interviews-1/learn/lecture/8463700#overview

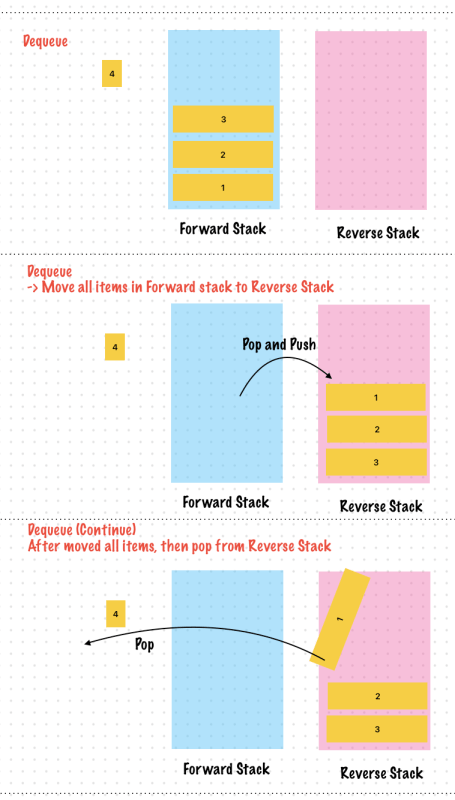
    So It looks tricky. It has 2 stacks to implement Enqueue and Dequeue operation like a Queue.

    enum StackError: Error {
        //Pushing into a full stack
        case stackOverflow
        //Popping from or peeking into an empty stack
        case stackUnderflow
    }
    
    class Stack<T> {
        private let maxSize: Int
        private(set) var array = Array<T>()
        //Topmost element in the stack
        private var top: T?
        //Track the size of the stack at every push, pop
        //This means the stack size operation can be constant time
        private var size = 0
        
        init(maxSize: Int) {
            self.maxSize = maxSize
        }
        
        func push(data: T) throws {
            if size == maxSize {
                throw StackError.stackOverflow
            }
            array.append(data)
            top = data
            size += 1
        }
        
        func pop() throws -> T {
            if size == 0 {
                throw StackError.stackUnderflow
            }
            //Remove the top element from the stack and return it's data
            let topElement = array.removeLast()
            top = array.last
            size -= 1
            return topElement
        }
        
        func peek() throws -> T {
            if size == 0 {
                throw StackError.stackUnderflow
            }
            guard let topElement = top else {
                throw StackError.stackUnderflow
            }
            //Just return the data of the top element, do not remove it
            return topElement
        }
        
        var isEmpty: Bool {
            size == 0
        }
        
        var isFull: Bool {
            size == maxSize
        }
    }
    
    class QueueUsingTwoStack<T> {
        let forwardStack: Stack<T>
        let reverseStack: Stack<T>
        
        init(size: Int) {
            self.forwardStack = Stack<T>(maxSize: size)
            self.reverseStack =  Stack<T>(maxSize: size)
        }
        
        var isFull: Bool {
            forwardStack.isFull || reverseStack.isFull
        }
        
        var isEmpty: Bool {
            forwardStack.isEmpty && reverseStack.isEmpty
        }
        
        func enqueue(data: T) throws {
            if isFull {
                throw StackError.stackOverflow
            }
            if forwardStack.isEmpty {
                //Push all elements from the reverse stack to the forward stack, enqueue always happens on the forward stack
                while !reverseStack.isEmpty {
                    let popedValue = try reverseStack.pop()
                    try forwardStack.push(data: popedValue)
                }
            }
            //Finally do the enqueue - A push on the forward stack
            try forwardStack.push(data: data)
        }
        
        func dequeue() throws -> T {
            if isEmpty {
                throw StackError.stackUnderflow
            }
            if reverseStack.isEmpty {
                //Push all elements from the forward stack to the reverse stack, dequeue alwyas happens on the reverse stack
                while !forwardStack.isEmpty {
                    let poppedValue = try forwardStack.pop()
                    try reverseStack.push(data: poppedValue)
                }
            }
            //Finally do the dequeue - A pop on the reverse stack
            return try reverseStack.pop()
        }
    }
    
    let queue = QueueUsingTwoStack<Int>(size: 4)
    
    try? queue.enqueue(data: 1)
    try? queue.enqueue(data: 2)
    try? queue.enqueue(data: 3)
    try? queue.enqueue(data: 4)
    queue.isFull
    
    try? queue.dequeue()


    Performance

    All enqueues and then all dequeues are O(1) – If only one of these operations are performed

    Notice that each element is pushed no more than twice

    • Once onto the forward stack to enqueue it and once onto the reverse stack just before dequeueing

    Each element is popped no more than twice

    • Once to move to the reverse from the forward stack just before dequeuing and then to actually dequeue it

    Time complexity is O(M) where M is the number of operations we perform on the queue.

    https://www.udemy.com/course/break-away-coding-interviews-1/learn/lecture/8463700#overview
  • iOS, App Architectures

    iOS, App Architectures

    ✍️ Note

    Some codes and contents are sourced from Apple’s official documentation, google android official site and wikipedia. This post is for personal notes where I summarize the original contents to grasp the key concepts (🎨 some images I draw it)

    MVC: Model View Controller

    The Model-View-Controller (MVC) design pattern assigns objects in an application one of three roles: model, view, or controller. The pattern defines not only the roles objects play in the application, it defines the way objects communicate with each other. Each of the three types of objects is separated from the others by abstract boundaries and communicates with objects of the other types across those boundaries. The collection of objects of a certain MVC type in an application is sometimes referred to as a layer—for example, model layer.

    MVC is central to a good design for a Cocoa application. The benefits of adopting this pattern are numerous. Many objects in these applications tend to be more reusable, and their interfaces tend to be better defined. Applications having an MVC design are also more easily extensible than other applications. Moreover, many Cocoa technologies and architectures are based on MVC and require that your custom objects play one of the MVC roles.

    https://developer.apple.com/library/archive/documentation/General/Conceptual/DevPedia-CocoaCore/MVC.html

    Model Objects

    Model objects encapsulate the data specific to an application and define the logic and computation that manipulate and process that data. For example, a model object might represent a character in a game or a contact in an address book. A model object can have to-one and to-many relationships with other model objects, and so sometimes the model layer of an application effectively is one or more object graphs. Much of the data that is part of the persistent state of the application (whether that persistent state is stored in files or databases) should reside in the model objects after the data is loaded into the application. Because model objects represent knowledge and expertise related to a specific problem domain, they can be reused in similar problem domains. Ideally, a model object should have no explicit connection to the view objects that present its data and allow users to edit that data—it should not be concerned with user-interface and presentation issues. 

    Communication: User actions in the view layer that create or modify data are communicated through a controller object and result in the creation or updating of a model object. When a model object changes (for example, new data is received over a network connection), it notifies a controller object, which updates the appropriate view objects.

    Apple

    View Objects

    A view object is an object in an application that users can see. A view object knows how to draw itself and can respond to user actions. A major purpose of view objects is to display data from the application’s model objects and to enable the editing of that data. Despite this, view objects are typically decoupled from model objects in an MVC application. 

    Because you typically reuse and reconfigure them, view objects provide consistency between applications. Both the UIKit and AppKit frameworks provide collections of view classes, and Interface Builder offers dozens of view objects in its Library. 

    Communication: View objects learn about changes in model data through the application’s controller objects and communicate user-initiated changes—for example, text entered in a text field—through controller objects to an application’s model objects.

    Apple

    Controller Objects

    A controller object acts as an intermediary between one or more of an application’s view objects and one or more of its model objects. Controller objects are thus a conduit through which view objects learn about changes in model objects and vice versa. Controller objects can also perform setup and coordinating tasks for an application and manage the life cycles of other objects. 

    Communication: A controller object interprets user actions made in view objects and communicates new or changed data to the model layer. When model objects change, a controller object communicates that new model data to the view objects so that they can display it.

    Apple

    UIViewController

    A view controller’s main responsibilities include the following:

    • Updating the contents of the views, usually in response to changes to the underlying data
    • Responding to user interactions with views
    • Resizing views and managing the layout of the overall interface
    • Coordinating with other objects — including other view controllers — in your app
    https://developer.apple.com/documentation/uikit/uiviewcontroller

    MVP: Model View Presenter

    Model–View–Presenter

    MVP is a user interface architectural pattern engineered to facilitate automated unit testing and improve the separation of concerns in presentation logic:

    • The model is an interface defining the data to be displayed or otherwise acted upon in the user interface.
    • The view is a passive interface that displays data (the model) and routes user commands (events) to the presenter to act upon that data.
    • The presenter acts upon the model and the view. It retrieves data from repositories (the model), and formats it for display in the view.

    Normally, the view implementation instantiates the concrete presenter object, providing a reference to itself. 

    The degree of logic permitted in the view varies among different implementations. At one extreme, the view is entirely passive, forwarding all interaction operations to the presenter. In this formulation, when a user triggers an event method of the view, it does nothing but invoke a method of the presenter that has no parameters and no return value. The presenter then retrieves data from the view through methods defined by the view interface. Finally, the presenter operates on the model and updates the view with the results of the operation. Other versions of model–view–presenter allow some latitude with respect to which class handles a particular interaction, event, or command. This is often more suitable for web-based architectures, where the view, which executes on a client’s browser, may be the best place to handle a particular interaction or command.

    From a layering point of view, the presenter class might be considered as belonging to the application layer in a multilayered architecture system, but it can also be seen as a presenter layer of its own between the application layer and the user interface layer.

    https://en.wikipedia.org/wiki/Model%E2%80%93view%E2%80%93presenter

    Wikipedia provided an example written in c#

    public class Presenter : IPresenter 
    {
        public Presenter(IView view) 
        {
            // ...
        }
    }
    
    public class View : IView
    {
        private IPresenter _presenter;
    
        public View()
        {
            _presenter = new Presenter(this);
        }
    }
    

    I wrote an example written in Swift

    //View Interface
    protocol AccountViewProtocol: AnyObject {
        var presenter: AccountPresentProtocol! { get set }
        
        //From Presenter
        func display(username: String)
        func showError(message: String)
    }
    
    //Presenter Interface
    protocol AccountPresentProtocol {
        init(view: AccountViewProtocol, service: AccountServiceInterface)
        
        //Actions from ViewProtocol
        func update(username: String)
    }
    
    //Model Interface: Optional
    protocol AccountModelProtocol {
        func usernameIsNotEmpty() -> Bool
        mutating func update(username: String) -> Bool
    }
    
    struct AccountModel: AccountModelProtocol {
        var username: String
        var password: String
        
        func usernameIsNotEmpty() -> Bool {
            !username.isEmpty
        }
        
        mutating func update(username: String) -> Bool {
            guard usernameIsNotEmpty() else {
                return false
            }
            self.username = username
            return true
        }
    }
    
    protocol AccountServiceInterface {
        func getUser() async throws -> AccountModel
    }
    
    class AccountService: AccountServiceInterface {
        func getUser() async throws -> AccountModel {
            AccountModel(username: "Sungwook", password: "1234")
        }
    }
    
    class AccountPresenter: AccountPresentProtocol {
        private weak var view: AccountViewProtocol?
        private var model: AccountModelProtocol?
        private let service: AccountServiceInterface
        
        required init(view: AccountViewProtocol, service: AccountServiceInterface) {
            self.view = view
            self.service = service
        }
        
        func update(username: String) {
            @Sendable func notifyModelUpdateStatus() {
                let isUpdated = model?.update(username: username) ?? false
                isUpdated ? view?.display(username: username) : view?.showError(message: "Username can't be empty")
            }
            
            if model == nil {
                Task { [weak self] in
                    do {
                        let userModel = try await self?.service.getUser()
                        self?.model = userModel
                        notifyModelUpdateStatus()
                    }
                    catch {
                        self?.view?.showError(message: error.localizedDescription)
                    }
                }
            }
            else {
                notifyModelUpdateStatus()
            }
        }
    }
    
    
    class AccountView: UIView, AccountViewProtocol {
        var presenter: AccountPresentProtocol!
        @IBOutlet private weak var usernameTextField: UITextField!
        
        init() {
            super.init(frame: .zero)
            self.presenter = AccountPresenter(view: self, service: AccountService())
        }
        
        required init?(coder: NSCoder) {
            fatalError("init(coder:) has not been implemented")
        }
        
        private func setupView() {
            //Setup Views - e.g, UITextField
        }
        
        @objc func didTapSaveButton(username: String) {
            presenter.update(username: username)
        }
        
        //MARK: Events from Presenter
        func display(username: String) {
            //Update name
            usernameTextField?.text = username
            print("🟢 Username updated -> \(username)")
        }
        
        func showError(message: String) {
            //Show error message
            print("🔴 \(message)")
        }
    }
    
    let accountView = AccountView()
    accountView.didTapSaveButton(username: "Shawn")
    
    //Prints
    Username updated -> Shawn\n"
    
    //This sample is written by Shawn (Me)
    

    MVVM: Model-View-ViewModel

    WWDC, Apple gave a sample code using MVVM

    Model–view–viewmodel (MVVM) is an architectural pattern in computer software that facilitates the separation of the development of a graphical user interface (GUI; the view)—be it via a markup language or GUI code—from the development of the business logic or back-end logic (the model) such that the view is not dependent upon any specific model platform.

    The viewmodel of MVVM is a value converter,[1] meaning it is responsible for exposing (converting) the data objects from the model in such a way they can be easily managed and presented. In this respect, the viewmodel is more model than view, and handles most (if not all) of the view’s display logic.[1] The viewmodel may implement a mediator pattern, organizing access to the back-end logic around the set of use cases supported by the view.

    MVVM is a variation of Martin Fowler‘s Presentation Model design pattern.[2][3] It was invented by Microsoft architects Ken Cooper and Ted Peters specifically to simplify event-driven programming of user interfaces. The pattern was incorporated into the Windows Presentation Foundation (WPF) (Microsoft’s .NET graphics system) and Silverlight, WPF’s Internet application derivative.[3] John Gossman, a Microsoft WPF and Silverlight architect, announced MVVM on his blog in 2005.[3][4]

    Model–view–viewmodel is also referred to as model–view–binder, especially in implementations not involving the .NET platform. ZK, a web application framework written in Java, and the JavaScript library KnockoutJS use model–view–binder.

    Model

    Model refers either to a domain model, which represents real state content (an object-oriented approach), or to the data access layer, which represents content (a data-centric approach).[citation needed]

    View

    As in the model–view–controller (MVC) and model–view–presenter (MVP) patterns, the view is the structure, layout, and appearance of what a user sees on the screen.[7] It displays a representation of the model and receives the user’s interaction with the view (mouse clicks, keyboard input, screen tap gestures, etc.), and it forwards the handling of these to the view model via the data binding (properties, event callbacks, etc.) that is defined to link the view and view model.

    View model

    The view model is an abstraction of the view exposing public properties and commands. Instead of the controller of the MVC pattern, or the presenter of the MVP pattern, MVVM has a binder, which automates communication between the view and its bound properties in the view model. The view model has been described as a state of the data in the model.[8]The main difference between the view model and the Presenter in the MVP pattern is that the presenter has a reference to a view, whereas the view model does not. Instead, a view directly binds to properties on the view model to send and receive updates. To function efficiently, this requires a binding technology or generating boilerplate code to do the binding.[7]Under object-oriented programming, the view model can sometimes be referred to as a data transfer object.[9]

    Binder

    Declarative data and command-binding are implicit in the MVVM pattern. In the Microsoft solution stack, the binder is a markup language called XAML.[10] The binder frees the developer from being obliged to write boiler-plate logic to synchronize the view model and view. When implemented outside of the Microsoft stack, the presence of a declarative data binding technology is what makes this pattern possible,[5][11] and without a binder, one would typically use MVP or MVC instead and have to write more boilerplate (or generate it with some other tool).

    Summary

    The MVVM pattern attempts to gain both advantages of separation of functional development provided by MVC, while leveraging the advantages of data bindings and the framework by binding data as close to the pure application model as possible.[3][4][12][clarification needed] It uses the binder, view model, and any business layers’ data-checking features to validate incoming data. The result is that the model and framework drive as much of the operations as possible, eliminating or minimizing application logic which directly manipulates the view (e.g., code-behind).

    Criticism

    John Gossman has criticized the MVVM pattern and its application in specific uses, stating that MVVM can be “overkill” when creating simple user interfaces. For larger applications, he believes that generalizing the viewmodel upfront can be difficult, and that large-scale data binding can lead to lower performance.

    https://en.wikipedia.org/wiki/Model%E2%80%93view%E2%80%93viewmodel

    MVVM is the most popular architecture of iOS app architecture. Binder is the key different with the others. We can implement this feature using Combine framework or RxSwift.

    MVVM-C: Model-View-ViewModel + Coordinator

    MVVM-C, There is an extra layer. It called coordinator. It handles UI flows likes present / push.

    VIPER: View Interactor Presenter Entity Router

    This architecture is well explained at objc.io blog.

    The main parts of VIPER are:

    • View:
      • displays what it is told to by the Presenter and relays user input back to the Presenter.
      • The View is passive. It waits for the Presenter to give it content to display; it never asks the Presenter for data.
      • The Presenter does not know about the existence of UILabelUIButton, etc. The Presenter only knows about the content it maintains and when it should be displayed. It is up to the View to determine how the content is displayed.
      • The View is an abstract interface, defined in Objective-C with a protocol. A UIViewController or one of its subclasses will implement the View protocol.
      • Views and view controllers also handle user interaction and input. It’s easy to understand why view controllers usually become so large, since they are the easiest place to handle this input to perform some action. To keep our view controllers lean, we need to give them a way to inform interested parties when a user takes certain actions. The view controller shouldn’t be making decisions based on these actions, but it should pass these events along to something that can.
    • Interactor:
      • contains the business logic as specified by a use case.
      • Interactor is a PONSO (Plain Old NSObject) that primarily contains logic, it is easy to develop using TDD.
    • Presenter:
      • contains view logic for preparing content for display (as received from the Interactor) and for reacting to user inputs (by requesting new data from the Interactor).
      • The Presenter is a PONSO that mainly consists of logic to drive the UI. It knows when to present the user interface. It gathers input from user interactions so it can update the UI and send requests to an Interactor.
      • Entities are never passed from the Interactor to the Presenter. Instead, simple data structures that have no behavior are passed from the Interactor to the Presenter. This prevents any ‘real work’ from being done in the Presenter. The Presenter can only prepare the data for display in the View.
    • Entity:
      • contains basic model objects used by the Interactor.
      • Entities are only manipulated by the Interactor. The Interactor never passes entities to the presentation layer (i.e. Presenter).
      • Entities also tend to be PONSOs. If you are using Core Data, you will want your managed objects to remain behind your data layer. Interactors should not work with NSManagedObjects.
    • Routing:
      • contains navigation logic for describing which screens are shown in which order.
      • Routes from one screen to another are defined in the wireframes created by an interaction designer.
      • In VIPER, the responsibility for Routing is shared between two objects: the Presenter, and the wireframe. A wireframe object owns the UIWindowUINavigationControllerUIViewController, etc. It is responsible for creating a View/ViewController and installing it in the window.
      • Since the Presenter contains the logic to react to user inputs, it is the Presenter that knows when to navigate to another screen, and which screen to navigate to. Meanwhile, the wireframe knows how to navigate. So, the Presenter will use the wireframe to perform the navigation. Together, they describe a route from one screen to the next.
      • The wireframe is also an obvious place to handle navigation transition animations.

    Application Components Fitting in with VIPER

    • Network
      • Apps are usually much more compelling when they are connected to the network. But where should this networking take place and what should be responsible for initiating it? It’s typically up to the Interactor to initiate a network operation, but it won’t handle the networking code directly. It will ask a dependency, like a network manager or API client. The Interactor may have to aggregate data from multiple sources to provide the information needed to fulfill a use case. Then it’s up to the Presenter to take the data returned by the Interactor and format it for presentation.
    • Data Store
      • A data store is responsible for providing entities to an Interactor. As an Interactor applies its business logic, it will need to retrieve entities from the data store, manipulate the entities, and then put the updated entities back in the data store. The data store manages the persistence of the entities. Entities do not know about the data store, so entities do not know how to persist themselves.
      • The Interactor should not know how to persist the entities either. Sometimes the Interactor may want to use a type of object called a data manager to facilitate its interaction with the data store. The data manager handles more of the store-specific types of operations, like creating fetch requests, building queries, etc. This allows the Interactor to focus more on application logic and not have to know anything about how entities are gathered or persisted. One example of when it makes sense to use a data manager is when you are using Core Data.
    • TDD to develop an Interactor
      • it is possible to switch out the production data store with a test double/mock. Not talking to a remote server (for a web service) or touching the disk (for a database) allows your tests to be faster and more repeatable.
      • One reason to keep the data store as a distinct layer with clear boundaries is that it allows you to delay choosing a specific persistence technology. If your data store is a single class, you can start your app with a basic persistence strategy, and then upgrade to SQLite or Core Data later if and when it makes sense to do so, all without changing anything else in your application’s code base.
      • Using Core Data in an iOS project can often spark more debate than architecture itself. However, using Core Data with VIPER can be the best Core Data experience you’ve ever had. Core Data is a great tool for persisting data while maintaining fast access and a low-memory footprint. But it has a habit of snaking its NSManagedObjectContext tendrils all throughout an app’s implementation files, particularly where they shouldn’t be. VIPER keeps Core Data where it should be: at the data store layer.
      • In the to-do list example, the only two parts of the app that know that Core Data is being used are the data store itself, which sets up the Core Data stack, and the data manager. The data manager performs a fetch request, converts the NSManagedObjects returned by the data store into standard PONSO model objects, and passes those back to the business logic layer. That way, the core of the application is never dependent on Core Data, and as a bonus, you never have to worry about stale or poorly threaded NSManagedObjects gunking up the works.
    • Storyboard
      • we tend to make is to choose not to use segues. There may be some cases where using the segue makes sense, but the danger with segues is they make it very difficult to keep the separation between screens — as well as between UI and application logic — intact. As a rule of thumb, we try not to use segues if implementing the prepareForSegue method appears necessary.
      • Otherwise, storyboards are a great way to implement the layout for your user interface, especially while using Auto Layout. We chose to implement both screens for the to-do list example using a storyboard, and use code such as this to perform our own navigation:
    • Writing a test cases
      • Building the Interactor first is a natural fit with TDD. If you develop the Interactor first, followed by the Presenter, you get to build out a suite of tests around those layers first and lay the foundation for implementing those use cases. You can iterate quickly on those classes, because you won’t have to interact with the UI in order to test them. Then, when you go to develop the View, you’ll have a working and tested logic and presentation layer to connect to it. By the time you finish developing the View, you might find that the first time you run the app everything just works, because all your passing tests tell you it will work.

    Conclusion

    At its core, VIPER is an architecture based on the Single Responsibility Principle.

    https://www.objc.io/issues/13-architecture/viper/

    You can check an swift version example

    App Architecture in SwiftUI

    SwiftUI provide a powerful features like StateObject, ObservedObject, ObservableObject, State, Bindable, Binding and more. If you interested in, check this article

    Managing user interface state

    Encapsulate view-specific data within your app’s view hierarchy to make your views reusable

    Store data as state in the least common ancestor of the views that need the data to establish a single source of truth that’s shared across views. Provide the data as read-only through a Swift property, or create a two-way connection to the state with a binding. SwiftUI watches for changes in the data, and updates any affected views as needed.

    Don’t use state properties for persistent storage because the life cycle of state variables mirrors the view life cycle. Instead, use them to manage transient state that only affects the user interface, like the highlight state of a button, filter settings, or the currently selected list item. You might also find this kind of storage convenient while you prototype, before you’re ready to make changes to your app’s data model.

    https://developer.apple.com/documentation/swiftui/managing-user-interface-state

    Managing model data

    💡 Below image is no longer available. It has disappeared after Apple introduced Observable macro.

    Model data

    Manage the data that your app uses to drive its interface.

    SwiftUI offers a declarative approach to user interface design. As you compose a hierarchy of views, you also indicate data dependencies for the views. When the data changes, either due to an external event or because of an action that the user performs, SwiftUI automatically updates the affected parts of the interface. As a result, the framework automatically performs most of the work that view controllers traditionally do.

    The framework provides tools, like state variables and bindings, for connecting your app’s data to the user interface. These tools help you maintain a single source of truth for every piece of data in your app, in part by reducing the amount of glue logic you write. Select the tool that best suits the task you need to perform:

    • Manage transient UI state locally within a view by wrapping value types as State properties.
    • Share a reference to a source of truth, like local state, using the Binding property wrapper.
    • Connect to and observe reference model data in views by applying the Observable() macro to the model data type. Instantiate an observable model data type directly in a view using a State property. Share the observable model data with other views in the hierarchy without passing a reference using the Environment property wrapper.
    https://developer.apple.com/documentation/swiftui/model-data
  • iOS, Communicate with a Server

    iOS, Communicate with a Server

    ✍️ Note

    Some codes and contents are sourced from Apple’s official documentation, educative.io and mozilla. This post is for personal notes where I summarize the original contents to grasp the key concepts (🎨 some images I draw it)

    URLSession

    The URLSession class and related classes provide an API for downloading data from and uploading data to endpoints indicated by URLs. Your app can also use this API to perform background downloads when your app isn’t running or, in iOS, while your app is suspended.

    Your app creates one or more URLSession instances, each of which coordinates a group of related data-transfer tasks. For example, if you’re creating a web browser, your app might create one session per tab or window, or one session for interactive use and another for background downloads. Within each session, your app adds a series of tasks, each of which represents a request for a specific URL (following HTTP redirects, if necessary).

    Type of URL Sessions

    URLSession has a singleton shared session (which doesn’t have a configuration object) for basic requests. It’s not as customizable as sessions you create, but it serves as a good starting point if you have very limited requirements. You access this session by calling the shared class method. For other kinds of sessions, you create a URLSession with one of three kinds of configurations:

    • A default session behaves much like the shared session, but lets you configure it. You can also assign a delegate to the default session to obtain data incrementally.
    • Ephemeral sessions are similar to shared sessions, but don’t write caches, cookies, or credentials to disk.
    • Background sessions let you perform uploads and downloads of content in the background while your app isn’t running.

    Types of URL session tasks

    • Data tasks send and receive data using NSData objects. Data tasks are intended for short, often interactive requests to a server.
    • Upload tasks are similar to data tasks, but they also send data (often in the form of a file), and support background uploads while the app isn’t running.
    • Download tasks retrieve data in the form of a file, and support background downloads and uploads while the app isn’t running.
    • WebSocket tasks exchange messages over TCP and TLS, using the WebSocket protocol defined in RFC 6455.

    Using a session delegate

    • Authentication fails.
    • Data arrives from the server.
    • Data becomes available for caching.

    The session object keeps a strong reference to the delegate until your app exits or explicitly invalidates the session. If you don’t invalidate the session, your app leaks memory until the app terminates.

    URLSession provides status and progress properties. Query these properties if you need to make programmatic decisions based on the current state of the task (with the caveat that its state can change at any time).

    Protocol supports

    he URLSession class natively supports the datafileftphttp, and https URL schemes, with transparent support for proxy servers and SOCKS gateways, as configured in the user’s system preferences.

    URLSession supports the HTTP/1.1, HTTP/2, and HTTP/3 protocols. HTTP/2 support, as described by RFC 7540, requires a server that supports Application-Layer Protocol Negotiation (ALPN).

    You can also add support for your own custom networking protocols and URL schemes (for your app’s private use) by subclassing URLProtocol.

    App Transport Security (ATS)

    iOS 9.0 and macOS 10.11 and later use App Transport Security (ATS) for all HTTP connections made with URLSession. ATS requires that HTTP connections use HTTPS (RFC 2818).

    For more information, see NSAppTransportSecurity.

    https://developer.apple.com/documentation/foundation/urlsession

    Network 101

    If you want to learn more about network related topics, I recommend visit Mozilla MDN Web Docs

    http structure

    https://developer.mozilla.org/en-US/docs/Web/HTTP

    TCP/IP Model

    Short communication

    HTTP Request

    Polling

    Long communication

    Long polling

    WebSocket

    since iOS 13, You can use webSocketTask (https://developer.apple.com/documentation/foundation/urlsession/3181171-websockettask)

    If you want to know details I suggest visit mozilla website

    SSEs: Server Sent Events

    In my working experience, I haven’t use SSEs.

    Summary

    There are various ways to communicate with a server. In my experience, these methods can often be combined with others, such as APNS (Apple Push Notification Service).

  • iOS, hitTesting a View – hitTest, point(inside)

    iOS, hitTesting a View – hitTest, point(inside)

    ✍️ Note

    Some codes and contents are sourced from Apple’s official documentation. This post is for personal notes where I summarize the original contents to grasp the key concepts

    hitTest

    Returns the farthest descendant in the view hierarchy of the current view, including itself, that contains the specified point.

    Return value

    • The view object that’s the farthest descendent of the current view and contains point. Returns nil if the point lies completely outside the view hierarchy of the current view.

    This method traverses the view hierarchy by calling the point(inside:with:) method of each subview to determine which subview to send a touch event to. If point(inside:with:) returns true, this method continues to traverse the subview hierarchy until it finds the frontmost view that contains the specified point. If a view doesn’t contain the point, this method ignores its branch of the view hierarchy. You rarely need to call this method yourself, but you might override it to hide touch events from subviews.

    This method ignores view objects that are hidden, that have disabled user interactions, or that have an alpha level less than 0.01. This method doesn’t take the view’s content into account when determining a hit, so it can return a view even if the specified point is in a transparent portion of that view’s content.

    This method doesn’t report points that lie outside the view’s bounds as hits, even if they actually lie within one of the view’s subviews. This situation can occur if the view’s clipsToBounds property is false and the affected subview extends beyond the view’s bounds.

    Note

    When the system calls this method to perform hit-testing for event routing, it expects the resulting view to be part of a UIWindow hierarchy.

    https://developer.apple.com/documentation/uikit/uiview/1622469-hittest

    Let’s check How it works!

    RedView is the farthest view in view hierarchy.

    class ViewController: UIViewController {
        @IBOutlet weak var blueView: UIView!
        @IBOutlet weak var greenView: UIView!
        @IBOutlet weak var redView: UIView!
        
        override func viewDidLoad() {
            super.viewDidLoad()
            // Do any additional setup after loading the view.
            let tapGesture = UITapGestureRecognizer(target: self, action: #selector(didTap))
            view.addGestureRecognizer(tapGesture)
        }
        @objc func didTap(_ recognizer: UITapGestureRecognizer) {
            let point = recognizer.location(in: view)
            
            let farthestView = view.hitTest(point, with: nil)
            let viewTag = farthestView?.tag
            
            guard let viewTag else {
                return
            }
            switch viewTag {
            case 0:
                print("BlueView")
            case 1:
                print("GreenView")
            case 2:
                print("RedView")
            default:
                break
            }
        }
    }
    

    When you tap the center of rectangle, It prints RedView because It’s the farthest view.

    point(inside:with:)

    Returns a Boolean value indicating whether the receiver contains the specified point. by Apple Document

    point

    • A point that is in the receiver’s local coordinate system (bounds).event

    The event that warranted a call to this method. If you are calling this method from outside your event-handling code, you may specify nil.

    Let’s test.

    @objc func didTap(_ recognizer: UITapGestureRecognizer) {
            let point = recognizer.location(in: view)
            
            let isPointInsideBlueView = blueView.point(inside: point, with: nil) //false
            let isPointInsideGreenView = greenView.point(inside: point, with: nil) //false
            let isPointInsideRedView = redView.point(inside: point, with: nil) //false
            
            print(point)
            print(blueView.bounds)
        }
    

    I changed UIView(Blue, Green, and Red) to CustomView to check hitTest and point(inside: CGPoint, with: event)

    In fact, when pass the UITapGestureRecognizer’s point which is view based coordinates converted to subview’s coordinates.

    See this API

    //Point: UITapGestureRecognizer's point based on viewController's view
    let point = recognizer.location(in: view)
    //convert it to redView's coordinates (bounds)
    let convertedPoint = view.convert(point, to: redView)
    

    Summary

    hitTest itself calls point(inside:) function to check is bounds contains point or not. It uses Depth First Search.

    If point(inside:with:) returns true, this method continues to traverse the subview hierarchy until it finds the frontmost view that contains the specified point. 

    https://developer.apple.com/documentation/uikit/uiview/1622469-hittest
  • Swift, Recursion and the Recursive Sense

    Swift, Recursion and the Recursive Sense

    ✍️ Note

    Some codes are sourced from Loony Corn’s Udemy Course (https://www.udemy.com/user/janani-ravi-2/). This post is for personal notes where I summarize the original contents to grasp the key concepts

    Warming up, Recursive sense

    Iterative solutions involve loops

    Recursive solutions involve function that call themselves

    A recursively written function takes in input, splits that input into smaller parts. Then calls itself on the smaller parts and re-combines the outputs

    If the inputs to the function are too simple to split further, the recursive function will return a simple output (and not call itself)

    Base case of the recursion (It prevents the recursion from going on forever)

    This special case for simple inputs is called

    https://www.udemy.com/course/break-away-coding-interviews-1/learn/lecture/8463332#content

    Reverse String

    func reverseStringIteratively(input: String) -> String {
        if input.count == 1 || input.isEmpty {
            return input
        }
        var inputArray = Array(input)
        for i in 0..<input.count {
            let firstIndex = i
            let lastIndex = (input.count - 1) - i
            
            if firstIndex == lastIndex {
                break
            }
            inputArray.swapAt(firstIndex, lastIndex)
        }
        return String(inputArray)
    }
    
    
    reverseStringIteratively(input: "2AB") //BA2
    

    Recursion approach

    func reverseStringRecursively(input: String) -> String {
        //Base case
        if input.count == 1 || input.isEmpty {
            return input
        }
        var inputArray = Array(input)
        let first = inputArray.removeFirst()
        let reversedString = reverseStringRecursively(input: String(inputArray))
        return reversedString + String(first)
    }
    
    reverseStringRecursively(input: "2AB") //BA2
    

    Exercise 1. Binary Search

    Choose an element in at the mid point of a sorted list

    Check whether it’s smaller than or greater than the element you are looking for

    If the element at the mid point is larger than the element you are searching for

    Reduce your search area to the portion where the element might be present

    Base case

    • There is no part of the list to search and the element has not been found
    • The search element has been found at the mid point of the portion we’re searching

    Recursive case

    • Binary search smaller portions of the list where the element might be found

    Summary

    • By halving the search area at every step, binary search works much fatser than linear search
    • The complexity of binary search is O(logN)
    • The Iterative approach to binary search might perform better than the recursive approach in terms of space complexity. There is not recursive stack in the iterative approach, which means we save on some space.
    https://www.udemy.com/course/break-away-coding-interviews-1/learn/lecture/8463334#content

    Example 1. No boundary, Assumed that You will search entire input ranges

    let input = Array(0...10000)
    
    /// Return : Index
    func binarySearch(input: [Int], search: Int) -> Int {
        if input.isEmpty {
            return -1
        }
        let midPoint = (input.count - 1) / 2
        if input[midPoint] == search {
            return input[midPoint]
        }
        if search > input[midPoint] {
            return binarySearch(input: Array(input[midPoint..<input.count]), search: search)
        }
        else {
            return binarySearch(input: Array(input[0..<midPoint]), search: search)
        }
    }
    
    let searchedItem = binarySearch(input: input, search: 2859)
    

    Example 2. Boundary search

    let input = Array(0...10000)
    
    /// Return : Index
    /// min, max: Search Area in Input
    func binarySearch(input: [Int], search: Int, min: Int, max: Int) -> Int {
        //If the indices have crossed one another at the center, the term is not present in the array, return -1, base case of the recursion
        if min > max {
            return -1
        }
        let midPoint = min + (max - min) / 2
        if input[midPoint] == search {
            return input[midPoint]
        }
        //Call binary search on a smaller portion of the array depending on whether the element might be found in the first or second half of the list
        if search > input[midPoint] {
            return binarySearch(input: input, search: search, min: midPoint + 1, max: max)
        }
        else {
            return binarySearch(input: input, search: search, min: min, max: midPoint - 1)
        }
    }
    
    let searchedItem = binarySearch(input: input, search: 2859, min: 2800, max: 2900)
    print(searchedItem)


    Exercise 2. Find all subsets of a given set

    Example, {1, 2, 3, 4}

    • There are 2^4 subsets of this set, If we have a set of N elements the number of subsets will be 2^N
    • At subsets, order is not important!

    Recursive mind (Find a pattern!)

    • Break this down, 1 element {1} -> subsets are {}, {1}
    • 2 elements {1, 2} -> subsets are {}, {1}, {2}, {1, 2}
    • 3 elements {1, 2, 3} -> subsets are {}, {1}, {2}, {1, 2}, {3}, {1, 3}, {2, 3}, {1, 2, 3}
    https://www.udemy.com/course/break-away-coding-interviews-1/learn/lecture/8463346#content
    func findAllSubSets(input: [Int]) -> [[Int]] {
        //Base case, Break the Recursive
        if input.isEmpty {
            return [[]]
        }
        if input.count == 1 {
            return [[], [input.first!]]
        }
        
        var inputArray = input
        
        //Recursive case
        let currentItem = inputArray.removeFirst()
        //Reduce the inputArray at every step by removeFirst
        var subsets = findAllSubSets(input: inputArray)
        
        var currentSubSets = [[Int]]()
        
        for subset in subsets {
            var temp = subset
            //Subset's items order can be ignored
            temp.insert(currentItem, at: 0)
            currentSubSets.append(temp)
        }
        for currentSubSet in currentSubSets {
            subsets.append(currentSubSet)
        }
        return subsets
    }
    
    let subsets = findAllSubSets(input: [1, 2, 3, 4])
    print(subsets)
    
    //Prints
    [[], [4], [3], [3, 4], [2], [2, 4], [2, 3], [2, 3, 4], [1], [1, 4], [1, 3], [1, 3, 4], [1, 2], [1, 2, 4], [1, 2, 3], [1, 2, 3, 4]]
    Program ended with exit code: 0


    Let’s take a look How to make subsets

    Create the subsets of very small sets first

    The for every subset, add a new element in to create newer subsets

    Repeat till all elements from the original set have been used

    Base Case

    • When the original set is empty, only the empty set is it’s subset

    Recursive Case

    • Add the elements to the existing subsets to create new subsets

    Since there are 2^N Subsets the complexity of this Code is O(2^N) -> This cannot be reduced further

    https://www.udemy.com/course/break-away-coding-interviews-1/learn/lecture/8463346#content

    Exercise 3. Find whether 2 binary trees are exactly the same

    A binary tree is one where every node can have a maximum of two children – A left child and right child

    Two binary trees are the same if

    • Every corresponding node has the same value
    • The structure of the tree at every corresponding node is the same

    Base case

    • A null current node on one tree should correspond to a null in the other tree
    • Node values should be the same at every node

    Recursive case

    • Check that the sub-tree rooted at every node is the same

    Time Complexity

    • We have to visit every node in both trees so 2N nodes, the complexity is O(N)
    https://www.udemy.com/course/break-away-coding-interviews-1/learn/lecture/8463352#content
    class Tree {
        let value: String
        var left: Tree?
        var right: Tree?
        
        init(value: String, left: Tree? = nil, right: Tree? = nil) {
            self.value = value
            self.left = left
            self.right = right
        }
    }
    
    let treeA = Tree(value: "a")
    treeA.left = Tree(value: "b")
    treeA.right = Tree(value: "c")
    treeA.left?.left = Tree(value: "d")
    treeA.left?.right = Tree(value: "e")
    treeA.right?.right = Tree(value: "f")
    treeA.right?.right?.right = Tree(value: "g")
    
    let treeB = Tree(value: "a")
    treeB.left = Tree(value: "b")
    treeB.right = Tree(value: "c")
    treeB.left?.left = Tree(value: "d")
    treeB.left?.right = Tree(value: "e")
    treeB.right?.right = Tree(value: "f")
    treeB.right?.right?.right = Tree(value: "g")
    
    
    func isSameTree(_ a: Tree?, _ b: Tree?) -> Bool {
        //Base case
        if a?.left == nil, a?.right == nil, b?.left == nil, b?.right == nil, a?.value == b?.value {
            return true
        }
        if a?.value == b?.value {
            return isSameTree(a?.left, b?.left) && isSameTree(a?.right, b?.right)
        }
        return false
    }
    
    let isSame = isSameTree(treeA, treeB)
    
    print(isSame) //True


    Exercise 4. Build a car given all tasks and each task’s dependencies

    Tip (It’s the same, How OperationQueue works, see my post)

    • Set up the data structure that you plan to use to store a tasks and it’s dependencies
    • Dependencies of Task “A” are all tasks which should be complete before “A” can execute.
      • Paint a car, depends on build chassis of the car, The chassis needs to be ready before it can be painted
    • The method should take in a list of all tasks which are needed to build a car along with their dependencies and execute every task in order to build the car
      • The tasks are in any order, It’s up to you to determine some order in which it can be executed.

    Tasks and dependencies

    • Tasks are A, B, C, D, E, F, G, H
      • B depends on A
      • D depends on E
      • C depends on A, B, D
      • F depends on C
    • An acceptable order of performing the tasks are
      • E-> D -> A -> B -> C -> F
      • or A -> E -> B -> D -> C -> F
      • and more

    Remember

    • Remember that you can’t execute a task unless it’s dependencies have completed
    • Store the dependencies such that they are easily accessible from a task
    • Recursively execute the dependencies till you get to the task

    Base case

    • The current task has been executed, it’s marked done

    Recursive case

    • Execute dependencies before coming to the current task

    Notes

    • The tasks and it’s dependencies form a directed acyclic graph
    • The graph may not be fully connected, I.E. certain tasks stand completely alone.
    • It’s a topological sort.
    • We have to visit every task to execute it, the complexity is O(N), where N is the number of tasks.
    https://www.udemy.com/course/break-away-coding-interviews-1/learn/lecture/8463360#content

    Example 1. Recursively run a tasks

    class TaskQueue {
        let value: String
        var dependsOn = [TaskQueue]()
        var isFinished = false
        
        init(value: String) {
            self.value = value
        }
    }
    
    let taskA = TaskQueue(value: "A")
    let taskB = TaskQueue(value: "B")
    let taskC = TaskQueue(value: "C")
    let taskD = TaskQueue(value: "D")
    let taskE = TaskQueue(value: "E")
    let taskF = TaskQueue(value: "F")
    let taskG = TaskQueue(value: "G")
    let taskH = TaskQueue(value: "H")
    
    taskB.dependsOn = [taskA]
    taskD.dependsOn = [taskE]
    taskC.dependsOn = [taskA, taskB, taskD]
    taskF.dependsOn = [taskC]
    
    func buildCar(_ tasks: [TaskQueue]) {
        //Base case
        if tasks.isEmpty {
            return
        }
        var remainingTasks = tasks
        let dequeue = remainingTasks.removeFirst()
        if dequeue.isFinished {
            return buildCar(remainingTasks)
        }
        
        //[a, b, c]
        // a: finish return
        
        //Recursive case
        let dependsOnUnfinishedTasks = dequeue.dependsOn.filter { $0.isFinished == false }
        
        if !dependsOnUnfinishedTasks.isEmpty {
            buildCar(dependsOnUnfinishedTasks)
        }
        dequeue.isFinished = true
        print("\(dequeue.value)", terminator: "->")
        return buildCar(remainingTasks)
    }
    
    buildCar([taskA, taskB, taskC, taskD, taskE, taskF, taskG, taskH])
    
    //Prints
    A->B->E->D->C->F->G->H
    

    Example 2. Simplify version

    class TaskQueue {
        let value: String
        var dependsOn = [TaskQueue]()
        var isFinished = false
        
        init(value: String) {
            self.value = value
        }
        
        func run() {
            if isFinished {
                return
            }
            //Before run, recursively call run on all the dependencies of this task
            for task in dependsOn {
                task.run()
            }
            isFinished = true
            print("Completed task: \(value)")
        }
    }
    
    let taskA = TaskQueue(value: "A")
    let taskB = TaskQueue(value: "B")
    let taskC = TaskQueue(value: "C")
    let taskD = TaskQueue(value: "D")
    let taskE = TaskQueue(value: "E")
    let taskF = TaskQueue(value: "F")
    let taskG = TaskQueue(value: "G")
    let taskH = TaskQueue(value: "H")
    
    taskB.dependsOn = [taskA]
    taskD.dependsOn = [taskE]
    taskC.dependsOn = [taskA, taskB, taskD]
    taskF.dependsOn = [taskC]
    
    func runTask(_ tasks: [TaskQueue]) {
        for task in tasks {
            task.run()
        }
    }
    
    runTask([taskA, taskB, taskC, taskD, taskE, taskF, taskG, taskH])
    
    //Prints
    Completed task: A
    Completed task: B
    Completed task: E
    Completed task: D
    Completed task: C
    Completed task: F
    Completed task: G
    Completed task: H
    

    Exercise 5. Generate anagrams of a Word

    Anagrams

    • A word have all the same letters of the word itself in a different order
    • Consider that the letters in the word passed in are unique and that there are no spaces. I.E. It’s a word not a sentence
    • The anagram need not be a valid word, we just want all the permutations of the letters.
    • If all letters are unique then there are N! anagrams.

    Example

    • “ROAD” -> 4! Anagrams
      • “ROAD”, “ORAD”, “OARD”, “RDOA”, “RAOD”, …more!

    Hint

    • Basic idea is the same as finding a all subsets from given a string

    Break this down! (Finding a patterns!)

    • Consider a word of 1 letter “A” -> Anagrams are “A”
    • Consider a word of 2 letters “AB” -> Anagrams are “AB“, “BA”
    • Consider a word of 3 letters “ABC” -> Anagrams are “CAB”, “ACB”, “ABC“, “CBA”, “BCA”, “BAC

    Break the word into smaller and smaller words, till we find the anagram of the smallest word.

    To the smaller anagrams add in letter by letter at every possible positions

    Recursively do this till we get all the letters in at every position

    Base case

    • The anagram of an empty string is an empty string
    • The smallest word of one letter is the anagram itself

    Recursive case

    • Find anagrams of smaller words by removing letters from the original word
    • Add the letters back one by one to every position

    Complexity

    • The number of anagrams for a word with unique letter is N! which means the complexity of this algorithm is also O(N!)
    • This cannot be further optimized
    https://www.udemy.com/course/break-away-coding-interviews-1/learn/lecture/8463362#content
    func generateAnagrams(input: String) -> [String] {
        //Base case
        if input.count <= 1 {
            return [input]
        }
        var inputString = input
        let currentLetter = inputString.removeFirst()
        var anagram = generateAnagrams(input: inputString)
        
        var newAnagrams = [String]()
        for (index, word) in anagram.enumerated() {
            let wordCount = word.count
            for i in 0...wordCount {
                var tempWord = anagram[index]
                tempWord.insert(currentLetter, at: tempWord.index(tempWord.startIndex, offsetBy: i))
                newAnagrams.append(tempWord)
            }
        }
        return newAnagrams
    }
    
    let anagrams = generateAnagrams(input: "ABC")
    print(anagrams)
    
    //Prints
    ["ABC", "BAC", "BCA", "ACB", "CAB", "CBA"]
    

    Exercise 6. Implement the paint fill feature from MS Paint

    Paint starts from one pixel where you click and moves outwards

    All adjoining pixels with the same original color get the color fill with the new color

    The color fill moves outwards till it reaches a boundary which has a different color

    https://www.udemy.com/course/break-away-coding-interviews-1/learn/lecture/8463358#content

    Start with one pixel which has some original color

    Move outwards, If the neighboring pixels have the same original color, color them as well

    Repeat till the borders are reached

    What is the base case?

    • The current pixel does not have the same original color, so represents a border
    • The current pixel is beyond the screen boundaries

    What is the recursive case?

    • Move outward from the start pixel coloring individual pixels
    https://www.udemy.com/course/break-away-coding-interviews-1/learn/lecture/8463358#content
    var screen: [[Int]] = [
    [0, 0, 1, 0, 0, 0, 0, 0, 0, 0],
    [0, 0, 1, 0, 0, 0, 0, 0, 0, 0],
    [0, 0, 1, 0, 2, 0, 0, 0, 0, 0],
    [0, 0, 1, 2, 2, 2, 0, 0, 0, 0],
    [0, 0, 1, 2, 2, 2, 2, 0, 3, 3],
    [0, 0, 1, 1, 1, 0, 0, 0, 3, 0],
    [0, 0, 0, 0, 0, 0, 0, 0, 3, 0],
    [0, 0, 0, 5, 0, 0, 0, 0, 3, 0],
    [0, 0, 5, 5, 0, 0, 0, 0, 3, 0],
    [0, 5, 5, 5, 0, 0, 0, 0, 3, 0]
    ]
    
    func paintFill(screen: inout [[Int]], x: Int, y: Int, originalColor: Int, newColor: Int) {
        //Base Case
        let width = screen.first?.count ?? 0
        let height = screen.count
        //Boundary check
        if x < 0 || x > (width - 1) {
            return
        }
        if y < 0 || y > (height - 1) {
            return
        }
        //Important! y is row, x is column
        let currentColor = screen[y][x]
        if currentColor != originalColor {
            return
        }
        
        //Paint it
        screen[y][x] = newColor
        
        //Fill neighbors pixels too
        //Up, Y is Row
        paintFill(screen: &screen, x: x, y: y-1, originalColor: originalColor, newColor: newColor)
        //Down, Y is Row
        paintFill(screen: &screen, x: x, y: y+1, originalColor: originalColor, newColor: newColor)
        //Left, X is Column
        paintFill(screen: &screen, x: x - 1, y: y, originalColor: originalColor, newColor: newColor)
        //Right, X is Column
        paintFill(screen: &screen, x: x + 1, y: y, originalColor: originalColor, newColor: newColor)
    }
    
    paintFill(screen: &screen, x: 4, y: 3, originalColor: 2, newColor: 9)
    
    print("2 -> 9\n")
    printBoard(screen)
    
    //Results
    [0, 0, 1, 0, 0, 0, 0, 0, 0, 0],
    [0, 0, 1, 0, 0, 0, 0, 0, 0, 0],
    [0, 0, 1, 0, 9, 0, 0, 0, 0, 0],
    [0, 0, 1, 9, 9, 9, 0, 0, 0, 0],
    [0, 0, 1, 9, 9, 9, 9, 0, 3, 3],
    [0, 0, 1, 1, 1, 0, 0, 0, 3, 0],
    [0, 0, 0, 0, 0, 0, 0, 0, 3, 0],
    [0, 0, 0, 5, 0, 0, 0, 0, 3, 0],
    [0, 0, 5, 5, 0, 0, 0, 0, 3, 0],
    [0, 5, 5, 5, 0, 0, 0, 0, 3, 0]
    

    Exercise 7. Find a path a rat can travel through a maze

    💡 Hint! Back Tracking!

    Game Rule

    • Assume the maze is made up of cells with 4 walls. Each wall can have a door
    • All walls do not have a door, only some do
    • The rat has been placed in one of the cells, It has to make It’s way to a cell which is the “End” cell
    • The rat should not go through the same cell twice while finding a path

    Base case

    • The rat has reached the end cell

    Recursive case

    • Keep visiting cells by passing through doors when they exist
    • Do not visit cells if they are present in the current path, we don’t want the rat to move in circles
    https://www.udemy.com/course/break-away-coding-interviews-1/learn/lecture/8463368#content

    Solution 1. Using 2D Array

    var maze: [[String]] = [
    [" ", "G", "H", "I"],
    ["D", "E", "F", " "],
    ["A", "B", "C", " "]
    ]
    
    //l: left, u: up, r: right, d: down
    let door: [String: [String]] = [
        "D":["l", "u", "r"],
        "A": ["l", "d"],
        "B": ["d"],
        "C": ["d", "l", "u"],
        "E": ["l"],
        "F": ["d", "r"],
        "G": ["l", "u"],
        "H": ["u"],
        "I": ["u", "r", "d"]
    ]
    
    //Path: Keep track of the current path, The rat has traversed
    func findPath(maze: [[String]], currentX: Int, currentY: Int, endX: Int, endY: Int, path: inout [String]) -> Bool {
        //Base case
        if maze.isEmpty {
            return false
        }
        let width = maze.first?.count ?? 0
        let height = maze.count
        
        if currentX < 0, currentX >= width {
            return false
        }
        if currentY < 0, currentY >= height {
            return false
        }
        if endX < 0, endX >= width {
            return false
        }
        if endY < 0, endY >= height {
            return false
        }
        //X is column, Y is row, start X, Y means rabit's current position
        let cellValue = maze[currentY][currentX]
        if cellValue == " " {
            return false
        }
        //Set visited
        path.append(cellValue)
        
        //Reached the destination
        if currentX == endX, currentY == endY {
            return true
        }
        
        let doors = door[cellValue]!
        let allDoors = Set(["l", "r", "u", "d"])
        let availableOpenedDoors = allDoors.subtracting(Set(doors))
        
    //Check All available neighbors
        for direction in availableOpenedDoors {
            switch direction {
            case "l":
                let leftCellValue = maze[currentY][currentX - 1]
    //Check If already visited or not
                if path.contains(leftCellValue) == false {
    //Store current path
                    var newPath = path
    //Recursive call!
                    if findPath(maze: maze, currentX: currentX - 1, currentY: currentY, endX: endX, endY: endY, path: &newPath) {
    //It is very important
                        path.removeAll()
                        path.append(contentsOf: newPath)
                        return true
                    }
                }
            case "r":
                let rightCellValue = maze[currentY][currentX + 1]
                if path.contains(rightCellValue) == false {
                    var newPath = path
                    if findPath(maze: maze, currentX: currentX + 1, currentY: currentY, endX: endX, endY: endY, path: &newPath) {
                        path.removeAll()
                        path.append(contentsOf: newPath)
                        return true
                    }
                }
            case "u":
                let upCellValue = maze[currentY - 1][currentX]
                if path.contains(upCellValue) == false {
                    var newPath = path
                    if findPath(maze: maze, currentX: currentX, currentY: currentY - 1, endX: endX, endY: endY, path: &newPath) {
                        path.removeAll()
                        path.append(contentsOf: newPath)
                        return true
                    }
                }
            case "d":
                let downCellValue = maze[currentY + 1][currentX]
                if path.contains(downCellValue) == false {
                    var newPath = path
                    if findPath(maze: maze, currentX: currentX, currentY: currentY + 1, endX: endX, endY: endY, path: &newPath) {
                        path.removeAll()
                        path.append(contentsOf: newPath)
                        return true
                    }
                }
            default:
                break
            }
        }
        print("This cell is false: \(maze[currentY][currentX])")
        return false
    }
    
    var path = [String]()
    let isFoundPath = findPath(maze: maze, currentX: 0, currentY: 1, endX: 3, endY: 0, path: &path)
    
    print("\(isFoundPath) -> \(path)")
    
    print("Finish")
    
    //Prints Case 1
    This is false: C
    This is false: F
    true -> ["D", "A", "B", "E", "G", "H", "I"]
    Finish
    
    //Prints Case 2
    This cell is false: G
    true -> ["D", "A", "B", "E", "F", "H", "I"]
    Finish
    Program ended with exit code: 0
    

    Solution 2. Using Cell class

    class Cell {
        let id: String
        let isEnd: Bool
        var neighbors = [Cell]()
        
        init(id: String, isEnd: Bool) {
            self.id = id
            self.isEnd = isEnd
        }
    }
    
    let cellD = Cell(id: "D", isEnd: false)
    let cellA = Cell(id: "A", isEnd: false)
    let cellB = Cell(id: "B", isEnd: false)
    let cellC = Cell(id: "C", isEnd: false)
    let cellE = Cell(id: "E", isEnd: false)
    let cellF = Cell(id: "F", isEnd: false)
    let cellG = Cell(id: "G", isEnd: false)
    let cellH = Cell(id: "H", isEnd: false)
    let cellI = Cell(id: "I", isEnd: true)
    
    cellD.neighbors = [cellA]
    cellA.neighbors = [cellD, cellB]
    cellB.neighbors = [cellA, cellC, cellE]
    cellC.neighbors = [cellB]
    cellE.neighbors = [cellG, cellF, cellB]
    cellF.neighbors = [cellE, cellH]
    cellH.neighbors = [cellG, cellF, cellI]
    cellI.neighbors = [cellH]
    
    func findPath(currentCell: Cell, path: inout [Cell]) -> Bool {
        path.append(currentCell)
        
        //Base case
        if currentCell.isEnd {
            return true
        }
        for neighborCell in currentCell.neighbors {
            if path.contains(where: { $0.id == neighborCell.id }) == false {
                var currentPath = path
                if findPath(currentCell: neighborCell, path: &currentPath) {
                    path.removeAll()
                    path.append(contentsOf: currentPath)
                    return true
                }
            }
        }
        return false
    }
    
    var path = [Cell]()
    let isFoundPath = findPath(currentCell: cellD, path: &path)
    
    print("\(isFoundPath) -> \(path.compactMap { $0.id })")


    Exercise 8. Place 8 Queens on a Chessboard so they don’t kill each other

    Rules

    • Queens can move along their rows, columns and along both diagonals
    • Place one queen at a time, one on each row or one on each column
    • Remember to check at every step to see if the queen placed is safe, and if the remaining queens can be placed with that configuration

    Solution

    • Place a queen in each row or column in a safe position
    • See if the remaining queens can be placed safely with the current position of the queen
    • Recursively do this till the right positions for all queens have been found
    • Place all 8 queens safety

    Base case

    • The queens have been all placed and we’re beyond the boundary of the chessboard

    Recursive case

    • Keep placing queens in different positions of the same row or column
    • Check whether the remaining queens can be successfully placed
    https://www.udemy.com/course/break-away-coding-interviews-1/learn/lecture/8463370#content
    import Foundation
    //https://github.com/ShawnBaek/Table
    import Table
    
    //0: Empty, 1: Queen
    var chessBoard = Array(
        repeating: Array(repeating: 0, count: 8),
        count: 8
    )
    
    func isSafeOnLeftDiagonal(chess: [[Int]], row: Int, col: Int) -> Bool {
        var r = 0
        var c = 0
        
        //Find the initial position tracing the left diagonal from the first cell in the line of the placed queen
        if row > col {
            r = row - col
        }
        else {
            c = col - row
        }
        let columns = chess.first?.count ?? 0
        let rows = chess.count
        var numberOfQueen = 0
        while r < rows && c < columns {
            if chess[r][c] == 1 {
                numberOfQueen += 1
            }
            r += 1
            c += 1
        }
        return numberOfQueen <= 1
    }
    
    func isSafeOnRightDiagonal(chess: [[Int]], row: Int, col: Int) -> Bool {
        let columns = chess.first?.count ?? 0
        let rows = chess.count
        
        //Start position will be top right based on current position
        var r = 0
        var c = columns - 1
        var numberOfQueens = 0
        //Option 1. I suggest calculating it and checking the start position
        if (row + col < columns) {
            c = min(row + col, columns - 1)
        }
        else {
            r = (row + col) % (columns - 1)
        }
        
        while r < rows && c > 0 {
            if chess[r][c] == 1 {
                numberOfQueens += 1
            }
            r += 1
            c -= 1
        }
        return numberOfQueens <= 1
    }
    
    func isSafePosition(chess: [[Int]], row: Int, col: Int) -> Bool {
        let columns = chess.first?.count ?? 0
        let rows = chess.count
        //Edge case
        if col < 0 || col >= columns {
            return false
        }
        if row < 0 || row >= rows {
            return false
        }
        //Check horizontal
        for c in 0..<columns {
            //Found a Queen and It's not a current position of Queen
            if chess[row][c] == 1, c != col {
                return false
            }
        }
        //Check vertical
        for r in 0..<rows {
            if chess[r][col] == 1, r != row {
                return false
            }
        }
        
        //Check TopLeft -> DownRight Diagonal
        if !isSafeOnLeftDiagonal(chess: chess, row: row, col: col) {
            return false
        }
        
        if !isSafeOnRightDiagonal(chess: chess, row: row, col: col) {
            return false
        }
        return true
    }
    
    func placeQueen(
        chess: inout [[Int]],
        col: Int
    ) -> Bool {
        //Base case, Placed all Queens
        if col >= 8 {
            return true
        }
        for row in 0..<8 {
            //Place a Queen
            chess[row][col] = 1
            if isSafePosition(chess: chess, row: row, col: col) {
                if placeQueen(chess: &chess, col: col + 1) {
                    return true
                }
            }
            //Remove Queen at this position
            chess[row][col] = 0
        }
        return false
    }
    
    let isPlacedAllQueens = placeQueen(chess: &chessBoard, col: 0)
    print(table: chessBoard)


    Results

    Time Complexity is O(N!), We’re trying every possible position for the queens

  • iOS, What is Clean Architecture and SOLID principle?

    iOS, What is Clean Architecture and SOLID principle?

    ✍️ Note

    Some codes and contents are sourced from The Clean Code Blog official documentation, The iOS Interview Guide Book, Head First Design Patterns 2nd, theswiftdev.com, and Wiki Pedia. This post is for personal notes where I summarize the original contents to grasp the key concepts

    Clean Architecture

    The Dependency Rule always applies. Source code dependencies always point inwards. As you move inwards the level of abstraction increases. The outermost circle is low level concrete detail. As you move inwards the software grows more abstract, and encapsulates higher level policies. The inner most circle is the most general by cleancoder.com

    1. Independent of Frameworks. The architecture does not depend on the existence of some library of feature laden software. This allows you to use such frameworks as tools, rather than having to cram your system into their limited constraints.
    2. Testable. The business rules can be tested without the UI, Database, Web Server, or any other external element.
    3. Independent of UI. The UI can change easily, without changing the rest of the system. A Web UI could be replaced with a console UI, for example, without changing the business rules.
    4. Independent of Database. You can swap out Oracle or SQL Server, for Mongo, BigTable, CouchDB, or something else. Your business rules are not bound to the database.
    5. Independent of any external agency. In fact your business rules simply don’t know anything at all about the outside world
    https://blog.cleancoder.com/uncle-bob/2012/08/13/the-clean-architecture.html

    Dependency rule

    The overriding rule that makes this architecture work is The Dependency Rule. This rule says that source code dependencies can only point inwards. Nothing in an inner circle can know anything at all about something in an outer circle. 

    Entities

    Entities encapsulate Enterprise wide business rules. An entity can be an object with methods, or it can be a set of data structures and functions. It doesn’t matter so long as the entities could be used by many different applications in the enterprise

    If you don’t have an enterprise, and are just writing a single application, then these entities are the business objects of the application. They encapsulate the most general and high-level rules. They are the least likely to change when something external changes. For example, you would not expect these objects to be affected by a change to page navigation, or security. No operational change to any particular application should affect the entity layer.

    My comments

    • ViewModel can be a Entities

    Use Cases

    The software in this layer contains application specific business rules. It encapsulates and implements all of the use cases of the system. These use cases orchestrate the flow of data to and from the entities, and direct those entities to use their enterprise wide business rules to achieve the goals of the use case.

    We do not expect changes in this layer to affect the entities. We also do not expect this layer to be affected by changes to externalities such as the database, the UI, or any of the common frameworks. This layer is isolated from such concerns.

    Interface Adapters

    The software in this layer is a set of adapters that convert data from the format most convenient for the use cases and entities, to the format most convenient for some external agency such as the Database or the Web. It is this layer, for example, that will wholly contain the MVC architecture of a GUI. The Presenters, Views, and Controllers all belong in here. The models are likely just data structures that are passed from the controllers to the use cases, and then back from the use cases to the presenters and views.

    Frameworks and Drivers

    The outermost layer is generally composed of frameworks and tools such as the Database, the Web Framework, etc. Generally you don’t write much code in this layer other than glue code that communicates to the next circle inwards.

    Crossing boundaries.

    At the lower right of the diagram is an example of how we cross the circle boundaries. It shows the Controllers and Presenters communicating with the Use Cases in the next layer. Note the flow of control. It begins in the controller, moves through the use case, and then winds up executing in the presenter. Note also the source code dependencies. Each one of them points inwards towards the use cases.

    For example, consider that the use case needs to call the presenter. However, this call must not be direct because that would violate The Dependency Rule: No name in an outer circle can be mentioned by an inner circle. So we have the use case call an interface (Shown here as Use Case Output Port) in the inner circle, and have the presenter in the outer circle implement it.

    I redraw the Clean Architecture

    As my understanding, Clean Architecture is guidance that app can be separated by layers. There are boundaries between layers

    App can have multiple layers like below (by The iOS Interview Guide)

    • Service Layer
    • UI Layer
    • Storage Layer
    • Business Logic Layer

    This Image I added layers and informations which can be related to from the original clean architecture diagram.

    VIPER Architecture, It’s iOS version of Clean Architecture

    https://www.objc.io/issues/13-architecture/viper

    https://theswiftdev.com/viper-best-practices-for-ios-developers

    The main parts of VIPER are:

    • View: displays what it is told to by the Presenter and relays user input back to the Presenter.
    • Interactor: contains the business logic as specified by a use case.
    • Presenter: contains view logic for preparing content for display (as received from the Interactor) and for reacting to user inputs (by requesting new data from the Interactor).
    • Entity: contains basic model objects used by the Interactor.
    • Routing: contains navigation logic for describing which screens are shown in which order.
    https://www.objc.io/issues/13-architecture/viper/

    SOLID Principles

    I summarized this principle by reading Head First Design Patterns, 2nd edition and The iOS Interview Guide blog.

    S, Single Responsibility Principle

    Class / Module should have only one responsibility and reason to change. Avoid changing a class if possible. This principle is related to cohesion. If you follow this principle, You can easily maintain a class than a class which has multiple responsibility.

    If class have multiple responsibility, There is multiple reason to change it. It makes hard to maintaining.

    O, Open-Closed Principle

    Class opens for extension but closed for modification. It sounds complicated when I read this principle.

    Opens for extension. It means without modification, class can be extended. There is many way to extension. The purpose is adding a new functionalities without changing the existing codes / logics. (by Head First Design Patterns 2nd)

    For example, Observer pattern, you can add a new observer without changing a existing code. You can also follow this principle by adopting decoration pattern. Abstraction is also good for following this principle. Important thing is choosing which parts will be changed and separate it. (by Head First Design Pattens 2nd)

    Also you can extend objects through inheritance, polymorphism, and composition by implementing them using interfaces, abstractions, and dependency injection. (by The iOS Interview Guide book)

    L, Liskov Substitution Principle

    An object (such as a class) may be replaced by a sub-object (such as a class that extends the first class) without breaking the program

    Let say you have a class T. And you have a class S that inheritance from T. Your program could allow to replace T with S without breaking it.

    Or you can think usecase protocol. You have a protocol and struct or class which conforms to usecase protocol. And You can inject that protocol type in ViewModel. In this case your program can allow to replace the injecting objects with the others that conforms to usecase protocol without breaking it.

    Sub-Type: Subclass or Conforms to Protocol

    Super-Type: Super class or high level protocol

    I, Interface Segregation Principle

    No code should be forced to depend on methods it does not use.[1] ISP splits interfaces that are very large into smaller and more specific ones so that clients will only have to know about the methods that are of interest to them. Such shrunken interfaces are also called role interfaces. (by Wikipedia)

    If you familiar with protocol oriented programming, You can easily understand what is meaning.

    This principle is introduced at chapter 1, Head First Design Patterns 2nd

    Example is making a Duck class. There are protocols that has multiple methods. Like a FlyBehavior and QuackBehavior. Separating the interfaces prevents the problem like RubberDuck class doesn’t need to implement FlyBehavior because It can’t fly. That interface doesn’t need.

    In a Head First Design Patterns book, author suggested creating a FlyNoWay class that conforms to FlyBehavior protocol.

    Example

    protocol FlyBehavior {
        func fly()
    }
    
    protocol QuackBehavior {
        func quack()
    }
    
    class FlyWithWings: FlyBehavior {
        func fly() {
            print("I'm flying")
        }
    }
    
    class FlyNoWay: FlyBehavior {
        func fly() {
            print("I can't fly")
        }
    }
    
    class Quack: QuackBehavior {
        func quack() {
            print("Quack!!")
        }
    }
    
    class MuteQuack: QuackBehavior {
        func quack() {
            print("....")
        }
    }
    
    class Duck {
        let flyBehavior: FlyBehavior
        let quackBehavior: QuackBehavior
        
        init(flyBehavior: FlyBehavior, quackBehavior: QuackBehavior) {
            self.flyBehavior = flyBehavior
            self.quackBehavior = quackBehavior
        }
        
        func performFly() {
            flyBehavior.fly()
        }
        
        func performQuack() {
            quackBehavior.quack()
        }
    }
    
    class RubberDuck: Duck {}
    
    let rubberDuck = RubberDuck(
        flyBehavior: FlyNoWay(),
        quackBehavior: Quack()
    )
    
    rubberDuck.performFly()
    rubberDuck.performQuack()
    
    //Prints
    I can't fly
    Quack!!


    D, Dependency Inversion Principle

    Depend on abstractions, not concretions

    Tips for following this principle (by Head First Design Patterns 2nd)

    • Don’t save concrete class’s reference using variable
    • Create a class that conforms to protocol (Don’t create a class by inheritance from concrete class)
    • Don’t override function that already implemented at base class. (Base class’s function should be defined that can be sharable for all the subclasses)

    It is useful for writing unit testing.

    With the addition of an abstract layer, both high- and lower-level layers reduce the traditional dependencies from top to bottom. Nevertheless, the “inversion” concept does not mean that lower-level layers depend on higher-level layers directly. Both layers should depend on abstractions (interfaces) that expose the behavior needed by higher-level layers.

    In a direct application of dependency inversion, the abstracts are owned by the upper/policy layers. This architecture groups the higher/policy components and the abstractions that define lower services together in the same package. The lower-level layers are created by inheritance/implementation of these abstract classes or interfaces.[1]

    The inversion of the dependencies and ownership encourages the re-usability of the higher/policy layers. Upper layers could use other implementations of the lower services. When the lower-level layer components are closed or when the application requires the reuse of existing services, it is common that an Adapter mediates between the services and the abstractions.

    https://en.wikipedia.org/wiki/Dependency_inversion_principle
  • Swift, final keyword

    Swift, final keyword

    ✍️ Note

    Some codes and contents are sourced from Apple’s official documentation. This post is for personal notes where I summarize the original contents to grasp the key concepts

    Increasing Performance by Reducing Dynamic Dispatch

    Swift allows a class to override methods and properties declared in its superclasses. This means that the program has to determine at runtime which method or property is being referred to and then perform an indirect call or indirect access. This technique, called dynamic dispatch, increases language expressivity at the cost of a constant amount of runtime overhead for each indirect usage. In performance sensitive code such overhead is often undesirable. This blog post showcases three ways to improve performance by eliminating such dynamismfinal, private, and Whole Module Optimization.

    https://developer.apple.com/swift/blog/?id=27

    Example

    class ParticleModel {
    	var point = ( 0.0, 0.0 )
    	var velocity = 100.0
    
    	func updatePoint(newPoint: (Double, Double), newVelocity: Double) {
    		point = newPoint
    		velocity = newVelocity
    	}
    
    	func update(newP: (Double, Double), newV: Double) {
    		updatePoint(newP, newVelocity: newV)
    	}
    }
    
    var p = ParticleModel()
    for i in stride(from: 0.0, through: 360, by: 1.0) {
    //dynamically dispatched call
    	p.update((i * sin(i), i), newV:i*1000)
    }
    

    As written, the compiler will emit a dynamically dispatched call to:

    1. Call update on p.
    2. Call updatePoint on p.
    3. Get the property point tuple of p.
    4. Get the property velocity of p.

    The dynamic calls are necessary because a subclass of ParticleModel might override point or velocity with a computed property or override updatePoint() or update() with new implementations.

    In Swift, dynamic dispatch calls are implemented by looking up a function from a method table and then performing an indirect call. This is slower than performing a direct call. Additionally, indirect calls also prevent many compiler optimizations, making the indirect call even more expensive. In performance critical code there are techniques you can use to restrict this dynamic behavior when it isn’t needed to improve performance.

    Apple

    Use final keyword

    class ParticleModel {
    	final var point = ( x: 0.0, y: 0.0 )
    	final var velocity = 100.0
    
    	final func updatePoint(newPoint: (Double, Double), newVelocity: Double) {
    		point = newPoint
    		velocity = newVelocity
    	}
    
    //This function performing a indirect call because no final keyword
    	func update(newP: (Double, Double), newV: Double) {
    		updatePoint(newP, newVelocity: newV)
    	}
    }
    
    /*
    It is possible to mark an entire class as final by attaching the attribute to the class itself. This forbids subclassing the class, implying that all functions and properties of the class are final as well.
    */
    
    final class ParticleModel {
    	var point = ( x: 0.0, y: 0.0 )
    	var velocity = 100.0
    	// ...
    }
    

  • iOS, App life cycle

    iOS, App life cycle

    ✍️ Note

    Some codes and contents are sourced from Apple’s official documentation. This post is for personal notes where I summarize the original contents to grasp the key concepts

    Life cycle

    I checked what functions are called when first launches, enter background, foreground and terminated.

    figure shows the state transitions for scenes. When the user or system requests a new scene for your app, UIKit creates it and puts it in the unattached state. User-requested scenes move quickly to the foreground, where they appear onscreen. A system-requested scene typically moves to the background so that it can process an event. For example, the system might launch the scene in the background to process a location event. When the user dismisses your app’s UI, UIKit moves the associated scene to the background state and eventually to the suspended state. UIKit can disconnect a background or suspended scene at any time to reclaim its resources, returning that scene to the unattached state.

    https://developer.apple.com/documentation/uikit/app_and_environment/managing_your_app_s_life_cycle

    UIApplicationMain

    Creates the application object and the application delegate and sets up the event cycle.

    This function instantiates the application object from the principal class and instantiates the delegate (if any) from the given class and sets the delegate for the application. It also sets up the main event loop, including the application’s run loop, and begins processing events. If the application’s Info.plist file specifies a main nib file to be loaded, by including the NSMainNibFile key and a valid nib file name for the value, this function loads that nib file.

    Despite the declared return type, this function never returns.

    https://developer.apple.com/documentation/uikit/1622933-uiapplicationmain

    UI restoration process

    Restoration occurs during the middle of your app’s initialization, and it proceeds only when a state restoration archive is available and your app delegate’s application(_:shouldRestoreApplicationState:) method returns true.

    https://developer.apple.com/documentation/uikit/view_controllers/preserving_your_app_s_ui_across_launches/about_the_ui_restoration_process
  • Swift, Data Structure – Linked List

    Swift, Data Structure – Linked List

    ✍️ Note

    Some codes are sourced from Loony Corn’s Udemy Course (https://www.udemy.com/user/janani-ravi-2/). This post is for personal notes where I summarize the original contents to grasp the key concepts

    What is Linked List

    It is a list data structure where each element in the list holds some information and points to where the next element lies.

    Linked List vs Arrays

    • Linked List
      • List sizes are unlimited, you don’t need to know up front how many elements will be added to the linked list, the size of the linked list can grow dynamically
      • Inserting a new element in a linked list is a very easy operation, the logical next pointers have to be reassigned but not much else needs to be done
      • Similarly deleting an element in a list is very easy and efficient
      • Random access to an element at a specific index in the linked list is not possible. The entire list up-to that element has to be traversed
      • Each element requires additional space to store a pointer to the next element
      • Cannot take advantage of spatial locality (for caching) when accessing the elements
      • Each element can live pretty much anywhere in memory and be pointed to
    • Arrays
      • Arrays have to be declared upfront with the number of elements it will hold, the size of array cannot be increased dynamically <- In Swift, You can increase size, You can read details at Apple Document – Growing the Size of an Array
      • Arrays are located in contiguous memory locations, in order to insert an element, the elements to it’s right have to move over to make room for it. It is a more heavyweight operation.
      • Array elements have to be moved in the case of deletion as well
      • Arrays provide very quick lookup for elements at specific indices, since they are in contiguous memory locations, we know exactly where in memory the element is
      • No extra space is required other than for the actual elements which make up the array
      • As elements are in contiguous memory locations access to arrays takes significant advantage of spatial locality in caches
      • This can be a significant performance improvement

    Use Linked Lists when

    • You have a large number of insert or delete operations to perform
    • You have no idea how large your list might be

    Use Array when

    • Read operations need to be extremely fast and you have relatively few updates to the array
    • You require random access to array elements

    Source: https://www.udemy.com/course/from-0-to-1-data-structures/learn/lecture/8504232#content

    Last element points to nil

    First element is head

    class Node {
        let value: Int
        var next: Node?
        init(value: Int, next: Node? = nil) {
            self.value = value
            self.next = next
        }
    }
    
    let head = Node(value: 1)
    let second = Node(value: 2)
    let third = Node(value: 3)
    let fourth = Node(value: 4)
    
    //Make linked list
    head.next = second
    second.next = third
    third.next = fourth
    fourth.next = nil
    
    var start: Node? = head
    
    while start != nil {
        print("\(start!.value)")
        var next = start?.next
        start = next
    }
    
    //Prints
    1
    2
    3
    4
    

    Exercise 1. Get Length of a linked list

    func length(of linkedList: Node?) -> Int {
        var length = 0
        var head = linkedList
        while head != nil {
            length += 1
            head = head?.next
        }
        return length
    }
    
    length(of: head)
    

    Exercise 2. Get the N-th element in a Linked List

    func element(of linkedList: Node?, at index: Int) -> Node? {
        if index < 0 {
            return nil
        }
        var length = 0
        var head = linkedList
        while head != nil {
            if index == length {
                return head
            }
            length += 1
            head = head?.next
        }
        return nil
    }
    
    // 1 -> 2 -> 3 -> 4, Index 3 is 4
    element(of: head, at: 3)?.value //Prints 4, It's correct


    Exercise 3. Append an element to the end of a linked list

    There is 2 case you need to handle

    • head is null -> create a head node
    • there is a linked list, create a new node and append it as a last node. Don’t forget to handle last node’s next is nil
    var head: Node? = Node(value: 1)
    let second = Node(value: 2)
    let third = Node(value: 3)
    let fourth = Node(value: 4)
    
    //Make linked list
    head?.next = second
    second.next = third
    third.next = fourth
    fourth.next = nil
    
    func print(linkedList: Node?) {
        var head = linkedList
        while head != nil {
            print("\(head!.value)")
            head = head?.next
        }
    }
    
    //To handle if linkedList is nil, and You don't want to return anything then use inout parameter.
    func append(data: Int, at linkedList: inout Node?) {
        if linkedList == nil {
            linkedList = Node(value: data)
            return
        }
        var head = linkedList
        var lastItem: Node?
        while linkedList?.next != nil {
            linkedList = linkedList?.next
        }
        lastItem = linkedList
        lastItem?.next = Node(value: data)
        //Important, Reset head node
        linkedList = head
    }
    
    var emptyHead: Node?
    //Case 1. Empty Head
    append(data: 4, at: &emptyHead)
    print(emptyHead?.value)
    
    //Case 2. 1 -> 2 -> 3 -> 4, append 5
    append(data: 5, at: &head)
    print(linkedList: head)
    

    Exercise 4. Remove the first element

    func removeFirst(linkedList: inout Node?) {
        guard linkedList != nil else {
            return
        }
        var head: Node? = linkedList
        head = head?.next
        linkedList = head
    }
    print("LinkedList")
    print(linkedList: head)
    
    removeFirst(linkedList: &head)
    print("Removed:")
    print(linkedList: head)
    
    //Prints
    LinkedList
    1
    2
    3
    4
    Removed:
    2
    3
    4
    

    Exercise 5. Delete all the elements (All nodes should be removed from Memory)

    class Node {
        let value: Int
        var next: Node?
        init(value: Int, next: Node? = nil) {
            self.value = value
            self.next = next
        }
        
        deinit {
            print("Node \(value) is deinit")
        }
    }
    
    func removeAll(linkedList: inout Node?) {
        guard linkedList != nil else {
            return
        }
        while linkedList != nil {
            print("Remove : \(linkedList!.value) Refcount: \(CFGetRetainCount(linkedList))")
            var next = linkedList?.next
            linkedList?.next = nil
            linkedList = next
        }
    }
    
    //Prints
    Remove : 1 Refcount: 2
    Node 1 is deinit
    Remove : 2 Refcount: 3
    Remove : 3 Refcount: 3
    Remove : 4 Refcount: 3
    

    What’s wrong? Only Node 1 deinit. The rest of nodes are still remaining in Memory.

    To remove all nodes from Memory, We need to fix previous example of linked list.

    Let’s make a linkedList function.

    func linkedList(_ input: [Int]) -> Node? {
        guard input.count > 0 else {
            return nil
        }
        var head: Node? = Node(value: input.first!)
        var linkedList = head
        for i in 1..<input.count {
            let value = input[i]
            linkedList?.next = Node(value: value)
            linkedList = linkedList?.next
        }
        return head
    }
    
    var newList = linkedList([1, 2, 3, 4])
    removeAll(linkedList: &newList)
    
    //Prints
    Remove : 1 Refcount: 2
    Node 1 is deinit
    Remove : 2 Refcount: 2
    Node 2 is deinit
    Remove : 3 Refcount: 2
    Node 3 is deinit
    Remove : 4 Refcount: 2
    Node 4 is deinit
    

    I used a same removeAll function. I only change the linkedList by using linkedList function. This function returns linkedList and all nodes has a same reference counts.

    Now You can see all nodes are completely removed from Memory.

    Next example, I’ll continue use linkedList function for creating a linked list.

    Exercise 6. Insert an elements at index

    func print(linkedList: Node?) {
        var head = linkedList
        while head != nil {
            print("\(head!.value)", terminator: head?.next == nil ? "" : " -> ")
            head = head?.next
        }
    }
    
    func insert(value: Int, at index: Int, in linkedList: inout Node?) {
        guard linkedList != nil else {
            return
        }
        var head = linkedList
        //Edge case
        if index == 0 {
            var newHead = Node(value: value, next: linkedList)
            linkedList = newHead
            return
        }
        for i in 0..<index - 1 {
            var next = linkedList?.next
            linkedList = next
        }
        var prevItem = linkedList
        var prevNextItem = prevItem?.next
        prevItem?.next = Node(value: value)
        prevItem?.next?.next = prevNextItem
        
        //Pointing to head node
        linkedList = head
    }
    var newList = linkedList([1, 2, 3, 4])
    
    //MARK: Print All nodes
    print("Current List")
    print(linkedList: newList)
    print("\n")
    
    insert(value: 9, at: 2, in: &newList)
    print("After insert 9 at index 2")
    print(linkedList: newList)
    
    
    print("\n")
    insert(value: 10, at: 0, in: &newList)
    print("After insert 10 at index 0")
    print(linkedList: newList)
    
    //Prints
    Current List
    1 -> 2 -> 3 -> 4
    
    After insert 9 at index 2
    1 -> 2 -> 9 -> 3 -> 4
    
    After insert 10 at index 0
    10 -> 1 -> 2 -> 9 -> 3 -> 4


    Example 7. Insert an element at the right position in Sorted Linked List

    func insert(value: Int, in sortedLinkedList: inout Node?) {
        guard sortedLinkedList != nil else {
            return
        }
        var head = sortedLinkedList
        while sortedLinkedList != nil, sortedLinkedList!.value < value  {
            var next = sortedLinkedList?.next
            if let nextValue = next?.value, nextValue > value {
                break
            }
            else {
                sortedLinkedList = sortedLinkedList?.next
            }
        }
        var prevItem = sortedLinkedList
        var prevNextItem = prevItem?.next
        prevItem?.next = Node(value: value)
        prevItem?.next?.next = prevNextItem
        
        //Pointing to head node
        sortedLinkedList = head
    }
    
    var newList = linkedList([1, 2, 3, 5])
    
    //MARK: Print All nodes
    print("Current List")
    print(linkedList: newList)
    print("\n")
    
    insert(value: 4, in: &newList)
    print("After insert 4 in sorted LinkedList")
    print(linkedList: newList)
    
    //Prints
    Current List
    1 -> 2 -> 3 -> 5
    
    After insert 4 in sorted LinkedList
    1 -> 2 -> 3 -> 4 -> 5
    

    Example 8. Append one linked list to the end of another

    func append(a: inout Node?, b: inout Node?) {
        var mergedLinkedListHeader = a
        
        while a?.next != nil {
            a = a?.next
        }
        a?.next = b
        a = mergedLinkedListHeader
        b = mergedLinkedListHeader
    }
    
    var a = linkedList([1, 2, 3, 4])
    var b = linkedList([5, 6, 7, 8])
    
    //MARK: Print All nodes
    print("A: Linked List")
    print(linkedList: a)
    print("\n")
    
    print("B: Linked List")
    print(linkedList: b)
    print("\n")
    
    print("A+B")
    append(a: &a, b: &b)
    print(linkedList: a)
    print("\n")
    
    //Prints
    A: Linked List
    1 -> 2 -> 3 -> 4
    
    B: Linked List
    5 -> 6 -> 7 -> 8
    
    A+B
    1 -> 2 -> 3 -> 4 -> 5 -> 6 -> 7 -> 8


    Example 9. Split one Linked List to two Linked List, find a mid point and split it!

    🤔 Wait, why use 2 pointer?

    • Without 2 pointer, You need to get a length of linkedList first and then iterate linkedList again to split it.
    func split(list: inout Node?) -> (first: Node?, seconds: Node?) {
        var firstNode: Node? = list
        var secondsNode: Node?
        
        //for 1 step
        var slowPointer = list
        //for 2 steps
        var fastPointer = list?.next
        
        while fastPointer?.next != nil {
            slowPointer = slowPointer?.next
            fastPointer = fastPointer?.next?.next
        }
        //Split first list
        secondsNode = slowPointer?.next
        slowPointer?.next = nil
        return (firstNode, secondsNode)
    }
    

    Test case 1. Input = [1, 2, 3, 4, 5, 6, 7, 8]

    var list = linkedList([1, 2, 3, 4, 5, 6, 7, 8])
    //MARK: Print All nodes
    print("Linked List")
    print(linkedList: list)
    print("\n")
    
    var (firstSubList, secondsSublist) = split(list: &list)
    
    print("First Sub Linked List")
    print(linkedList: firstSubList)
    print("\n")
    
    print("Seconds Sub Linked List")
    print(linkedList: secondsSublist)
    print("\n")
    
    /Prints
    Linked List
    1 -> 2 -> 3 -> 4 -> 5 -> 6 -> 7 -> 8
    
    First Sub Linked List
    1 -> 2 -> 3 -> 4
    
    Seconds Sub Linked List
    5 -> 6 -> 7 -> 8
    

    Test case 2. Input = [1, 2, 3, 4, 5, 6, 7]

    var list = linkedList([1, 2, 3, 4, 5, 6, 7])
    //MARK: Print All nodes
    print("Linked List")
    print(linkedList: list)
    print("\n")
    
    var (firstSubList, secondsSublist) = split(list: &list)
    
    print("First Sub Linked List")
    print(linkedList: firstSubList)
    print("\n")
    
    print("Seconds Sub Linked List")
    print(linkedList: secondsSublist)
    print("\n")
    
    //Prints
    Linked List
    1 -> 2 -> 3 -> 4 -> 5 -> 6 -> 7
    
    First Sub Linked List
    1 -> 2 -> 3 -> 4
    
    Seconds Sub Linked List
    5 -> 6 -> 7


    Example 10. Remove duplicate nodes in a sorted linked list

    func removeDuplicates(linkedList: inout Node?) {
        var head: Node? = linkedList
        while linkedList?.next != nil {
            var nextNode = linkedList?.next
            //Check duplicates
            if linkedList?.value == nextNode?.value {
                while nextNode?.value == nextNode?.next?.value {
                    var tempNext = nextNode?.next
                    nextNode = tempNext
                }
                linkedList?.next = nextNode?.next
            }
            linkedList = linkedList?.next
        }
        linkedList = head
    }
    
    var list = linkedList([1, 2, 3, 3, 3, 4, 4, 5])
    //MARK: Print All nodes
    print("Linked List")
    print(linkedList: list)
    print("\n")
    
    
    removeDuplicates(linkedList: &list)
    print("Removed duplicates in Linked List")
    print(linkedList: list)
    print("\n")
    

    Example 11. Move node from the head of one list and add to the front of another

    func moveHeadToAnother(source: inout Node?, dest: inout Node?) {
        var sourceHead = source
        source = source?.next
        
        var destHead = dest
        sourceHead?.next = destHead
        dest = sourceHead
    }
    
    var source = linkedList([1, 2, 3])
    var dest = linkedList([7, 8, 9])
    //MARK: Print All nodes
    print("Source Linked List")
    print(linkedList: source)
    print("\n")
    
    print("Destination Linked List")
    print(linkedList: dest)
    print("\n")
    
    moveHeadToAnother(source: &source, dest: &dest)
    print("Result: Source Linked List")
    print(linkedList: source)
    print("\n")
    
    print("Result: Destination Linked List")
    print(linkedList: dest)
    print("\n")
    
    //Prints
    Source Linked List
    1 -> 2 -> 3
    
    Destination Linked List
    7 -> 8 -> 9
    
    Result: Source Linked List
    2 -> 3
    
    Result: Destination Linked List
    1 -> 7 -> 8 -> 9
    

    🤯 Example 12. Merge two sorted linked list and then return a new sorted linked list

    func merge(a: Node?, b: Node?) -> Node? {
        //Edge cases
        if a == nil, b == nil {
            return nil
        }
        if a == nil, b != nil {
            return b
        }
        if a != nil, b == nil {
            return a
        }
        
        var result: Node?
        var resultHead: Node?
        var headA = a
        var headB = b
        
        if headA!.value < headB!.value {
            resultHead = headA
            headA = headA?.next
        }
        else {
            resultHead = headB
            headB = headB?.next
        }
        resultHead?.next = nil
        result = resultHead
        
        while headA != nil && headB != nil {
            if headA!.value < headB!.value {
                result?.next = headA
                headA = headA?.next
            }
            else {
                result?.next = headB
                headB = headB?.next
            }
            result = result?.next
        }
        //Add rest of nodes
        var restNodes = headA ?? headB
        //When one list runs out make sure the remaining elements of the other are appended to the end of the result
        result?.next = restNodes
        //Pointing to head
        result = resultHead
        return result
    }
    
    var listA = linkedList([1, 2, 5])
    var listB = linkedList([1, 4, 6])
    //MARK: Print All nodes
    print("listA Linked List")
    print(linkedList: listA)
    print("\n")
    
    print("listB Linked List")
    print(linkedList: listB)
    print("\n")
    
    let mergedList = merge(a: listA, b: listB)
    print("Merged Linked List")
    print(linkedList: mergedList)
    print("\n")
    
    //Prints
    listA Linked List
    1 -> 2 -> 5
    
    listB Linked List
    1 -> 4 -> 6
    
    Merged Linked List
    1 -> 1 -> 2 -> 4 -> 5 -> 6


    Example 13. Reverse a Linked List

    Code

    func reverseLinkedList(input: Node?) -> Node? {
        //Prev will become a head of reversed linked list
        var prev = input
        var current = input?.next
        
        //At this time, prev is tail node, but after while loop, It become a head node
        prev?.next = nil
        while current != nil {
            //next node is input's next step
            var next = current?.next
            //It makes reversed direction
            current?.next = prev
            
            //next step for reversed linkedList
            prev = current
            current = next
        }
        return prev
    }
    
    var input = linkedList([1, 2, 5])
    //MARK: Print All nodes
    print("Input Linked List")
    print(linkedList: input)
    print("\n")
    
    var reversedLinkedList = reverseLinkedList(input: input)
    
    print("Reversed Linked List")
    print(linkedList: reversedLinkedList)
    print("\n")
    
    //Prints
    Input Linked List
    1 -> 2 -> 5
    
    Reversed Linked List
    5 -> 2 -> 1


    Doubly Linked List

    A doubly linked list has pointers to the next element as well as pointers to the previous element.

    This requires additional memory in every node to store the previous pointer.

    https://www.udemy.com/course/break-away-coding-interviews-1/learn/lecture/8462452#content
    class Node {
        let value: Int
        var prev: Node?
        var next: Node?
        
        init(value: Int, prev: Node? = nil, next: Node? = nil) {
            self.value = value
            self.prev = prev
            self.next = next
        }
    }
    
    func createDoublyLinkedList(input: [Int]) -> Node? {
        guard !input.isEmpty else {
            return nil
        }
        var queue = input
        var head: Node? = Node(value: queue.removeFirst())
        var temp = head
        
        while !queue.isEmpty {
            var currentNode = Node(value: queue.removeFirst())
            temp?.next = currentNode
            currentNode.prev = temp
            //Pointing to the next
            temp = currentNode
        }
        return head
    }
    
    func printAll(head: Node?) {
        guard let head else {
            return
        }
        var node: Node? = head
        while node != nil {
            
            print("Node: \(node!.value), prev: \(node?.prev?.value) next: \(node?.next?.value)", terminator: node?.next == nil ? "" : " <-> ")
            node = node?.next
        }
    }
    
    
    var head = createDoublyLinkedList(input: [1, 2, 3])
    printAll(head: head)
    
    //Prints
    current: 1, prev: nil next: Optional(2) <-> current: 2, prev: Optional(1) next: Optional(3) <-> current: 3, prev: Optional(2) next: nil
    

    Deleting a node in a doubly linked list

    Notes. Consider edge cases

    • Delete head
    • Delete tail
    • Delete node
    class Node {
        let value: Int
        var prev: Node?
        var next: Node?
        
        init(value: Int, prev: Node? = nil, next: Node? = nil) {
            self.value = value
            self.prev = prev
            self.next = next
        }
        
        deinit {
            print("🔥 deinit: \(value)")
        }
    }
    
    func createDoublyLinkedList(input: [Int]) -> Node? {
        guard !input.isEmpty else {
            return nil
        }
        var queue = input
        var head: Node? = Node(value: queue.removeFirst())
        var temp = head
        
        while !queue.isEmpty {
            var currentNode = Node(value: queue.removeFirst())
            temp?.next = currentNode
            currentNode.prev = temp
            //Pointing to the next
            temp = currentNode
        }
        return head
    }
    
    func printAll(head: Node?) {
        guard let head else {
            return
        }
        var node: Node? = head
        while node != nil {
            print("Node: \(node!.value), prev: \(node?.prev?.value) next: \(node?.next?.value)", terminator: node?.next == nil ? "" : " <-> ")
            node = node?.next
        }
        print("\n")
    }
    
    func delete(value: Int, in linkedList: inout Node?) {
        guard linkedList != nil else {
            return
        }
        print("Delete : \(value)")
        var head: Node? = linkedList
        var temp: Node? = head
        
        //Step find node to be deleted
        while temp != nil && temp?.value != value {
            temp = temp?.next
        }
    
        //Edge case, Not found value
        if temp == nil {
            return
        }
        
        //Unlink
        if temp?.prev != nil {
            temp?.prev?.next = temp?.next
        }
        else {
            //Edge case, It deleting node is head, set new head
            linkedList = temp?.next
            //Note, after removed the node, new head's prev became nil because It removed from memory
        }
        
        if temp?.next != nil {
            temp?.next?.prev = temp?.prev
        }
    }
    
    var head = createDoublyLinkedList(input: [1, 2, 3])
    printAll(head: head)
    delete(value: 1, in: &head)
    
    print("\nAfter delete\n")
    printAll(head: head)
    
    //Prints
    Node: 1, prev: nil next: Optional(2) <-> Node: 2, prev: Optional(1) next: Optional(3) <-> Node: 3, prev: Optional(2) next: nil
    
    Delete : 1
    🔥 deinit: 1
    
    After delete
    
    Node: 2, prev: nil next: Optional(3) <-> Node: 3, prev: Optional(2) next: nil
    
    
  • Swift, Data Structure – Tree Structure

    Swift, Data Structure – Tree Structure

    ✍️ Note

    Some codes are sourced from Loony Corn’s Udemy Course (https://www.udemy.com/user/janani-ravi-2/). This post is for personal notes where I summarize the original contents to grasp the key concepts

    Tree Data Structure

    class Node {
        var left: Node?
        var right: Node?
        var value: Int
        
        init(value: Int) {
            self.value = value
        }
    }
    
    //Create a Tree
    let root = Node(value: 5)
    
    root.left = Node(value: 3)
    root.right = Node(value: 7)
    
    root.right?.left = Node(value: 6)
    root.right?.right = Node(value: 9)
    

    BFS: Breadth First Search

    func bfs(root: Node) {
        var root = root
        var queue = [Node]()
        queue.append(root)
        while !queue.isEmpty {
            let dequeue = queue.removeFirst()
            print("\(dequeue.value)", terminator: " ")
            if let leftChild = dequeue.left {
                queue.append(leftChild)
            }
            if let rightChild = dequeue.right {
                queue.append(rightChild)
            }
        }
    }
    
    bfs(root: root)
    

    DFS: Depth First Search

    Use Recursion!

    • Define base case -> when the root is null
    • Recursion technique -> Processing can be performed
      • Before -> Pre-Order
      • In-Between or -> In-Order
      • After -> Post-Order

    Pre-Order

    Each node is processed first (PRE) before It’s right and left subtrees

    In-Order

    Post-Order

    func dfs(root: Node?) {
        //base: node is not null
        guard root != nil else {
            return
        }
        dfs(root: root?.left)
        dfs(root: root?.right)
        //Post-Order - print value after recursing to the left and right subtrees
        print("\(root!.value)", terminator: "  ")
    }
    dfs(root: root)
    
    //Prints
    3  6  9  7  5  


    Binary Search Tree

    It is called an Ordered Binary Tree.

    • Each node in the left sub-tree of that node has a value less than or equal to the value of the node
    • Each node in the right sub-tree of that node has a value greater than the value of the node

    Key Feature

    • Typically used for Fast Insertion and Fast Lookup
    • Fast Insertion
      • In a tree when a new node is added there is exactly one place that it can be
      • The structure of a tree depends on the order in which the nodes are added
    • Fast Lookup
      • While searching for a node in the tree there is only one place where that node can be found
      • You can simply follow the right or left sub-trees based on the value you want to find

    Insertion

    🙏 Below Images are wrong, Level 4 -> Level 3.

    Let’s see step by step.

    Step 1

    Step 2

    Step 3

    Step 4

    Step 5

    Step 6

    Step 7

    Step 8 -> Finish

    class Node {
        var left: Node?
        var right: Node?
        var value: Int
        
        init(value: Int) {
            self.value = value
        }
    }
    
    
    let root = Node(value: 8)
    
    //Level 1
    root.left = Node(value: 6)
    root.right = Node(value: 14)
    
    //Level 2
    root.left?.left = Node(value: 4)
    root.left?.right = Node(value: 7)
    root.right?.right = Node(value: 16)
    
    //Level 3
    root.right?.right?.right = Node(value: 18)
    
    func insertion(root: Node?, newNode: Node) -> Node? {
        if root == nil {
            return newNode
        }
        if newNode.value < root!.value {
            root?.left = insertion(root: root?.left, newNode: newNode)
        }
        else {
            root?.right = insertion(root: root?.right, newNode: newNode)
        }
        return root
    }
    
    insertion(root: root, newNode: Node(value: 15))
    
    func bfs(root: Node) {
        var root = root
        var queue = [Node]()
        queue.append(root)
        while !queue.isEmpty {
            let dequeue = queue.removeFirst()
            print("\(dequeue.value)", terminator: " ")
            if let leftChild = dequeue.left {
                queue.append(leftChild)
            }
            if let rightChild = dequeue.right {
                queue.append(rightChild)
            }
        }
    }
    bfs(root: root)
    
    //Prints
    8 6 14 4 7 16 15 18


    Look Up

    You can consider 2 case. Found or Not Found

    Found case

    🙏 Below Images are wrong, Level 4 -> Level 3.

    Not Found case

    Let’s implement Look Up function

    func lookUp(node: Node, from root: Node?) -> Node? {
        if root == nil {
            return nil
        }
        if node.value == root?.value {
            return root
        }
        if node.value < root!.value {
            return lookUp(node: node, from: root?.left)
        }
        else {
            return lookUp(node: node, from: root?.right)
        }
    }
    lookUp(node: Node(value: 7), from: root)?.value == 7 //found, true
    lookUp(node: Node(value: 20), from: root)?.value == 20 //Not found, false
    
    InsertionLook UP
    Average complexity O(logN)Average complexity O(logN)
    The actual complexity depends on the shape of the tree – Skewed tree (I.E with all left or right children only) can have complexity of O(n)For both insertion and lookup you halve the tree you have to traverse at every step. This gives us the O(logN) complexity
    Source: Udemy

    Let’s practice. Binary Tree Problems

    Exercise 1. Minimum Value

    func minimumValue(root: Node?) -> Int {
        if root == nil {
            return 0 //or return Int.min
        }
        //Left child has a minimum value
        if root?.left == nil {
            return root!.value
        }
        return minimumValue(root: root?.left)
    }
    
    minimumValue(root: root)
    

    Exercise 2. Maximum Depth

    🙏 Below Images are wrong, Level 4 -> Level 3.

    func maximumDepth(root: Node?) -> Int {
        if root == nil {
            return 0
        }
        //Leaf node
        if root?.left == nil, root?.right == nil {
            return 0
        }
        //Count up when look up next level
        let leftDepth = 1 + maximumDepth(root: root?.left)
        let rightDepth = 1 + maximumDepth(root: root?.right)
        return max(leftDepth, rightDepth)
    }
    
    maximumDepth(root: root) //Prints 3
    

    Exercise 3. Mirror Tree

    func mirror(root: Node?) {
        if root == nil {
            return
        }
        mirror(root: root?.left)
        mirror(root: root?.right)
        //Switch left and right child
        let temp = root?.left
        root?.left = root?.right
        root?.right = temp
    }
    mirror(root: root)
    

    🤯 Exercise 4. Create the number of structurally unique Binary Trees possible

    Problem definition

    • Let say If you have 3 nodes, How many various binary trees you can create?
    func countTrees(nodeCount: Int) -> Int {
        //Base case: node 1 -> possible tree is 1, If it is zero then root node will be null
        if nodeCount <= 1 {
            return 1
        }
        var sum = 0
        //Every node can be the root
        for i in 1...nodeCount {
            //Left and right form their own sub trees
            //The nodes before it will be on the left
            let leftTrees = countTrees(nodeCount: i - 1)
            //THe nodes after it on the right
            let rightTrees = countTrees(nodeCount: nodeCount - i)
            
            //leftTree * rightTrees = the number of possible trees with this root
            sum = sum + leftTrees * rightTrees
        }
        return sum
    }
    
    countTrees(nodeCount: 3) //Prints 5
    

    Exercise 5. Print all nodes within a range in a Binary Search Tree

    func printAllNodeWithin(root: Node?, range: ClosedRange<Int>) {
        if root == nil {
            return
        }
    //If the range low value is less than the current, run the operation on the left subtree
        if root!.value >= range.lowerBound {
            printAllNodeWithin(root: root?.left, range: range)
        }
        //In-Order
        if range ~= root!.value {
            print("\(root!.value)", terminator: "  ")
        }
    //If the range high value is greater than the current node, run the operation on the right subtree
        if root!.value < range.upperBound {
            printAllNodeWithin(root: root?.right, range: range)
        }
    }
    print("\nExercise: Print All Nodes\n")
    printAllNodeWithin(root: root, range: 6...14)
    
    //Prints
    Exercise: Print All Nodes
    6  7  8  14 
    

    Exercise 6. Is a Binary Tree is a Binary Search Tree?

    Remind what is Binary Search Tree?

    • For every node in a binary search tree – The nodes with values <= node are in the left subtree and nodes with values > node are in the right sub tree
    let nonBinarySearchTreeRoot = Node(value: 8)
    
    //Level 1
    nonBinarySearchTreeRoot.left = Node(value: 14)
    nonBinarySearchTreeRoot.right = Node(value: 6)
    
    //Level 2
    nonBinarySearchTreeRoot.left?.left = Node(value: 4)
    nonBinarySearchTreeRoot.left?.right = Node(value: 7)
    nonBinarySearchTreeRoot.right?.right = Node(value: 16)
    
    //Level 3
    nonBinarySearchTreeRoot.right?.right?.right = Node(value: 18)
    
    func isBinarySearchTree(root: Node?) -> Bool {
        //Null node consider valid binary search tree
        if root == nil {
            return true
        }
        if let left = root?.left?.value, root!.value < left {
            return false
        }
        if let right = root?.right?.value, root!.value > right {
            return false
        }
        return isBinarySearchTree(root: root?.left) && isBinarySearchTree(root: root?.right)
    }
    isBinarySearchTree(root: nonBinarySearchTreeRoot) //Prints false


    Exercise 7. Has Path Sum?

    func hasPathSum(root: Node?, sum: Int) -> Bool {
        //Check hasPathSum or not
        if root?.left == nil, root?.right == nil {
            return root?.value == sum
        }
        if root == nil {
            return false
        }
        let subSum = sum - root!.value
        if let left = root?.left {
            var hasPathSum = hasPathSum(root: root?.left, sum: subSum)
            if hasPathSum {
                return true
            }
        }
        if let right = root?.right {
            var hasPassSum = hasPathSum(root: root?.right, sum: subSum)
            if hasPassSum {
                return true
            }
        }
        return false
    }
    
    hasPathSum(root: root, sum: 21) //True


    Exercise 8. Print Paths from Root -> Leaf node

    func printAllPathes(root: Node?, array: inout [Int]) {
        if root == nil {
            return
        }
        array.append(root!.value)
        printAllPathes(root: root?.left, array: &array)
        printAllPathes(root: root?.right, array: &array)
        
        if root?.left == nil, root?.right == nil {
            print("Path: \(array)")
        }
        array.removeLast()
    }
    
    //Prints
    Path: [8, 6, 4]
    Path: [8, 6, 7]
    Path: [8, 14, 16, 18]
    

    Exercise 9. Find the Least Common Ancestor for 2 nodes

    Let’s check step by step.

    Remember, This step is important!

    Found! The lease common ancestor is 3

    //It's not a Binary Search Tree
    let findAncestorRoot = Node(value: 1)
    
    //Level 1
    findAncestorRoot.left = Node(value: 2)
    findAncestorRoot.right = Node(value: 3)
    
    //Level 2
    findAncestorRoot.right?.left = Node(value: 7)
    findAncestorRoot.right?.right = Node(value: 6)
    
    //Level 3
    findAncestorRoot.right?.left?.left = Node(value: 8)
    findAncestorRoot.right?.left?.right = Node(value: 5)
    findAncestorRoot.right?.right?.right = Node(value: 4)
    
    
    func findLeastCommonAncestor(root: Node?, targetNodeValue1: Int, targetNodeValue2: Int) -> Int? {
        if root == nil {
            return nil
        }
        //If the current root is either of the two node then return it itself. (It will be use later)
        if root!.value == targetNodeValue1 || root!.value == targetNodeValue2 {
            return root!.value
        }
        let leftAncestor = findLeastCommonAncestor(root: root?.left, targetNodeValue1: targetNodeValue1, targetNodeValue2: targetNodeValue2)
        let rightAncestor = findLeastCommonAncestor(root: root?.right, targetNodeValue1: targetNodeValue1, targetNodeValue2: targetNodeValue2)
        
        //If both exist it means - either the node or it's ancestor exist in the left and right subtree. So current node is the least common ancestor
        if let leftAncestor, let rightAncestor {
            return root!.value
        }
        if let leftAncestor {
            return leftAncestor
        }
        return rightAncestor
    }
    
    findLeastCommonAncestor(root: findAncestorRoot, targetNodeValue1: 8, targetNodeValue2: 6) //It is 3
    

    Exercise 10. iOS, Find the Least Common Ancestor for 2 subview

    UIView is not a binary tree. It has more 2 child views.

    func createNodeView(tag: Int) -> UIView {
        let view = UIView()
        view.tag = tag
        return view
    }
    
    //Level 0
    let rootView = createNodeView(tag: 1)
    
    //Level 1
    let tag3View = createNodeView(tag: 3)
    rootView.addSubview(createNodeView(tag: 2))
    rootView.addSubview(tag3View)
    
    
    //Level 2
    let tag7View = createNodeView(tag: 7)
    let tag6View = createNodeView(tag: 6)
    let tag9View = createNodeView(tag: 9)
    tag3View.addSubview(tag7View)
    tag3View.addSubview(tag6View)
    tag3View.addSubview(tag9View)
    
    //Level 3
    tag7View.addSubview(createNodeView(tag: 11))
    tag6View.addSubview(createNodeView(tag: 8))
    tag6View.addSubview(createNodeView(tag: 5))
    
    tag9View.addSubview(createNodeView(tag: 4))
    
    func findLeastCommonAncestor(root: UIView?, targetNodeValue1: Int, targetNodeValue2: Int) -> UIView? {
        print("visited: \(root?.tag)")
        if root == nil {
            return nil
        }
        //If the current root is either of the two node then return it itself. (It will be use later)
        if root!.tag == targetNodeValue1 || root!.tag == targetNodeValue2 {
            return root
        }
        var ancestors = [UIView]()
        for subView in root!.subviews {
            if let ancestor =
                findLeastCommonAncestor(root: subView, targetNodeValue1: targetNodeValue1, targetNodeValue2: targetNodeValue2) {
                ancestors.append(ancestor)
            }
        }
        print(ancestors.compactMap { $0.tag })
        let tags = ancestors.compactMap { $0.tag }
        //If rootView has both nodes then return it
        if tags.contains(targetNodeValue1), tags.contains(targetNodeValue2) {
            return root
        }
        if ancestors.isEmpty {
            return nil
        }
    //Need to check whether It's okay to return last item or not..but most of cases It works correctly so far.
        return ancestors.last
    }