Some codes and contents are sourced from Apple’s official documentation. This post is for personal notes where I summarize the original contents to grasp the key concepts
Archives and serializations are two ways in which you can create architecture-independent byte streams of hierarchical data. Byte streams can then be written to a file or transmitted to another process, perhaps over a network. When the byte stream is decoded, the hierarchy is regenerated. Archives provide a detailed record of a collection of interrelated objects and values. Serializations record only the simple hierarchy of property-list values
Apple
Example 1, Conforms NSCoding
class Person: NSObject, NSCoding {
    var name: String
    var age: Int
    var friend: Person?

    init(name: String, age: Int, friend: Person? = nil) {
        self.name = name
        self.age = age
        self.friend = friend
    }

    required convenience init?(coder: NSCoder) {
        guard let name = coder.decodeObject(forKey: "name") as? String
        else {
            return nil
        }
        let age = coder.decodeInteger(forKey: "age")
        let friend = coder.decodeObject(forKey: "friend") as? Person

        self.init(name: name, age: age, friend: friend)
    }

    func encode(with coder: NSCoder) {
        coder.encode(name, forKey: "name")
        coder.encode(age, forKey: "age")
        coder.encode(friend, forKey: "friend")
    }
}
func savePerson(_ person: Person, to path: String) {
    do {
        let data = try NSKeyedArchiver.archivedData(withRootObject: person, requiringSecureCoding: false)
        try data.write(to: URL(fileURLWithPath: path))
        print("Saved Person")
    } catch {
        print("Failed: \(error)")
    }
}

func loadPerson(from path: String) -> Person? {
    do {
        let data = try Data(contentsOf: URL(fileURLWithPath: path))

//Instead unarchiveTopLevelObjectWithData You can use unarchivedObject(ofClass:from:) when you conforms NSSecureCoding protocol

        if let loadedPerson = try NSKeyedUnarchiver.unarchiveTopLevelObjectWithData(data) as? Person {
            return loadedPerson
        }
    } catch {
        print("Failed: \(error)")
    }
    return nil
}

let friend = Person(name: "Bob", age: 35)
let person = Person(name: "Alice", age: 30, friend: friend)
let filePath = NSTemporaryDirectory() + "person_with_friend.archive"
savePerson(person, to: filePath)

if let loadedPerson = loadPerson(from: filePath) {
    if let loadedFriend = loadedPerson.friend {
        print("Person: \(loadedPerson.name), \(loadedPerson.age)")
        print("Friend: \(loadedFriend.name), \(loadedFriend.age)")
    } else {
        print("No friends")
    }
}
Example 2. Conforms NSSecureCoding
In example 1, You may see this warning. unarchiveTopLevelObjectWithData was deprecated. To resolve it, let’s conforms NSSecureCoding.
class Person: NSObject, NSSecureCoding {
    static var supportsSecureCoding = true
    var name: String
    var age: Int
    var friend: Person?

    init(name: String, age: Int, friend: Person? = nil) {
        self.name = name
        self.age = age
        self.friend = friend
    }

    required convenience init?(coder: NSCoder) {
        guard let name = coder.decodeObject(forKey: "name") as? String
        else {
            return nil
        }
        let age = coder.decodeInteger(forKey: "age")
        let friend = coder.decodeObject(forKey: "friend") as? Person

        self.init(name: name, age: age, friend: friend)
    }

    func encode(with coder: NSCoder) {
        coder.encode(name, forKey: "name")
        coder.encode(age, forKey: "age")
        coder.encode(friend, forKey: "friend")
    }
}
func savePerson(_ person: Person, to path: String) {
    do {
        let data = try NSKeyedArchiver.archivedData(withRootObject: person, requiringSecureCoding: true)
        try data.write(to: URL(fileURLWithPath: path))
        print("Saved Person")
    } catch {
        print("Failed: \(error)")
    }
}

func loadPerson(from path: String) -> Person? {
    do {
        let data = try Data(contentsOf: URL(fileURLWithPath: path))
        if let loadedPerson = try NSKeyedUnarchiver.unarchivedObject(ofClass: Person.self, from: data) {
            return loadedPerson
        }
    } catch {
        print("Failed: \(error)")
    }

    return nil
}

let friend = Person(name: "Bob", age: 35)
let person = Person(name: "Alice", age: 30, friend: friend)
let filePath = NSTemporaryDirectory() + "person_with_friend.archive"
savePerson(person, to: filePath)

if let loadedPerson = loadPerson(from: filePath) {
    if let loadedFriend = loadedPerson.friend {
        print("Person: \(loadedPerson.name), \(loadedPerson.age)")
        print("Friend: \(loadedFriend.name), \(loadedFriend.age)")
    } else {
        print("No friends")
    }
}
Some codes and contents are sourced from Apple’s official documentation. This post is for personal notes where I summarize the original contents to grasp the key concepts
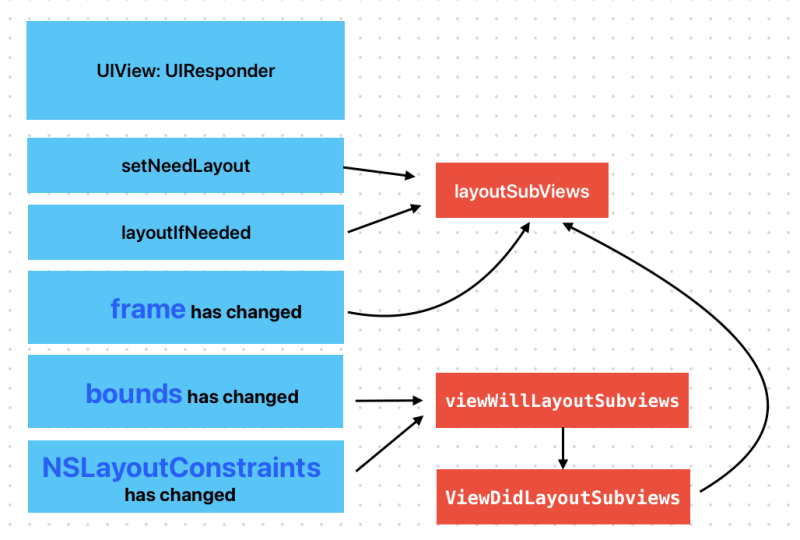
When layoutSubViews has called?
Subclasses can override this method as needed to perform more precise layout of their subviews. You should override this method only if the autoresizing and constraint-based behaviors of the subviews do not offer the behavior you want. You can use your implementation to set the frame rectangles of your subviews directly.
You should not call this method directly. If you want to force a layout update, call the setNeedsLayout() method instead to do so prior to the next drawing update. If you want to update the layout of your views immediately, call the layoutIfNeeded() method.
Test it your self. When you call a setNeedsLayout a layoutSubviews in CustomView will be called.
viewWillLayoutSubviews and viewDidLayoutSubviews
When a view’s bounds change, the view adjusts the position of its subviews. Your view controller can override this method to make changes before the view lays out its subviews. The default implementation of this method does nothing.
When you changed a subview’s bounds, viewWillLayoutSubviews and viewDidLayoutSubviews are called. And then subview’s layoutSubviews is also called
When use Autolayout and changes NSLayoutConstraints, It also calls viewWillLayoutSubviews and viewDidLayoutSubviews
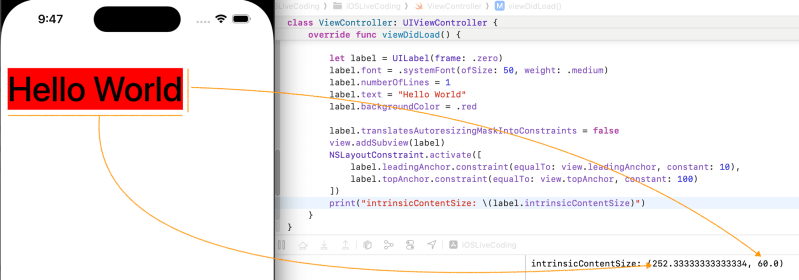
What is intrinsicContentSize?
The natural size for the receiving view, considering only properties of the view itself.
Custom views typically have content that they display of which the layout system is unaware. Setting this property allows a custom view to communicate to the layout system what size it would like to be based on its content. This intrinsic size must be independent of the content frame, because there’s no way to dynamically communicate a changed width to the layout system based on a changed height, for example.
If a custom view has no intrinsic size for a given dimension, it can use noIntrinsicMetric for that dimension.
Let’s test. UILabel has 2 constraints which are leading and top. I set font and text. As you can see It’s intrinsicContentSize is based on it’s content.
I added trailingAnchor. As you can see frame width is bigger than first one. ButintrinsicSize doesn’t changed. Because It’s based on contents. Now we know that It is independent from frame
UIImageView
An image view uses its contentMode property and the configuration of the image itself to determine how to display the image. It’s best to specify images whose dimensions match the dimensions of the image view exactly, but image views can scale your images to fit all or some of the available space. If the size of the image view itself changes, it automatically scales the image as needed.
You can create a resizable image that stretches using the resizableImage(withCapInsets:resizingMode:) method of UIImage. When using an image of this type, you typically set the image view’s content mode to UIView.ContentMode.scaleToFill so that the image stretches in the appropriate places and fills the image view’s bounds.
Image scaling and alpha blending are two relatively expensive operations that can impact your app’s performance. To maximize performance of your image view code, consider the following tips:
Cache scaled versions of frequently used images. If you expect certain large images to be displayed frequently in a scaled-down thumbnail view, consider creating the scaled-down images in advance and storing them in a thumbnail cache. Doing so alleviates the need for each image view to scale them separately.
Use images whose size is close to the size of the image view. Rather than assigning a large image to an image view, created a scaled version that matches the current size of the image view. You can also create a resizable image object using the UIImage.ResizingMode.tile option, which tiles the image instead of scaling it.
Make your image view opaque whenever possible. Unless you’re intentionally working with images that contain transparency (drawing UI elements, for example), make sure the isOpaque property of your image view is set to true. For more information about how transparency is determined, see Determine the final transparency of the image.
Some codes and contents are sourced from Apple’s official documentation. This post is for personal notes where I summarize the original contents to grasp the key concepts.
References
Apple official documents
Raywenderlich.com
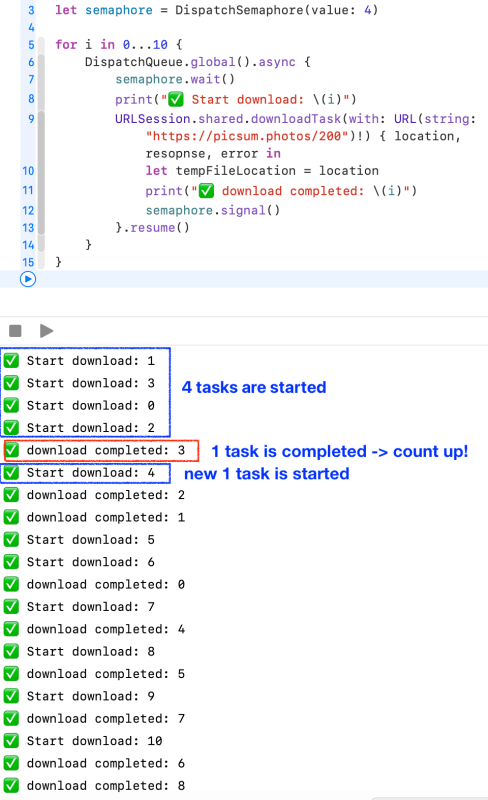
An object that controls access to a resource across multiple execution contexts through use of a traditional counting semaphore.
A dispatch semaphore is an efficient implementation of a traditional counting semaphore. Dispatch semaphores call down to the kernel only when the calling thread needs to be blocked. If the calling semaphore does not need to block, no kernel call is made.
You increment a semaphore count by calling the signal()method, and decrement a semaphore count by calling wait() or one of its variants that specifies a timeout.
Some codes and contents are sourced from Apple’s official documentation. This post is for personal notes where I summarize the original contents to grasp the key concepts
🔥 Apple documents about Dynamic and Static library was written for OSX Application.
Two important factors that determine the performance of apps are their launch times and their memory footprints. Reducing the size of an app’s executable file and minimizing its use of memory once it’s launched make the app launch faster and use less memory once it’s launched. Using dynamic libraries instead of static libraries reduces the executable file size of an app. They also allow apps to delay loading libraries with special functionality only when they’re needed instead of at launch time. This feature contributes further to reduced launch times and efficient memory use.
This article introduces dynamic libraries and shows how using dynamic libraries instead of static libraries reduces both the file size and initial memory footprint of the apps that use them. This article also provides an overview of the dynamic loader compatibility functions apps use to work with dynamic libraries at runtime.
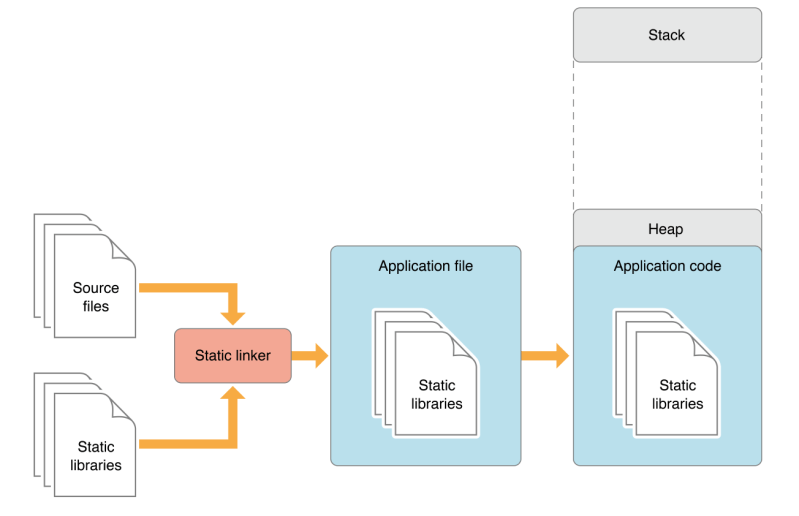
Most of an app’s functionality is implemented in libraries of executable code. When an app is linked with a library using a static linker, the code that the app uses is copied to the generated executable file. A static linker collects compiled source code, known as object code, and library code into one executable file that is loaded into memory in its entirety at runtime. The kind of library that becomes part of an app’s executable file is known as a static library. Static libraries are collections or archives of object files.
Note: Static libraries are also known as static archive libraries and static linked shared libraries.
When an app is launched, the app’s code—which includes the code of the static libraries it was linked with—is loaded into the app’s address space. Linking many static libraries into an app produces large app executable files. Figure 1 shows the memory usage of an app that uses functionality implemented in static libraries. Applications with large executables suffer from slow launch times and large memory footprints. Also, when a static library is updated, its client apps don’t benefit from the improvements made to it. To gain access to the improved functionality, the app’s developer must link the app’s object files with the new version of the library. And the apps users would have to replace their copy of the app with the latest version. Therefore, keeping an app up to date with the latest functionality provided by static libraries requires disruptive work by both developers and end users.
Apple
When you create a module using SPM, It is a static library.
Dynamic Library
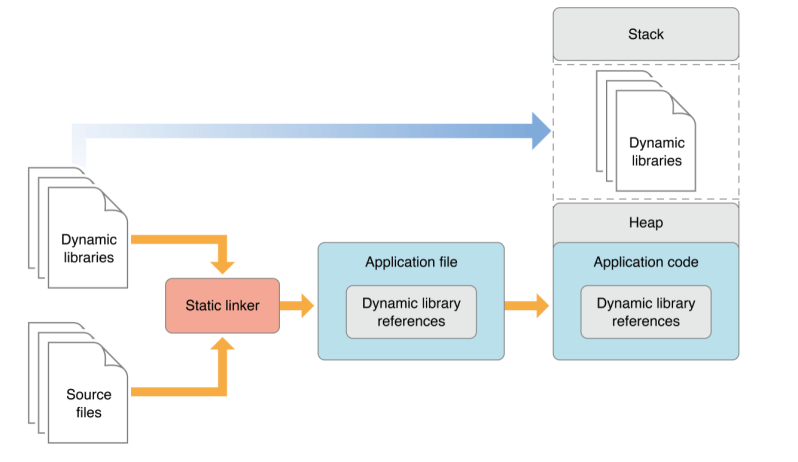
A better approach is for an app to load code into its address space when it’s actually needed, either at launch time or at runtime. The type of library that provides this flexibility is called dynamic library. Dynamic libraries are not statically linked into client apps; they don’t become part of the executable file. Instead, dynamic libraries can be loaded (and linked) into an app either when the app is launched or as it runs.
Using dynamic libraries, programs can benefit from improvements to the libraries they use automatically because their link to the libraries is dynamic, not static. That is, the functionality of the client apps can be improved and extended without requiring app developers to recompile the apps. Apps written for OS X benefit from this feature because all system libraries in OS X are dynamic libraries. This is how apps that use Carbon or Cocoa technologies benefit from improvements to OS X.
Another benefit dynamic libraries offer is that they can be initialized when they are loaded and can perform clean-up tasks when the client app terminates normally. Static libraries don’t have this feature. For details, see Module Initializers and Finalizers.
Apple
Reduce dependencies on external frameworks and dynamic libraries
Before any of your code runs, the system must find and load your app’s executable and any libraries on which it depends.
The dynamic loader (dyld) loads the app’s executable file, and examines the Mach load commands in the executable to find frameworks and dynamic libraries that the app needs. It then loads each of the frameworks into memory, and resolves dynamic symbols in the executable to point to the appropriate addresses in the dynamic libraries.
Each additional third-party framework that your app loads adds to the launch time. Although dyld caches a lot of this work in a launch closure when the user installs the app, the size of the launch closure and the amount of work done after loading it still depend on the number and sizes of the libraries loaded. You can reduce your app’s launch time by limiting the number of 3rd party frameworks you embed. Frameworks that you import or add to your app’s Linked Frameworks and Libraries setting in the Target editor in Xcode count toward this number. Built-in frameworks, like CoreFoundation, have a much lower impact on launch, because they use shared memory with other processes that use the same framework.
Some codes and contents are sourced from Apple’s official documentation. This post is for personal notes where I summarize the original contents to grasp the key concepts
Property Wrappers
A property wrapper adds a layer of separation between code that manages how a property is stored and the code that defines a property. For example, if you have properties that provide thread-safety checks or store their underlying data in a database, you have to write that code on every property. When you use a property wrapper, you write the management code once when you define the wrapper, and then reuse that management code by applying it to multiple properties.
When you apply a wrapper to a property, the compiler synthesizes code that provides storage for the wrapper and code that provides access to the property through the wrapper. (The property wrapper is responsible for storing the wrapped value, so there’s no synthesized code for that.)
struct SmallRectangle {
    private var _height = TwelveOrLess()
    private var _width = TwelveOrLess()
    var height: Int {
        get { return _height.wrappedValue }
        set { _height.wrappedValue = newValue }
    }
    var width: Int {
        get { return _width.wrappedValue }
        set { _width.wrappedValue = newValue }
    }
}
projected Value
The name of the projected value is the same as the wrapped value, except it begins with a dollar sign ($)
Apple
@propertyWrapper
struct TwelveOrLess {
    private var number = 0
    private(set) var projectedValue = true
    var wrappedValue: Int {
        get { return number }
        set {
            number = min(newValue, 12)
            projectedValue = number == 0
        }
    }

    init() {
        self.number = 0
        self.projectedValue = true
    }
}

struct Number {
    @TwelveOrLess var lessNumber
}

var number = Number()
number.lessNumber = 10
number.$lessNumber
Projected Value, property name should be projectedValue
And Compiler doesn’t allow to mutating the projectedValue from the others. So Access control for it, setting the private(set) var is make sense.
Some codes and contents are sourced from Apple’s official documentation. This post is for personal notes where I summarize the original contents to grasp the key concepts
Swift Concurrency Model
The possible suspension points in your code marked with await indicate that the current piece of code might pause execution while waiting for the asynchronous function or method to return. This is also called yielding the threadbecause, behind the scenes, Swift suspends the execution of your code on the current thread and runs some other code on that thread instead. Because code with await needs to be able to suspend execution, only certain places in your program can call asynchronous functions or methods:
Code in the body of an asynchronous function, method, or property.
Code in the static main() method of a structure, class, or enumeration that’s marked with @main.
Call Task.yield() method for long running operation that doesn’t contain any suspension point.
func listPhotos(inGallery name: String) async throws -> [String] {
    // ... some asynchronous networking code ...
    // use Task.sleep for simulating networking logic
    try await Task.sleep(for: .seconds(2))
    let result = ["photo1.jpg", "photo2.jpg", "photo3.jpg"]
    return result
}

func generateSlideshow(forGallery gallery: String) async throws {
    let photos = try await listPhotos(inGallery: gallery)
    for photo in photos {
        // ... render a few seconds of video for this photo ...
        print("photo file: \(photo)")
        // Explicitly insert a suspending point
        // It allows other tasks to execute
        await Task.yield()
    }
}

Task {
    let _ = try? await generateSlideshow(forGallery: "Summer Vacation")
}
Wait, there is no function to resuming it explicitly?
No.
Suspends the current task and allows other tasks to execute.
A task can voluntarily suspend itself in the middle of a long-running operation that doesn’t contain any suspension points, to let other tasks run for a while before execution returns to this task.
If this task is the highest-priority task in the system, the executor immediately resumes execution of the same task. As such, this method isn’t necessarily a way to avoid resource starvation.
Structuring long-running code this way (explicitly insert a suspension point) lets Swift balance between making progress on this task, and letting other tasks in your program make progress on their work.
Task.yield(), Apple
Wrap a throwing function
When you define an asynchronous or throwing function, you mark it with async or throws, and you mark calls to that function with await or try. An asynchronous function can call another asynchronous function, just like a throwing function can call another throwing function.
However, there’s a very important difference. You can wrap throwing code in a do–catch block to handle errors, or use Result to store the error for code elsewhere to handle it. These approaches let you call throwing functions from nonthrowing code.
Normal function can wrap a throwing function returning Result. But there’s no safe way to wrap asynchronous code so you can call it from synchronous code and wait for the result.
The Swift standard library intentionally omits this unsafe functionality — trying to implement it yourself can lead to problems like subtle races, threading issues, and deadlocks. When adding concurrent code to an existing project, work from the top down. Specifically, start by converting the top-most layer of code to use concurrency, and then start converting the functions and methods that it calls, working through the project’s architecture one layer at a time. There’s no way to take a bottom-up approach, because synchronous code can’t ever call asynchronous code.
Apple
Above the example is working fine. But If you try to wrap a async throws function using Result, It can’t. See below example.
Asynchronous Sequences
let handle = FileHandle.standardInput
for try await line in handle.bytes.lines {
    print(line)
}
In the same way that you can use your own types in a for–in loop by adding conformance to the Sequence protocol, you can use your own types in a for–await–in loop by adding conformance to the AsyncSequence protocol.
Apple
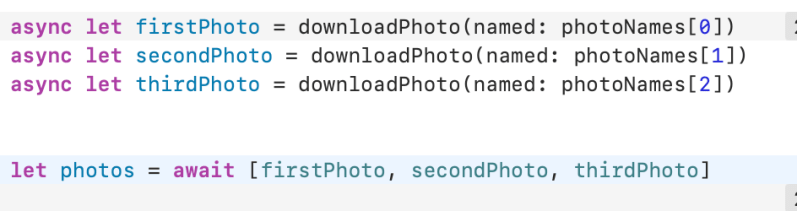
Calling Asynchronous Functions in Parallel
Call asynchronous functions with async–let when you don’t need the result until later in your code. This creates work that can be carried out in parallel.
Both await and async–let allow other code to run while they’re suspended.
In both cases, you mark the possible suspension point with await to indicate that execution will pause, if needed, until an asynchronous function has returned.
Apple
🤯 Tasks and Task Groups
func downloadPhoto(from url: String) async throws -> Data {
    //Download image
    try await URLSession.shared.data(from: URL(string: url)!).0
}

Task {
    let photoUrls = [
        "https://picsum.photos/200/300?grayscale",
        "https://picsum.photos/200",
        "https://picsum.photos/300"
    ]
    //async let, It implicitly create a new child task
    async let firstPhoto = downloadPhoto(from: photoUrls[0])
    async let secondPhoto = downloadPhoto(from: photoUrls[1])
    async let thirdPhoto = downloadPhoto(from: photoUrls[2])

    //3 child tasks are created
    let photos = try await [firstPhoto, secondPhoto, thirdPhoto]
}
Tasks are arranged in a hierarchy. Each task in a given task group has the same parent task, and each task can have child tasks. Because of the explicit relationship between tasks and task groups, this approach is called structured concurrency. The explicit parent-child relationships between tasks has several advantages:
In a parent task, you can’t forget to wait for its child tasks to complete.
When setting a higher priority on a child task, the parent task’s priority is automatically escalated.
When a parent task is canceled, each of its child tasks is also automatically canceled.
Task-local valuespropagate to child tasks efficiently and automatically.
Apple
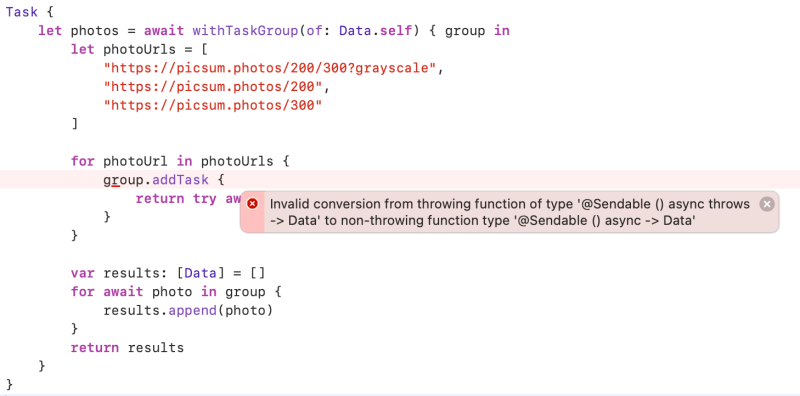
Task Group
Swift runs as many of these tasks concurrently as conditions allow.
Apple
Task {
    let photos = await withTaskGroup(of: Data.self) { group in
        let photoUrls = [
            "https://picsum.photos/200/300?grayscale",
            "https://picsum.photos/200",
            "https://picsum.photos/300"
        ]

        for photoUrl in photoUrls {
            group.addTask {
                return try await downloadPhoto(from: photoUrl)
            }
        }

        var results: [Data] = []
        for await photo in group {
            results.append(photo)
        }
        return results
    }
}
Ops, There is an error. Because withTaskGroup doesn’t support error handling.
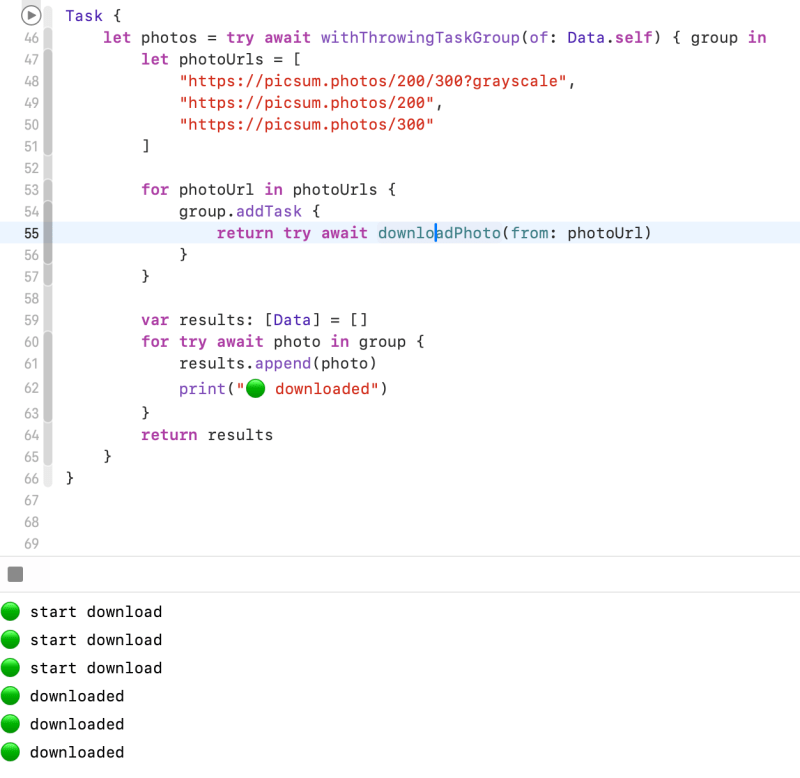
Task {
    let photos = try await withThrowingTaskGroup(of: Data.self) { group in
        let photoUrls = [
            "https://picsum.photos/200/300?grayscale",
            "https://picsum.photos/200",
            "https://picsum.photos/300"
        ]

        for photoUrl in photoUrls {
            //creates child tasks
            group.addTask {
                return try await downloadPhoto(from: photoUrl)
            }
        }

        var results: [Data] = []
        for try await photo in group {
            results.append(photo)
        }
        return results
    }
}
for–await–in loop waits for the next child task to finish, appends the result of that task to the array of results, and then continues waiting until all child tasks have finished. Finally, the task group returns the array of downloaded photos as its overall result.
Apple
I fixed it by using withThrowingTaskGroup
Task Cancellation
Swift concurrency uses a cooperative cancellation model. Each task checks whether it has been canceled at the appropriate points in its execution, and responds to cancellation appropriately. Depending on what work the task is doing, responding to cancellation usually means one of the following:
Throwing an error like CancellationError
Returning nil or an empty collection
Returning the partially completed work
Downloading pictures could take a long time if the pictures are large or the network is slow. To let the user stop this work, without waiting for all of the tasks to complete, the tasks need check for cancellation and stop running if they are canceled. There are two ways a task can do this: by calling the Task.checkCancellation() method, or by reading the Task.isCancelled property.
Calling checkCancellation() throws an error if the task is canceled; a throwing task can propagate the error out of the task, stopping all of the task’s work. This has the advantage of being simple to implement and understand. For more flexibility, use the isCancelledproperty, which lets you perform clean-up work as part of stopping the task, like closing network connections and deleting temporary files.
Apple
Task {
    let photos = try await withThrowingTaskGroup(of: Optional<Data>.self) { group in
        let photoUrls = [
            "https://picsum.photos/200/300?grayscale",
            "https://picsum.photos/200",
            "https://picsum.photos/300"
        ]

        for photoUrl in photoUrls {
            group.addTaskUnlessCancelled {
                return try await downloadPhoto(from: photoUrl)
            }
        }

        var results: [Data] = []
        for try await photo in group {
            if let photo {
                results.append(photo)
            }
            print("🟢 downloaded")
        }
        return results
    }
}
Each task checks for cancellation before starting to download the photo. If it has been canceled, the task returns nil. <- 🤔Need to check…
At the end, the task group skips nil values when collecting the results. Handling cancellation by returning nil means the task group can return a partial result — the photos that were already downloaded at the time of cancellation — instead of discarding that completed work.
If parent task has cancelled, all the child tasks are also cancelled.
What if I cancel a child task?
It seems cancelling a child task doesn’t cancel the parent task.
Let’s remind Task cancellation.
There are two ways a task can do this: by calling the Task.checkCancellation() method, or by reading the Task.isCancelled property. Calling checkCancellation() throws an error if the task is canceled;
a throwing task can propagate the error out of the task, stopping all of the task’s work. This has the advantage of being simple to implement and understand. For more flexibility, use the isCancelled property, which lets you perform clean-up work as part of stopping the task, like closing network connections and deleting temporary files.
Apple
Unstructured Concurrency
Unlike tasks that are part of a task group, an unstructured task doesn’t have a parent task. You have complete flexibility to manage unstructured tasks in whatever way your program needs, but you’re also completely responsible for their correctness. To create an unstructured task that runs on the current actor, call the Task.init(priority:operation:)initializer. To create an unstructured task that’s not part of the current actor, known more specifically as a detached task, call the Task.detached(priority:operation:)class method. Both of these operations return a task that you can interact with — for example, to wait for its result or to cancel it.
Apple
Apple document’s example
let newPhoto = // ... some photo data ...
let handle = Task {
    return await add(newPhoto, toGalleryNamed: "Spring Adventures")
}
let result = await handle.value
My example
let unstructuredTask = Task { () -> Data in
    return try! await URLSession.shared.data(from: URL(string: "https://picsum.photos/100")!).0
}
let firstPhoto = await unstructuredTask.value
Task Closure life cycle
Tasks are initialized by passing a closure containing the code that will be executed by a given task.
After this code has run to completion, the task has completed, resulting in either a failure or result value, this closure is eagerly released.
Retaining a task object doesn’t indefinitely retain the closure, because any references that a task holds are released after the task completes. Consequently, tasks rarely need to capture weak references to values.
For example, in the following snippet of code it is not necessary to capture the actor as weak, because as the task completes it’ll let go of the actor reference, breaking the reference cycle between the Task and the actor holding it.
Note that there is nothing, other than the Task’s use of self retaining the actor, And that the start method immediately returns, without waiting for the unstructured Taskto finish. So once the task completes and its the closure is destroyed, the strong reference to the “self” of the actor is also released allowing the actor to deinitialize as expected.
Apple
struct Work: Sendable {}


actor Worker {
    var work: Task<Void, Never>?
    var result: Work?


    deinit {
        assert(work != nil)
        // even though the task is still retained,
        // once it completes it no longer causes a reference cycle with the actor


        print("deinit actor")
    }


    func start() {
        //unstructured Task
        work = Task {
            print("start task work")
            try? await Task.sleep(for: .seconds(3))
            self.result = Work() // we captured self
            print("completed task work")
            // but as the task completes, this reference is released
        }
        // we keep a strong reference to the task
    }
}

await Actor().start()

//Prints
start task work
completed task work
deinit actor
Actors
sometimes you need to share some information between tasks. Actors let you safely share information between concurrent code.
Like classes, actors are reference types, so the comparison of value types and reference types in Classes Are Reference Types applies to actors as well as classes. Unlike classes, actors allow only one task to access their mutable state at a time, which makes it safe for code in multiple tasks to interact with the same instance of an actor. For example, here’s an actor that records temperatures:
You introduce an actor with the actor keyword, followed by its definition in a pair of braces. The TemperatureLogger actor has properties that other code outside the actor can access, and restricts the max property so only code inside the actor can update the maximum value.
Apple
actor TemperatureLogger {
    let label: String
    var measurements: [Int]
    private(set) var max: Int


    init(label: String, measurement: Int) {
        self.label = label
        self.measurements = [measurement]
        self.max = measurement
    }
}

let logger = TemperatureLogger(label: "Outdoors", measurement: 25)

print(await logger.max)
//Prints "25"

print(logger.max)  // Error, Should use await
You create an instance of an actor using the same initializer syntax as structures and classes. When you access a property or method of an actor, you use await to mark the potential suspension point. For example:
In this example, accessing logger.max is a possible suspension point. Because the actor allows only one task at a time to access its mutable state, if code from another task is already interacting with the logger, this code suspends while it waits to access the property.
Apple
extension TemperatureLogger {
    func update(with measurement: Int) {
    //part of the actor doesn’t write await when accessing the actor’s properties
        measurements.append(measurement)
        //At here, temporary inconsistent state.
        if measurement > max {
            max = measurement
        }
    }
}
Your code calls the update(with:) method. It updates the measurements array first.
Before your code can update max, code elsewhere reads the maximum value and the array of temperatures.
Your code finishes its update by changing max.
In this case, the code running elsewhere would read incorrect information because its access to the actor was interleaved in the middle of the call to update(with:) while the data was temporarily invalid. You can prevent this problem when using Swift actors because they only allow one operation on their state at a time, and because that code can be interrupted only in places where await marks a suspension point. Because update(with:) doesn’t contain any suspension points, no other code can access the data in the middle of an update.
Apple
actor isolation
Swift guarantees that only code running on an actor can access that actor’s local state. This guarantee is known as actor isolation.
The following aspects of the Swift concurrency model work together to make it easier to reason about shared mutable state:
Code in between possible suspension points runs sequentially, without the possibility of interruption from other concurrent code.
Code that interacts with an actor’s local state runs only on that actor.
An actor runs only one piece of code at a time.
Because of these guarantees, code that doesn’t include await and that’s inside an actor can make the updates without a risk of other places in your program observing the temporarily invalid state. For example, the code below converts measured temperatures from Fahrenheit to Celsius:
writing code in an actor that protects temporary invalid state by omitting potential suspension points, you can move that code into a synchronous method. The convertFahrenheitToCelsius() method above is a synchronous method, so it’s guaranteed to never contain potential suspension points.
Apple
Sendable Types
Inside of a task or an instance of an actor, the part of a program that contains mutable state, like variables and properties, is called a concurrency domain.
You mark a type as being sendable by declaring conformance to the Sendableprotocol. That protocol doesn’t have any code requirements, but it does have semantic requirements that Swift enforces. In general, there are three ways for a type to be sendable:
The type is a value type, and its mutable state is made up of other sendable data — for example, a structure with stored properties that are sendable or an enumeration with associated values that are sendable.
The type doesn’t have any mutable state, and its immutable state is made up of other sendable data — for example, a structure or class that has only read-only properties.
The type has code that ensures the safety of its mutable state, like a class that’s marked @MainActor or a class that serializes access to its properties on a particular thread or queue.
Value types
Reference types with no mutable storage
Reference types that internally manage access to their state
Functions and closures (by marking them with @Sendable)
Apple
struct TemperatureReading: Sendable {
    var measurement: Int
}


extension TemperatureLogger {
    func addReading(from reading: TemperatureReading) {
        measurements.append(reading.measurement)
    }
}


let logger = TemperatureLogger(label: "Tea kettle", measurement: 85)
let reading = TemperatureReading(measurement: 45)
await logger.addReading(from: reading)
Sendable Classes
Be marked final
Contain only stored properties that are immutable and sendable
Have no superclass or have NSObject as the superclass
Classes marked with @MainActorare implicitly sendable, because the main actor coordinates all access to its state. These classes can have stored properties that are mutable and nonsendable.
Apple
Sendable Functions and Closures
Instead of conforming to the Sendable protocol, you mark sendable functions and closures with the @Sendable attribute. Any values that the function or closure captures must be sendable. In addition, sendable closures must use only by-value captures, and the captured values must be of a sendable type.
In a context that expects a sendable closure, a closure that satisfies the requirements implicitly conforms to Sendable — for example, in a call to Task.detached(priority:operation:).
You can explicitly mark a closure as sendable by writing @Sendable as part of a type annotation, or by writing @Sendable before the closure’s parameters — for example:
Apple
let sendableClosure = { @Sendable (number: Int) -> String in
    if number > 12 {
        return "More than a dozen."
    } else {
        return "Less than a dozen"
    }
}
Sendable Tuples
To satisfy the requirements of theSendableprotocol, all of the elements of the tuple must be sendable. Tuples that satisfy the requirements implicitly conform toSendable. by Apple
Sendable Metatypes
Metatypes such as Int.Type implicitly conform to the Sendable protocol.
Some codes and contents are sourced from Apple’s official documentation. This post is for personal notes where I summarize the original contents to grasp the key concepts
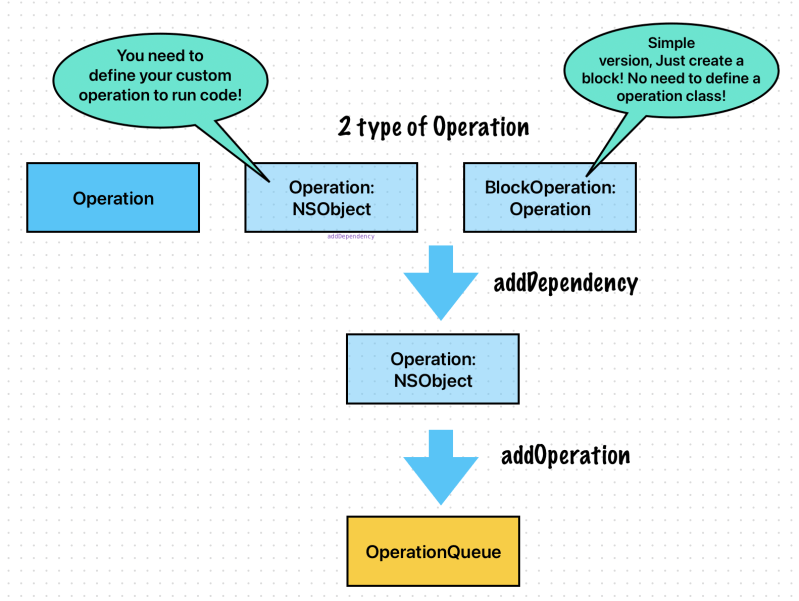
OperationQueue
An operation queue invokes its queued Operation objects based on their priority and readiness. After you add an operation to a queue, it remains in the queue until the operation finishes its task. You can’t directly remove an operation from a queue after you add it.
Operation queues retain operations until the operations finish, and queues themselves are retained until all operations are finished. Suspending an operation queue with operations that aren’t finished can result in a memory leak.
Apple
Operation
Operation objects are synchronous by default. In a synchronous operation, the operation object does not create a separate thread on which to run its task
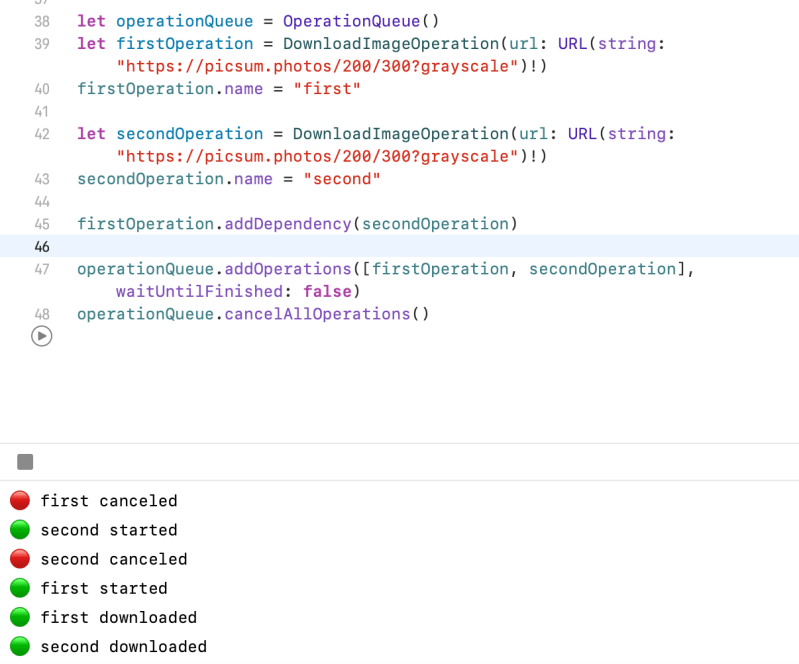
let operationQueue = OperationQueue()

let firstOperation = DownloadImageOperation(url: URL(string: "https://picsum.photos/200/300?grayscale")!)
firstOperation.name = "first"

let secondOperation = DownloadImageOperation(url: URL(string: "https://picsum.photos/200/300?grayscale")!)
secondOperation.name = "second"

//first operation will not start until second operation start.
firstOperation.addDependency(secondOperation)
operationQueue.addOperations([secondOperation, firstOperation], waitUntilFinished: false)


//Prints
second started
first started
second downloaded
first downloaded
The first operation depends on the second operation. This means it can’t be started if the second operation hasn’t started yet.
All the codes and contents are sourced from Apple’s official documentation. This post is for personal notes where I summarize the original contents to grasp the key concepts
Concurrency is the notion of multiple things happening at the same time. Although operating systems like OS X and iOS are capable of running multiple programs in parallel, most of those programs run in the background and perform tasks that require little continuous processor time. It is the current foreground application that both captures the user’s attention and keeps the computer busy. If an application has a lot of work to do but keeps only a fraction of the available cores occupied, those extra processing resources are wasted.
Both OS X and iOS adopt a more asynchronous approach to the execution of concurrent tasks than is traditionally found in thread-based systems and applications.
The term thread is used to refer to a separate path of execution for code. The underlying implementation for threads in OS X is based on the POSIX threads API.
The term process is used to refer to a running executable, which can encompass multiple threads.
The term task is used to refer to the abstract concept of work that needs to be performed.
Concurrency and Application design
Although threads have been around for many years and continue to have their uses, they do not solve the general problem of executing multiple tasks in a scalable way. With threads, the burden of creating a scalable solution rests squarely on the shoulders of you, the developer. You have to decide how many threads to create and adjust that number dynamically as system conditions change. Another problem is that your application assumes most of the costs associated with creating and maintaining any threads it uses.
Instead of relying on threads, OS X and iOS take an asynchronous design approachto solving the concurrency problem. Asynchronous functions have been present in operating systems for many years and are often used to initiate tasks that might take a long time, such as reading data from the disk. When called, an asynchronous function does some work behind the scenes to start a task running but returns before that task might actually be complete. Typically, this work involves acquiring a background thread, starting the desired task on that thread, and then sending a notification to the caller (usually through a callback function)when the task is done. In the past, if an asynchronous function did not exist for what you want to do, you would have to write your own asynchronous function and create your own threads. But now, OS X and iOS provide technologies to allow you to perform any task asynchronously without having to manage the threads yourself.
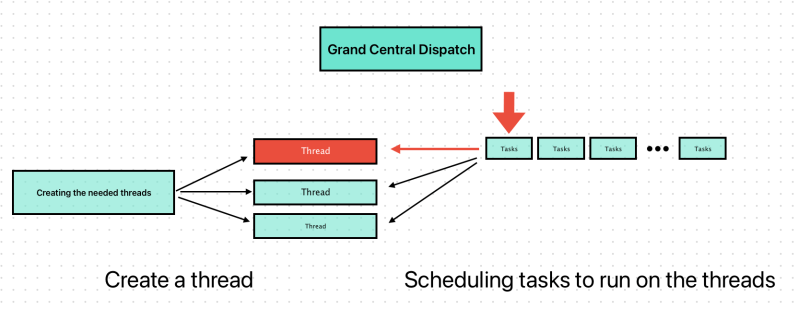
One of the technologies for starting tasks asynchronously is Grand Central Dispatch (GCD). This technology takes the thread management code you would normally write in your own applications and moves that code down to the system level. All you have to do is define the tasks you want to execute and add them to an appropriate dispatch queue. GCD takes care of creating the needed threads and of scheduling your tasks to run on those threads. Because the thread management is now part of the system, GCD provides a holistic approach to task management and execution, providing better efficiency than traditional threads.
Apple
OperationQueue
Operation queues are Objective-C objects that act very much like dispatch queues. You define the tasks you want to execute and then add them to an operation queue, which handles the scheduling and execution of those tasks. Like GCD, operation queues handle all of the thread management for you, ensuring that tasks are executed as quickly and as efficiently as possible on the system.
An operation queue is the Cocoa equivalent of a concurrent dispatch queue and is implemented by the NSOperationQueueclass. Whereas dispatch queues always execute tasks in first-in, first-out order, operation queues take other factors into account when determining the execution order of tasks. Primary among these factors is whether a given task depends on the completion of other tasks. You configure dependencies when defining your tasks and can use them to create complex execution-order graphs for your tasks.
The tasks you submit to an operation queue must be instances of the NSOperation class. An operation object is an Objective-C object that encapsulates the work you want to perform and any data needed to perform it. Because the NSOperation class is essentially an abstract base class, you typically define custom subclasses to perform your tasks. However, the Foundation framework does include some concrete subclasses that you can create and use as is to perform tasks.
Operation objectsgenerate key-value observing (KVO) notifications, which can be a useful way of monitoring the progress of your task. Although operation queues always execute operations concurrently, you can use dependencies to ensure they are executed serially when needed.
For more information about how to use operation queues, and how to define custom operation objects, see Operation Queues.
Apple
DispatchQueue
Dispatch queues are a C-based mechanism for executing custom tasks. A dispatch queue executes tasks either serially or concurrently but always in a first-in, first-out order. (In other words, a dispatch queue always dequeues and starts tasks in the same order in which they were added to the queue.) A serial dispatch queue runs only one task at a time, waiting until that task is complete before dequeuing and starting a new one. By contrast, a concurrent dispatch queuestarts as many tasks as it can without waiting for already started tasks to finish.
Dispatch queues have other benefits:
They provide a straightforward and simple programming interface.
They offer automatic and holistic thread pool management.
They provide the speed of tuned assembly.
They are much more memory efficient (because thread stacks do not linger in application memory).
They do not trap to the kernel under load.
The asynchronous dispatching of tasks to a dispatch queue cannot deadlock the queue.
They scale gracefully under contention.
Serial dispatch queues offer a more efficient alternative to locks and other synchronization primitives.
The tasks you submit to a dispatch queue must be encapsulated inside either a function or a block object.Block objects are a C language feature introduced in OS X v10.6 and iOS 4.0 that are similar to function pointers conceptually, but have some additional benefits. Instead of defining blocks in their own lexical scope, you typically define blocks inside another function or method so that they can access other variables from that function or method.Blocks can also be moved out of their original scope and copied onto the heap, which is what happens when you submit them to a dispatch queue. All of these semantics make it possible to implement very dynamic tasks with relatively little code.
Dispatch queues are part of the Grand Central Dispatch technology and are part of the C runtime. For more information about using dispatch queues in your applications, see Dispatch Queues. For more information about blocks and their benefits, see Blocks Programming Topics.
Apple
Dispatch Sources
Dispatch sources are a C-based mechanism for processing specific types of system events asynchronously. A dispatch source encapsulates information about a particular type of system event and submits a specific block object or function to a dispatch queue whenever that event occurs. You can use dispatch sources to monitor the following types of system events:
Timers
Signal handlers
Descriptor-related events
Process-related events
Mach port events
Custom events that you trigger
Dispatch sources are part of the Grand Central Dispatch technology. For information about using dispatch sources to receive events in your application, see Dispatch Sources.
Apple
Asynchronous Design Techniques
Concurrencycan improve the responsiveness of your code by ensuring that your main thread is free to respond to user events. It can even improve the efficiency of your code by leveraging more cores to do more work in the same amount of time. However, it also adds overhead and increases the overall complexity of your code, making it harder to write and debug your code.
If you implemented your tasks using blocks, you can add your blocks to either a serial or concurrent dispatch queue. If a specific order is required, you would always add your blocks to a serial dispatch queue. If a specific order is not required, you can add the blocks to a concurrent dispatch queue or add them to several different dispatch queues, depending on your needs.
If you implemented your tasks using operation objects, the choice of queue is often less interesting than the configuration of your objects. To perform operation objects serially, you must configure dependencies between the related objects. Dependencies prevent one operation from executing until the objects on which it depends have finished their work.
Apple
Tips for Improving Efficiency
Consider computing values directly within your task if memory usage is a factor.
If your application is already memory bound, computing values directly now may be faster than loading cached values from main memory. Computing values directly uses the registers and caches of the given processor core, which are much faster than main memory. Of course, you should only do this if testing indicates this is a performance win.
Identify serial tasks early and do what you can to make them more concurrent
If a task must be executed serially because it relies on some shared resource, consider changing your architecture to remove that shared resource. You might consider making copies of the resource for each client that needs one or eliminate the resource altogether.
Avoid using locks
The support provided by dispatch queues and operation queues makes locks unnecessary in most situations. Instead of using locks to protect some shared resource, designate a serial queue (or use operation object dependencies) to execute tasks in the correct order.
Rely on the system frameworks whenever possible
The best way to achieve concurrency is to take advantage of the built-in concurrency provided by the system frameworks. Many frameworks use threads and other technologies internally to implement concurrent behaviors. When defining your tasks, look to see if an existing framework defines a function or method that does exactly what you want and does so concurrently. Using that API may save you effort and is more likely to give you the maximum concurrency possible.
Some codes and contents are sourced from Apple’s official documentation. This post is for personal notes where I summarize the original contents to grasp the key concepts
A function or method can be declared with the rethrows keyword to indicate that it throws an error only if one of its function parameters throws an error. These functions and methods are known as rethrowing functions and rethrowing methods. Rethrowing functions and methods must have at least one throwing function parameter.
Apple
Let’s check Foundation’s map function. A transform is a rethrowing function parameter.
It means transform function can throwing an error.
A rethrowing function or method can contain a throw statement only inside a catch clause. This lets you call the throwing function inside a do–catch statement and handle errors in the catch clause by throwing a different error. In addition, the catch clause must handle only errors thrown by one of the rethrowing function’s throwing parameters. For example, the following is invalid because the catch clause would handle the error thrown by alwaysThrows().
A throwing method can’t override a rethrowing method, and a throwing method can’t satisfy a protocol requirement for a rethrowing method. That said, a rethrowing method can override a throwing method, and a rethrowing method can satisfy a protocol requirement for a throwing method.
Apple
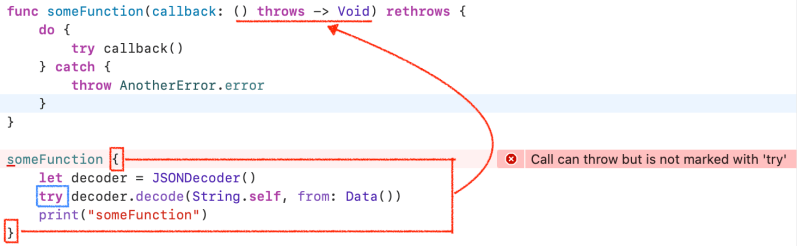
alwaysThrows function is not a function parameter. In a someFunction, only callback function parameter can throwing a error.
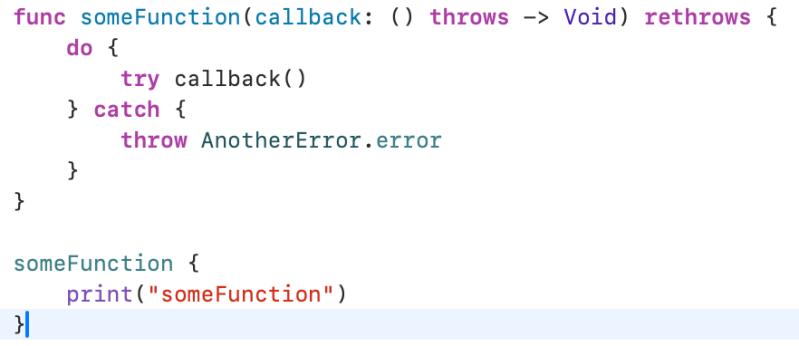
If you don’t use try in a closure, It’s okay not marking try at someFuntion.
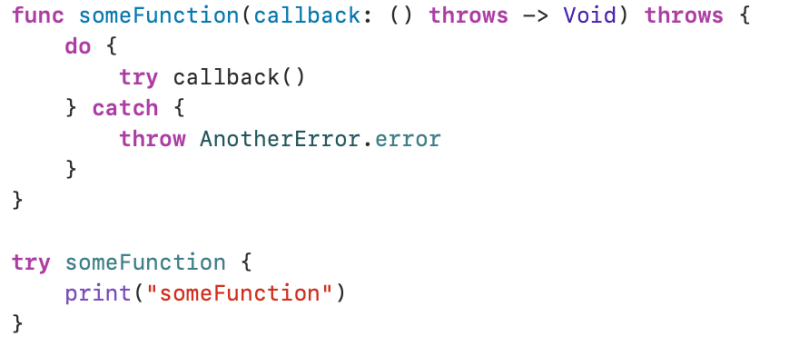
If I change rethrows to throws in the example above, what happens?
There is a compile error. Always use try keyword when you call a someFunction.
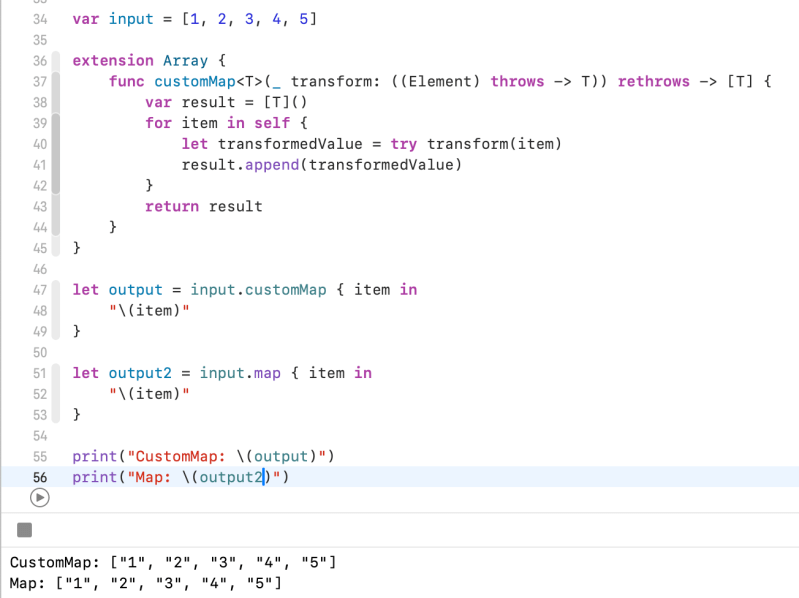
Let’s make a customMap using rethrows keyword.
Built-In map function uses rethrows keyword.
var input = [1, 2, 3, 4, 5]

extension Array {
    func customMap<T>(_ transform: ((Element) throws -> T)) rethrows -> [T] {
        var result = [T]()
        for item in self {
            let transformedValue = try transform(item)
            result.append(transformedValue)
        }
        return result
    }
}

let output = input.customMap { item in
    "\(item)"
}

let output2 = input.map { item in
    "\(item)"
}
map itself uses try keyword. Because It allows users to use try in a closure. It we are not using try keyword in a closure we can simply use it without try keyword.


You must be logged in to post a comment.