Blog

  • iOS, RunLoop

    iOS, RunLoop

    Some codes and contents are sourced from Apple’s official documentation. This post is for personal notes where I summarize the original contents to grasp the key concepts

    https://developer.apple.com/documentation/foundation/runloop

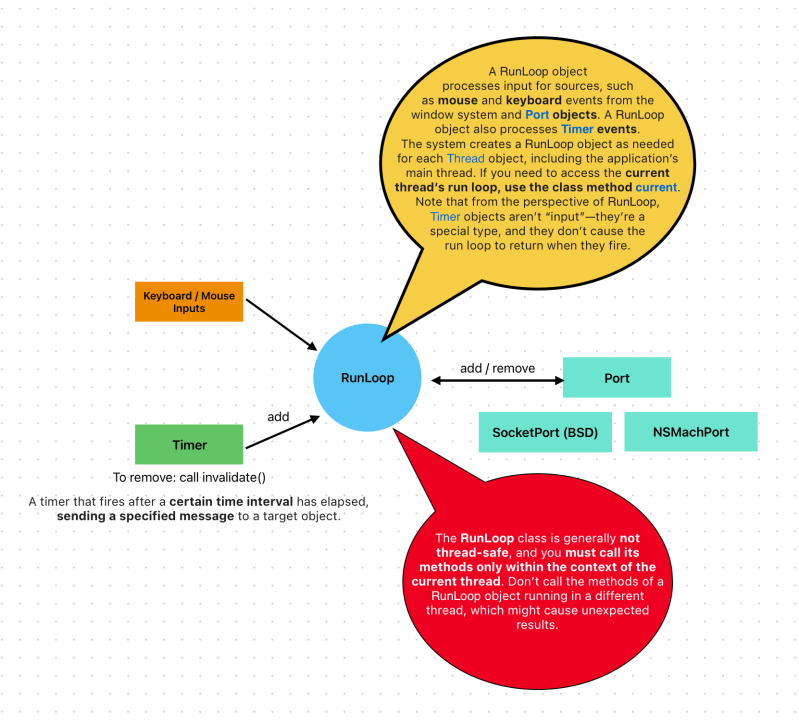
    Your code provides the control statements used to implement the actual loop portion of the run loop—in other words, your code provides the while or for loop that drives the run loop. Within your loop, you use a run loop object to “run” the event-processing code that receives events and calls the installed handlers.

    A run loop receives events from two different types of sources. Input sources deliver asynchronous events, usually messages from another thread or from a different application. Timer sources deliver synchronous events, occurring at a scheduled time or repeating interval. Both types of source use an application-specific handler routine to process the event when it arrives.

    Figure 3-1 shows the conceptual structure of a run loop and a variety of sources. The input sources deliver asynchronous events to the corresponding handlers and cause the runUntilDate: method (called on the thread’s associated NSRunLoop object) to exit. Timer sources deliver events to their handler routines but do not cause the run loop to exit.

    In addition to handling sources of input, run loops also generate notifications about the run loop’s behavior. Registered run-loop observers can receive these notifications and use them to do additional processing on the thread. You use Core Foundation to install run-loop observers on your threads.

    The following sections provide more information about the components of a run loop and the modes in which they operate. They also describe the notifications that are generated at different times during the handling of events.

    https://developer.apple.com/library/archive/documentation/Cocoa/Conceptual/Multithreading/RunLoopManagement/RunLoopManagement.html

    RunLoop.mode

    common

    When you add an object to a run loop using this mode, the runloop monitors the object when running in any of the common modes. For details about adding a runloop mode to the set of common modes,

    Apple

    default

    • for handling input sources

    perform a task

    RunLoop.current.perform {
        print("Hello RunLoop")
    }
    
    RunLoop.main.perform {
        print("Hellow?")
    }
    

    current

    • Returns the run loop for the current thread.

    main

    • Returns the run loop of the main thread.

    Add Timer to run a code at specific time

    class RunLoopTest {
        var timer: Timer!
        init() {
            let date = Date.now.addingTimeInterval(5)
            
            //After 5 secs from not, timer will fire an event, every 2 seconds It run a function
            timer = Timer(
                fireAt: date,
                interval: 2,
                target: self,
                selector: #selector(run),
                userInfo: ["time": date],
                repeats: true
            )
            RunLoop.main.add(timer, forMode: .common)
        }
        
        @objc func run() {
            print("Hellow? : \(timer.userInfo)")
        }
        
        func stop() {
            timer.invalidate()
        }
    }
    
    RunLoopTest()
    
    //Prints
    Hellow? : Optional({
        time = "2024-03-11 15:25:30 +0000";
    })
    Hellow? : Optional({
        time = "2024-03-11 15:25:30 +0000";
    })
    Hellow? : Optional({
        time = "2024-03-11 15:25:30 +0000";
    })


    Run a timer in a RunLoop while scrolling the table

    import UIKit
    
    class ViewController: UIViewController {
        var timer: Timer!
        var firedCount = 0
        
        lazy var tableView: UITableView = {
           let tableView = UITableView()
            tableView.dataSource = self
            tableView.register(UITableViewCell.self, forCellReuseIdentifier: "cell")
            return tableView
        }()
        
        lazy var items: [Int] = {
           var items = [Int]()
            for i in 0...1000 {
                items.append(i)
            }
            return items
        }()
        
        override func viewDidLoad() {
            super.viewDidLoad()
            timer = Timer(
                fireAt: Date.now.addingTimeInterval(5),
                interval: 0.2,
                target: self,
                selector: #selector(run),
                userInfo: nil,
                repeats: true
            )
            RunLoop.main.add(timer, forMode: .default)
            tableView.translatesAutoresizingMaskIntoConstraints = false
            view.addSubview(tableView)
            NSLayoutConstraint.activate([
                tableView.topAnchor.constraint(equalTo: view.topAnchor),
                tableView.leadingAnchor.constraint(equalTo: view.leadingAnchor),
                tableView.trailingAnchor.constraint(equalTo: view.trailingAnchor),
                tableView.bottomAnchor.constraint(equalTo: view.bottomAnchor)
            ])
        }
        
        @objc func run() {
            print("🔥 timer fired: \(firedCount)")
            firedCount += 1
        }
    }
    
    extension ViewController: UITableViewDataSource {
        func tableView(_ tableView: UITableView, numberOfRowsInSection section: Int) -> Int {
            items.count
        }
        
        func tableView(_ tableView: UITableView, cellForRowAt indexPath: IndexPath) -> UITableViewCell {
            let cell = tableView.dequeueReusableCell(withIdentifier: "cell", for: indexPath)
            cell.textLabel?.text = "\(items[indexPath.row])"
            return cell
        }
    }
    
    //Prints
    🔥 timer fired: 0
    
    🔥 timer fired: 1
    
    🔥 timer fired: 2
    
    🔥 timer fired: 3
    🔥 timer fired: 4
    🔥 timer fired: 5
    🔥 timer fired: 6


    Example 1. RunLoop Mode is defaults

    Above the code, timer starts after 5 secs. And I scrolling the table for 20 secs.

    Example 2. Changed RunLoop Mode to common

    Now I understand what RunLoop mode is…

    When you use default mode, timer might not fired if user touching the screens. defaults mode handles Input source.

  • Swift, Sorting and Binary Search Algorithm

    Swift, Sorting and Binary Search Algorithm

    Useful Foundation APIs

    swapAt

    • swap the value in an array by passing the index

    Bubble Sort

    func bubbleSort(input: inout [Int]) {
        for i in 0..<input.count {
            for j in 1..<input.count {
                if input[j] < input[j - 1] {
                    input.swapAt(j, j-1)
                }
            }
        }
    }
    
    var input = [4, 5, 2, 1, 6, 8, 9, 12, 13]
    bubbleSort(input: &input)
    

    Every steps compares 2 values and swapped it

    Red = Sorted Item

    Time complexity is O(n^2)

    Space complexity is O(1)

    Insertion Sort

    Apple Foundation uses TimSort (InsertionSort + MergeSort)

    Insertion Sort is another O(N^2) quadratic running time algorithm

    On large datasets it is very inefficient – but on arrays with 10-20 items it is quite good. (Apple uses TimSort, It items is less than 64 then use Insertion Sort. -> https://github.com/apple/swift/blob/387580c995fc9844d4f268723bd55e22440b1a3d/stdlib/public/core/Sort.swift#L462)

    A huge advantage is that it is easy to implement

    It is more efficient than other quadratic running time sorting procedures such as bubble sort or selection sort

    It is an adaptive algorithm – It speeds up when array is already substantially sorted

    It is stable so preserves the order of the items with equal keys

    Insertion sort is an in-place algorithm – does not need any additional memory

    It is an online algorithm – It can sort an array as it receives the items for example downloading data from web

    Hybrid algorithms uses insertion sort if the subarray is small enough: Insertion sort is faster for small subarrays than quicksort

    Variant of insertion sort is shell sort

    Sometimes selection sort is better: they are very similar algorithms

    Insertion sort requires more writes because the inner loop can require shifting large sections of the sorted portion of the array

    In general insertion sort will write to the array O(N^2) times while selection sort will write only O(N) times

    For this reason selection sort may be preferable in cases where writing to memory is significantly more expensive than reading (such as with flash memory)

    https://www.udemy.com/course/algorithms-and-data-structures-in-java-part-ii/learn/lecture/4901832#questions

    func insertSort(_ input: inout [Int]) {
        var i = 1
        for i in 1..<input.count {
            var j = i
            while j-1 >= 0, input[j] < input[j-1] {
                input.swapAt(j, j-1)
                j-=1
            }
        }
    }
    var input = [-9, 4, -9, 5, 8, 12]
    insertSort(&input)
    print(input)
    
    
    var input2 = [-9, 4, -9, 5, 8, 12, -249, 241, 4, 2, 12, 24140, 539, 3, 0, -2314]
    insertSort(&input2)
    print(input2)
    

    Merge Sort

    Divide and Conquer

    Break down into small subproblem, Use recursion.

    It needs two functions

    • split – divide into two array
    • merge – merging two array into the sorted array
    func mergeSort(input: inout [Int]) {
        //Base case
        if input.count == 1 {
            return
        }
        let midIndex = input.count / 2
        var left = Array(repeating: 0, count: midIndex)
        var right = Array(repeating: 0, count: input.count - midIndex)
        
        //Split into 2 sub array (create sub problems)
        split(input: &input, left: &left, right: &right)
        
        //Recursive - Divide and Conquer
        mergeSort(input: &left)
        mergeSort(input: &right)
        
        //Merge all together
        merge(input: &input, left: &left, right: &right)
    }
    
    func split(input: inout [Int], left: inout [Int], right: inout [Int]) {
        let leftCount = left.count
        for (index, item) in input.enumerated() {
            if index < leftCount {
                left[index] = item
            }
            else {
                right[index - leftCount] = item
            }
        }
    }
    
    func merge(input: inout [Int], left: inout [Int], right: inout [Int]) {
        var mergeIndex = 0
        var leftIndex = 0
        var rightIndex = 0
        
        while (leftIndex < left.count && rightIndex < right.count) {
            if left[leftIndex] < right[rightIndex] {
                input[mergeIndex] = left[leftIndex]
                leftIndex += 1
            }
            else if rightIndex < right.count {
                input[mergeIndex] = right[rightIndex]
                rightIndex += 1
            }
            mergeIndex += 1
        }
        if leftIndex < left.count {
            while mergeIndex < input.count {
                input[mergeIndex] = left[leftIndex]
                mergeIndex += 1
                leftIndex += 1
            }
        }
        if rightIndex < right.count {
            while mergeIndex < input.count {
                input[mergeIndex] = right[rightIndex]
                mergeIndex += 1
                rightIndex += 1
            }
        }
    }
    

    Split Function

    Calculate midIndex

    Split them into two subarray

    Time complexity: O(nlogn)

    Space complexity: O(n)

    • Because It needs a copy values when merging two array into the one sorted array

    Quick Sort

    func partition(_ input: inout [Int], low: Int, high: Int) -> Int {
        let pivot = input[low]
        var l = low
        var h = high
        while l < h {
            while (input[l] <= pivot && l < h) {
                l += 1
            }
            while (input[h] > pivot) {
                h -= 1
            }
            if l < h {
                input.swapAt(l, h)
            }
        }
        //Put pivot to the right position
        input.swapAt(low, h)
        return h
    }
    
    func quickSort(_ input: inout [Int], low: Int, high: Int) {
        //base
        if low >= high {
            return
        }
        //pivot
        let pivot = partition(&input, low: low, high: high)
        
        //left
        quickSort(&input, low: low, high: pivot - 1)
    
        //right
        quickSort(&input, low: pivot + 1, high: high)
    }
    
    var input = [2, 3, 1, 4, 9]
    quickSort(&input, low: 0, high: input.count - 1)
    print(input)
    

    Quick Sort is also Divide and Conquer.

    Time Complexity

    • Average Time Complexity is O(nlogn)

    Space Complexity

    • O(logn) -> Extra space for the call stack in the recursive call
    • O(n) -> worst case

    Binary Search

    Search a sorted list!

    //Binary Search
    func findIndex(array: [Int], value: Int) -> Int {
        var min = 0
        var max = array.count - 1
        
        while min <= max {
            let mid = min + (max - min) / 2
            
            if value == array[mid] {
                return mid
            }
            //search right side
            if value > array[mid] {
                min = mid - 1
            }
            //search left side
            else {
                max = mid + 1
            }
        }
        return -1
    }
    
    let sortedArray = Array(0...100)
    findIndex(array: sortedArray, value: 49)
    findIndex(array: sortedArray, value: 78)
    findIndex(array: sortedArray, value: 22)
    findIndex(array: sortedArray, value: 89)
    
  • Swift, DispatchQueue

    Swift, DispatchQueue

    ✍️ Note

    All the codes and contents are sourced from Apple’s official documentation. This post is for personal notes where I summarize the original contents to grasp the key concepts

    Apple documents

    DispatchQueue

    QoS (Quality of Service)

    • UserInteractive
      • Animations, event handling, or updates to your app’s user interface.
      • User-interactive tasks have the highest priority on the system. Use this class for tasks or queues that interact with the user or actively update your app’s user interface. For example, use this class for animations or for tracking events interactively.
    • UserInitiated
      • Prevent the user from actively using your app
      • User-initiated tasks are second only to user-interactive tasks in their priority on the system. Assign this class to tasks that provide immediate results for something the user is doing, or that would prevent the user from using your app. For example, you might use this quality-of-service class to load the content of an email that you want to display to the user.
    • Default
      • Default tasks have a lower priority than user-initiated and user-interactive tasks, but a higher priority than utility and background tasks. Assign this class to tasks or queues that your app initiates or uses to perform active work on the user’s behalf.
    • Utility
      • Utility tasks have a lower priority than default, user-initiated, and user-interactive tasks, but a higher priority than background tasks. Assign this quality-of-service class to tasks that do not prevent the user from continuing to use your app. For example, you might assign this class to long-running tasks whose progress the user does not follow actively.
    • Background
      • Background tasks have the lowest priority of all tasks. Assign this class to tasks or dispatch queues that you use to perform work while your app is running in the background.

    let concurrentQueue = DispatchQueue(label: "concurrent", qos: .userInitiated, attributes: 
    .concurrent)
    let serialQueue = DispatchQueue(label: "serial", qos: . userInitiated)
    

    Example 1. Perform async tasks on serialQueue

    for i in 0...3 {
      serialQueue.async {
        print("serial task(\(i)) start")
        sleep(1)
        print("serial task(\(i)) end")
      }
    }
    
    //prints
    serial task(0) start
    serial task(0) end
    
    serial task(1) start
    serial task(1) end
    
    serial task(2) start
    serial task(2) end
    
    serial task(3) start
    serial task(3) end
    

    It’s make sense because serialQueue can run a one task at a time.

    Example 2. Perform sync tasks on serialQueue

    for i in 0...3 {
      serialQueue.sync {
        print("serial task(\(i)) start")
        sleep(1)
        print("serial task(\(i)) end")
      }
    }
    
    //prints
    serial task(0) start
    serial task(0) end
    
    serial task(1) start
    serial task(1) end
    
    serial task(2) start
    serial task(2) end
    
    serial task(3) start
    serial task(3) end
    

    Results are the same as example 1

    Submits a work item for execution on the current queue and returns after that block finishes executing.

    https://developer.apple.com/documentation/dispatch/dispatchqueue/2016083-sync

    Example 3. Perform a sync task on the concurrentQueue

    for i in 0...3 {
      concurrentQueue.sync {
        print("concurrent task(\(i)) start")
        sleep(1)
        print("concurrent task(\(i)) end")
      }
    }
    
    //Prints
    concurrent task(0) start
    concurrent task(0) end
    
    concurrent task(1) start
    concurrent task(1) end
    
    concurrent task(2) start
    concurrent task(2) end
    
    concurrent task(3) start
    concurrent task(3) end
    

    Example 4. Perform a async task on the concurrentQueue

    for i in 0...3 {
      concurrentQueue.async {
        print("concurrent task(\(i)) start")
        sleep(1)
        print("concurrent task(\(i)) end")
      }
    }
    
    //Prints
    concurrent task(0) start
    concurrent task(3) start
    concurrent task(1) start
    concurrent task(2) start
    
    concurrent task(0) end
    concurrent task(1) end
    concurrent task(3) end
    concurrent task(2) end
    

    Schedules a work item for immediate execution, and returns immediately.

    https://developer.apple.com/documentation/dispatch/dispatchqueue/2016103-async

    It immediate execution and returns immediately.

    Example 5. Perform async task on the concurrentQueue and sync task on the serialQueue

    for i in 0...3 {
      concurrentQueue.async {
        print("concurrent task(\(i)) start")
        sleep(1)
        print("concurrent task(\(i)) end")
      }
                
      serialQueue.sync {
        print("serial task(\(i)) start")
        sleep(1)
        print("serial task(\(i)) end")
      }
    }
    
    //Prints
    concurrent task(0) start
    serial task(0) start
    serial task(0) end
    serial task(1) start
    concurrent task(1) start
    concurrent task(0) end
    concurrent task(1) end
    serial task(1) end
    serial task(2) start
    concurrent task(2) start
    serial task(2) end
    serial task(3) start
    concurrent task(3) start
    concurrent task(2) end
    serial task(3) end
    concurrent task(3) end
    

    Example 6. Run async tasks on the concurrentQueue and serialQueue

    for i in 0...3 {
       concurrentQueue.async {
         print("concurrent task(\(i)) start")
         sleep(1)
         print("concurrent task(\(i)) end")
       }
    
       serialQueue.async {
         print("serial task(\(i)) start")
         sleep(1)
         print("serial task(\(i)) end")
       }
    }
    
    //Prints
    concurrent task(0) start
    concurrent task(2) start
    concurrent task(3) start
    serial task(0) start
    concurrent task(1) start
    concurrent task(3) end
    concurrent task(0) end
    concurrent task(2) end
    serial task(0) end
    concurrent task(1) end
    serial task(1) start
    serial task(1) end
    serial task(2) start
    serial task(2) end
    serial task(3) start
    serial task(3) end
    

    As you can see a SerialQueue run a task and returned when task has finished either perform it on sync or async.

    What about dispatchQueue.main.async?

    for i in 0...3 {
      DispatchQueue.main.async {
        print("main task(\(i)) start")
        sleep(1)
        print("main task(\(i)) end")
      }
    }
    
    //Prints
    main task(0) start
    main task(0) end
    
    main task(1) start
    main task(1) end
    
    main task(2) start
    main task(2) end
    
    main task(3) start
    main task(3) end
    

    The dispatch queue associated with the main thread of the current process.

    The system automatically creates the main queue and associates it with your application’s main thread. Your app uses one (and only one) of the following three approaches to execute blocks submitted to the main queue:

    As with the global concurrent queues, calls to suspend()resume()dispatch_set_context(_:_:), and the like have no effect when used on the queue in this property.

    https://developer.apple.com/documentation/dispatch/dispatchqueue/1781006-main

    As the results, It is not returns immediately like a concurrent queue. Because It’s a serial queue. You can check it on Xcode.

    What about dispatchQueue.global().async?

    for i in 0...3 {
      DispatchQueue.global().async {
        print("global task(\(i)) start")
        sleep(1)
        print("global task(\(i)) end")
      }
    }
    
    //Prints
    global task(3) start
    global task(2) start
    global task(0) start
    global task(1) start
    
    global task(1) end
    global task(0) end
    global task(3) end
    global task(2) end
    

    This method returns a queue suitable for executing tasks with the specified quality-of-service level. Calls to the suspend()resume(), and dispatch_set_context(_:_:) functions have no effect on the returned queues.

    Tasks submitted to the returned queue are scheduled concurrently with respect to one another

    https://developer.apple.com/documentation/dispatch/dispatchqueue/2300077-global

    🤯 When function is returned?

    It’s a good example for understanding sync vs async.

    Before look at the example, let’s remind

    Dispatch queues are FIFO queues to which your application can submit tasks in the form of block objects. Dispatch queues execute tasks either serially or concurrently. Work submitted to dispatch queues executes on a pool of threads managed by the system. Except for the dispatch queue representing your app’s main thread, the system makes no guarantees about which thread it uses to execute a task.

    You schedule work items synchronously or asynchronously. When you schedule a work item synchronously, your code waits until that item finishes execution. When you schedule a work item asynchronously, your code continues executing while the work item runs elsewhere.

    https://developer.apple.com/documentation/dispatch/dispatchqueue

    ConcurrentQueue with sync

    runWorkItem function is returned when after finishing the sync task.

    ConcurrentQueue with async

    runWorkItem function returned and then async task starts

    SerialQueue with async

    DispatchQueue.main.async

    Custom Serial DispatchQueue

    SerialQueue with sync but what if a submitted task is delayed?

    Keep in mind

    Work submitted to dispatch queues executes on a pool of threads managed by the system. Except for the dispatch queue representing your app’s main thread, the system makes no guarantees about which thread it uses to execute a task.

    https://developer.apple.com/documentation/dispatch/dispatchqueue

    sync -> block will run and returned when task finished

    async -> block will immediately returned when task started

    syncasyncwhen function returned?
    SerialQeueuewait until task finishedwait until task finishedeither sync or async it returned when after task finished
    ConcurrentQueuewait until task finishedimmediately return when task startedsync: it returned after task finished
    async: it returned before task finished
  • Swift, ARC Automatic Reference Counting

    Swift, ARC Automatic Reference Counting

    ✍️ Note

    All the codes and contents are sourced from Apple’s official documentation. This post is for personal notes where I summarize the original contents to grasp the key concepts

    Apple document

    class Person {
        let name: String
        init(name: String) {
            self.name = name
            print("\(name) is being initialized")
        }
        deinit {
            print("\(name) is being deinitialized")
        }
    }
    

    Check Strong Reference Count

    Example 1

    var person = Person(name: "Shawn") //1
    CFGetRetainCount(person) //2
    

    Example 2

    CFGetRetainCount(Person(name: "Shawn") //1
    

    Example 3

    var person = Person(name: "Shawn") //2
    var person2 = person //3
    var person3 = person //4
    
    CFGetRetainCount(person) //4
    

    As you can see when you initiate an object, the retain count is 1. And when you assign it, retain count will be counting up.

    Strong Reference Cycle between classes

    class Person {
        let name: String
        init(name: String) { self.name = name }
        var apartment: Apartment?
        deinit { print("\(name) is being deinitialized") }
    }
    
    
    class Apartment {
        let unit: String
        init(unit: String) { self.unit = unit }
        var tenant: Person?
        deinit { print("Apartment \(unit) is being deinitialized") }
    }
    

    Example 1

    var person = Person(name: "Shawn")
    var apt = Apartment(unit: "3")
    
    CFGetRetainCount(person) //2
    CFGetRetainCount(apt) //2
    

    Example 2 (🔥 Strong Reference Cycle)

    var person = Person(name: "Shawn")
    var apt = Apartment(unit: "3")
    
    person.apartment = apt
    apt.tenant = person
    
    CFGetRetainCount(person) //3 (apt.tenant -> count up)
    CFGetRetainCount(apt) //3 (person.apartment -> count up)


    ✅ Solution -> weak / unowned

    What is weak reference and when to use it?

    Use a weak reference when the other instance has a shorter lifetime — that is, when the other instance can be deallocated first.

    Apple – https://docs.swift.org/swift-book/documentation/the-swift-programming-language/automaticreferencecounting

    ARC automatically sets a weak reference to nil when the instance that it refers to is deallocated. And, because weak references need to allow their value to be changed to nil at runtime, they’re always declared as variables, rather than constants, of an optional type.

    class Person {
        let name: String
        init(name: String) { self.name = name }
        var apartment: Apartment?
        deinit { print("\(name) is being deinitialized") }
    }
    
    
    class Apartment {
        let unit: String
        init(unit: String) { self.unit = unit }
        weak var tenant: Person?
        deinit { print("Apartment \(unit) is being deinitialized") }
    }
    

    What is unowned reference and when to use it?

    In contrast, use an unowned reference when the other instance has the same lifetime or a longer lifetime. Unlike a weak reference, an unowned reference is expected to always have a value. As a result, marking a value as unowned doesn’t make it optional, and ARC never sets an unowned reference’s value to nil.

    Important

    Use an unowned reference only when you are sure that the reference always refers to an instance that hasn’t been deallocated.

    If you try to access the value of an unowned reference after that instance has been deallocated, you’ll get a runtime error.

    Apple – https://docs.swift.org/swift-book/documentation/the-swift-programming-language/automaticreferencecounting
    class Customer {
        let name: String
        var card: CreditCard?
        init(name: String) {
            self.name = name
        }
        deinit { print("\(name) is being deinitialized") }
    }
    
    
    class CreditCard {
        let number: UInt64
        unowned let customer: Customer
        init(number: UInt64, customer: Customer) {
            self.number = number
            self.customer = customer
        }
        deinit { print("Card #\(number) is being deinitialized") }
    }
    

    Example 1

    var customer: Customer! = Customer(name: "Shawn")
    customer.card = CreditCard(number: 7788_9999_1223_1225, customer: customer)
    
    CFGetRetainCount(customer) //2 (because CreditCard's customer is defined as unowned let)
    
    customer = nil
    
    //Shawn is being deinitialized
    //Card #7788999912231225 is being deinitialized 
    

    unowned(unsafe)

    Swift also provides unsafe unowned references for cases where you need to disable runtime safety checks — for example, for performance reasons. As with all unsafe operations, you take on the responsibility for checking that code for safety. You indicate an unsafe unowned reference by writing unowned(unsafe). If you try to access an unsafe unowned reference after the instance that it refers to is deallocated, your program will try to access the memory location where the instance used to be, which is an unsafe operation.

    https://docs.swift.org/swift-book/documentation/the-swift-programming-language/automaticreferencecounting

    When you access the unowned(unsafe), It try to access the memory location where the instance used to be

    when use unowned, error type is different.

    Unowned Optional References

    You can mark an optional reference to a class as unowned. In terms of the ARC ownership model, an unowned optional reference and a weak reference can both be used in the same contexts. The difference is that when you use an unowned optional reference, you’re responsible for making sure it always refers to a valid object or is set to nil.

    https://docs.swift.org/swift-book/documentation/the-swift-programming-language/automaticreferencecounting
    class Department {
        var name: String
        var courses: [Course]
        init(name: String) {
            self.name = name
            self.courses = []
        }
    }
    
    
    class Course {
        var name: String
        unowned var department: Department
        unowned var nextCourse: Course?
        init(name: String, in department: Department) {
            self.name = name
            self.department = department
            self.nextCourse = nil
        }
    }
    

    Example

    var department: Department! = Department(name: "Horticulture")
    
    let intro = Course(name: "Survey of Plants", in: department)
    var intermediate: Course! = Course(name: "Growing Common Herbs", in: department)
    var advanced: Course = Course(name: "Caring for Tropical Plants", in: department)
    
    intro.nextCourse = intermediate
    intermediate.nextCourse = advanced
    department.courses = [intro, intermediate, advanced]
    
    //Deinit department and intermediate
    department = nil
    intermediate = nil
    
    //Try to access nextCourse
    intro.nextCourse //SIGABRT Error
    

    Unlike weak, when you try to access the deallocated object, It causes a crash issue. Even you set it as unowned optionals.

    Unowned References and Implicitly Unwrapped Optional Properties

    class Country {
        let name: String
        var capitalCity: City! //Unwrapped Optional Properties
        init(name: String, capitalName: String) {
            self.name = name
            //At this point, Country already initiated. So can pass self to City initializer
            self.capitalCity = City(name: capitalName, country: self)
        }
    }
    
    
    class City {
        let name: String
        unowned let country: Country //Unowned References
        init(name: String, country: Country) {
            self.name = name
            self.country = country
        }
    }
    

    var capitalCity: City!

    • It’s initial value is nil

    Above the example is Two-Phased initialization

    🤔 Strong Reference Cycles for Closures

    It’s such an important topic.

    A strong reference cycle can also occur if you assign a closure to a property of a class instance, and the body of that closure captures the instance. This capture might occur because the closure’s body accesses a property of the instance, such as self.someProperty, or because the closure calls a method on the instance, such as self.someMethod(). In either case, these accesses cause the closure to “capture” self, creating a strong reference cycle.

    This strong reference cycle occurs because closures, like classes, are reference types. When you assign a closure to a property, you are assigning a reference to that closure. In essence, it’s the same problem as above — two strong references are keeping each other alive. However, rather than two class instances, this time it’s a class instance and a closure that are keeping each other alive.

    Swift provides an elegant solution to this problem, known as a closure capture list

    https://docs.swift.org/swift-book/documentation/the-swift-programming-language/automaticreferencecounting
    class HTMLElement {
        let name: String
        let text: String?
    
        lazy var asHTML: () -> String = {
            if let text = self.text {
                return "<\(self.name)>\(text)</\(self.name)>"
            } else {
                return "<\(self.name) />"
            }
        }
    
        init(name: String, text: String? = nil) {
            self.name = name
            self.text = text
        }
    
        deinit {
            print("\(name) is being deinitialized")
        }
    }
    
    var paragraph: HTMLElement? = HTMLElement(name: "p", text: "hello, world")
    print(paragraph!.asHTML())
    
    //Deallocate HTMLElement
    paragraph = nil // Can't deallocate it because the reference cycle between property (asHTML) and closure's capture list
    

    Even though the closure refers to self multiple times (self.text and self.name), it only captures one strong reference to the HTMLElement instance.

    Apple

    Resolving Strong Reference Cycles for Closures

    Use weak or unowned at capture lists

    Defining a capture list

    Each item in a capture list is a pairing of the weak or unowned keyword with a reference to a class instance (such as self) or a variable initialized with some value (such as delegate = self.delegate). These pairings are written within a pair of square braces, separated by commas.

    Place the capture list before a closure’s parameter list and return type if they’re provided:

    Apple
    lazy var someClosure = {
            [unowned self, weak delegate = self.delegate]
            (index: Int, stringToProcess: String) -> String in
        // closure body goes here
    }
    
    
    lazy var someClosure2 = {
            [unowned self, weak delegate = self.delegate] in
        // closure body goes here
    }
    

    🔥 Think it again, weak vs unowned in Closures

    Define a capture in a closure as an unowned reference when the closure and the instance it captures will always refer to each other, and will always be deallocated at the same time.

    Conversely, define a capture as a weak reference when the captured reference may become nil at some point in the future. Weak references are always of an optional type, and automatically become nil when the instance they reference is deallocated. This enables you to check for their existence within the closure’s body.

    Apple
    class HTMLElement {
        let name: String
        let text: String?
        //Use unowned self to break reference cycle
        lazy var asHTML: () -> String = {
                [unowned self] in
            if let text = self.text {
                return "<\(self.name)>\(text)</\(self.name)>"
            } else {
                return "<\(self.name) />"
            }
        }
    
        init(name: String, text: String? = nil) {
            self.name = name
            self.text = text
        }
    
        deinit {
            print("\(name) is being deinitialized")
        }
    }
    

    Capture value from nested Closure

    class Test {}
    DispatchQueue.global().async {
      let test = Test()
       print("closure A: Start retain count is: \(CFGetRetainCount(test))")
       DispatchQueue.global().async {
         print("nested closure B retainCount: \(CFGetRetainCount(test))")
       }
       print("closure A: End")
    }
    
    //Prints
    closure A: Start retain count is: 2
    closure A: End
    nested closure B retainCount: 3
    

    As you can see nested closure also counting up ARC.

    But… what about this example?

    test object was already deallocated. And when you trying to access test, It should not be nil because It’s unowned.

    Conclusion

    Understanding How ARC works is very important to avoid memory leaks and crash issues. It’s also good to know what happens when objects are deallocated and How ARC handles those objects.

  • Leetcode official iOS app – How can I change Chinese language to English

    Leetcode official iOS app – How can I change Chinese language to English

    Download Leetcode official app

    Did you know leetcode has an official iOS app? You can download it.

    But there is one problem. They are not fully support English.

    Good news is we can change Leetcode problem descriptions to English. It’s enough to solve problem!

    Step 1. Change Settings

    The seconds option meaning Question Language. Let’s change it to English.

    Check your setting (blue circle)

    Step 2. Go to the second tab (Question bank)

    You can see some Chinese characters are changed to English (Blue circle)

    As you can see all the questions are English. Let’s enjoy problem solving!

  • 20년 넘은 스케이트보드 수리하기

    20년 넘은 스케이트보드 수리하기

    스케이트보드 부품은 크게 데크, 트럭, 휠, 베어링이다.

    20년 넘은 소중한 보드 수리과정을 공개한다

    트럭 수리하기

    트럭 상태가 정말 최악이었다. 볼트는 다 상했고 실린더(쿠션)도 작살난 상태였다.

    녹 제거도 필수.. WD40을 휴지에 적셔서 딱아냈다. (WD40은 절대로 베어링에는 뿌리지 말자, 난 트럭의 녹 제거에만 사용했다)

    보드샵에가서 인디팬던트 실린더랑 교체해야 될 부품을 사왔다. (내 트럭은 아주 오래된 스탠다드 제품의 트럭이지만 이격없이 잘 맞았다)

    작살난 검은색 부품도 새로 교체했다.

    문제가 생겼다. 휠을 연결하는 부분이 마모가 되서 너트가 돌아가지 않았다. 이런 경우 위와 같이 생긴 툴을 이용해서 마모가 된 부분에 너트가 잘 조여지도록 갈아야 한다. 툴을 구매할 때 반드시 가운데 모양이 저렇게 생긴 제품을 사는 것을 추천한다.

    오케이! 이제 너트가 잘 조여졌다. 휠 고정 완료!

    실린더(노란색) 교체했고 킹핀을 고정시키는 너트도 새걸로 교체했다.

    베어링 교체하기

    의외로 제일 간단하다. 트럭을 이용해서 기존에 있는 베어링을 쉽게 제거할 수 있다.

    뭔가 설명하기 좀 어려운데 일단 휠을 고정하고 있는 너트를 트럭에서 제거한다. 그리고 휠을 다시 살짝 트럭의 볼트 조이는 곳에 걸친다음에 꺽어서 베어링을 제거하면 된다.

    가성비 최고인 Spitfire 베어링으로 교체 완료

    데크 수리하기

    시행착오를 많이 겪었다. 일단 상태에 따라서 판단하고 제품을 구매하면 된다.

    먼저 그립 테이프를 벗기자.

    헤어드라이기로 열을 가하면서 잘 떼어내자. 진득진듯한 것이 만약 데크에 남는다면 일이 엄청 복잡해진다. 뗄때 잘 떼는게 정말 중요하다.

    자 다음으로..

    손상된 데크 수리하기

    1. 우드 글루

    데크의 나무 겹겹이 벌어진 곳이 있다

    데크의 일 부분이 깨졌고 깨진 조각을 갖고 있다

    위의 경우에 해당하면 우드 글루가 필요하다. 그리고 클램프로 고정시켜서 단단하게 부착 시켜야 된다.

    내가 실수한 부분. 사실 나의 데크는 우드 글루를 저렇게 많이 바를 필요가 없었다. 중간 중간 벌어진 곳이나 틈새 정도에만 발라도 충분했다.

    2. 우드 필러

    데크의 상태를 보면 깨지고 파인 부분들이 많이 보인다. 이런 경우 우드 필러를 이용해서 메꿀수가 있다.

    우드필러로 떡칠을 했다. 저 상태로 2-3일 냅두자. 완전히 굳을 때까지..

    80이나 120이라고 적힌 사포(샌드 페이퍼)로 잘 갈아주자. 맨들 맨들 해질때까지 고르게 문지르면 위의 사진 처럼 된다.

    오케이! 이제 그립 테이프를 붙일 준비가 되었다.

    이 단계가 제일 쉽다. 끝에서 부터 천천히 눌러가면서 붙이자.

    다 부착했으면 툴이나 드라이버를 이용해서 저렇게 보드 외곽을 문질러주면 잘라내야 될 선이 선명하게 표시된다.

    표시된 선을 따라 칼로 잘라내면 된다.

  • Do you require a server for your iOS app? CloudKit might be the perfect fit for you!

    Do you require a server for your iOS app? CloudKit might be the perfect fit for you!

    Choosing a server can be challenging, especially if you’re not a backend engineer but still need one for your iOS app. You may find yourself in this situation.

    So, Why did I consider CloudKit?

    Well, first off, it’s maintained by Apple and has been around since its introduction at the 2014 WWDC.

    Apple actively uses it for various apps like Photos and Notes, which gives me confidence in its longevity and reliability. Plus, I expect it to receive regular updates from Apple.

    My experience

    Parse.com

    I used Parse (Acquired by Facebook) and contributed to the Parse iOS SDK. I liked it, but Facebook announced its discontinuation.

    Consequently, I had to migrate to alternatives like back4app or Sashido.io, which serve as alternatives to parse.com. While they were good, I encountered issues with the lack of active updates to the iOS SDK. This led me to contribute to its development, but I felt it was a waste of time. I wanted to focus on my app rather than on open-source projects.

    Vapor

    I like Vapor because I can create a server using Swift, which is a significant benefit as an iOS Engineer. Additionally, there are numerous helpful resources available, such as books, YouTube videos, and Udemy courses.

    But why did I consider CloudKit?

    Unlike CloudKit, I would need to implement server logic from scratch, including authentication, deployment, database setup, migration, and data sharing between users.

    My approach

    Context

    • I’ve already implemented a server using Vapor to handle authentication. While working on sharing data between users, I researched an easy way to implement the invite/accept feature and found that CloudKit fully supports it.

    The server I implemented using Vapor is deployed on AWS, using ECS with a Load Balancer. Its primary role is handling SignIn/SignUp and supporting user-related features such as changing passwords and usernames. All user information is saved in PostgreSQL.

    For data synchronization across user devices, I utilize NSPersistentCloudKitContainer, which syncs data between CoreData and CloudKit seamlessly. This integration is very convenient and eliminates the need for manual synchronization logic.

    CloudKit also supports invite and accept functionality for sharing data between users, eliminating the need to implement server-side logic for this feature.

    Be aware of CloudKit topics

    Now, returning to Vapor,

    I can access and edit CloudKit’s data using CloudKit Web Service. NSPersistentCloudKitContainer use a special zone called com.apple.coredata.cloudkit.zone. If you’re interested how to access it using CloudKit Web Service, you can check out Reading CloudKit Records for Core Data.

    Public Data

    As for public data storage, I haven’t decided yet where to store it. I’ll update you once I make a decision.

    How about CloudKit costs?

    Currently, the pricing seems like a black box. I can’t find pricing information on the Apple Developer website. That’s why I can’t decide where I should store public data.

    If you want to know AWS costs, see my previous post.

    I captured pricing information by accessing the archived website.

    Overage Fees

    Asset Storage$0.03/GB
    Database Storage$3.00/GB
    Data Transfer$0.10/GB
    Requests per sec$100 per 10 requests
  • 리얼포스 키보드 키캡 분리 및 청소

    리얼포스 키보드 키캡 분리 및 청소

    오랜만에 키보드를 청소했다

    키캡 분리기로 모든 키를 제거하고 키보드 상판을 칫솔로 청소해줬다

    얼핏 보면 깨끗해보이지만 상판에 전에 없었던 약간의 녹을 발견했다.

    검색해보니 리얼포스의 고질적인 문제였다고 한다. 음 키보드에 뭘 흘린적이 한번도 없는데도 녹이 생긴걸 보니 습한 지역에서는 발생할 수도 있겠구나 싶다.

    녹이 발생한 부분 😢

    그래도 사용하는데는 전혀 지장없으니 괜찮다. 최대한 오래 사용할 수 있으면 좋겠다.

    참고로 녹이 생겼다고해서 절대로 wd40을 사용하면 안된다. 혹시나 녹을 제거하겠다고 키보드에 뿌리거나 사용라면 키보드 버려야 된다

    암튼 이상으로 간단한 키보드 청소 후기를 마친다

  • 싱가포르 외벌이 한달 고정 지출 비용 (2인 기준)

    싱가포르 외벌이 한달 고정 지출 비용 (2인 기준)

    싱가포르로 이주하기 전에 내가 개인적으로 궁금했던 정보이다. 혹여나 싱가포르 이직을 고려하고 있는 외벌이 분들에게 도움 되길 바란다. 자..싱가포르에서 한달 생활하는 데 고정으로 나가는 비용이 얼마정도인지 정리해봤다.

    (도움이 되었다면 좋아요 혹은 팔로우가 지속적으로 블로그를 운영하는 데 큰 힘이 됩니다)

    월세

    일단 현재 외곽지역에 살고있다. 일단 재택근무가 1주일에 3일정도 가능한 회사라서 외곽도 괜찮다. 준공년도 2019년으로 비교적 신축 콘도이고 세대수도 한 1400세대 정도인데 2 베드룸 (678 sqft) 기준으로 3200 SGD이다. 콘도 관리비는 집주인이 부담하기 때문에 신경쓰지 않아도 된다.

    인터넷

    ViewQwest 업체를 사용하고 있다. 라우터 없는 요금제로 1G에 월 39.72 SGD

    세금

    정부에서 세금 계산기 엑셀 파일을 공개했다. 여기서 다운로드 받자.

    빨간 박스에 본인 연봉을 입력하자. 그러면 하단 NET TAX PAYABLE 에 본인이 내야 될 세금이 나온다. 참고로 싱가포르는 세금을 일시불로 낼 수도 있고 12개월 무이자로 분납할 수도 있다.

    수도, 가스, 전기요금

    이 부분이 정말 집집마다 천차만별이다. 참고로 내가 사는 지역은 생각보다 시원하다. 고층에 살고 있는데 창문 열어놓고 선풍기만 틀고 산다. 에어컨을 하루에 1시간도 안틀고 살고 있고 그래도 덥지 않다. 다만 샤워는 꽤 자주 하는 편이고 하루에 한 3번 정도? 가스는 요리할 때나 온수틀 때 주로 사용하고 집에서 요리는 그래도 자주 하는 편이다.

    싱가포르에서는 SP라는 앱을 통해서 수도, 가스, 전기요금을 한꺼번에 납부한다.

    나는 한달에 약 60-70 SGD 정도 나온다. 아주 가끔 에어컨을 많이 사용한 달은 많아도 120불 정도 나온다. (2 베드룸, 678 sqft 기준)


    고정 지출 총 정리

    참고로 개인 핸드폰 요금이나 식비 같은 요소들은 집집마다 기준이 너무 다르기 때문에 제외하고 무조건 지출해야 되는 부분들만 요약해서 정리해보니 크게 3가지였다. 렌트비, 인터넷 그리고 공과금.

    내역지출 (SGD)
    렌트비 콘도 2 베드룸 외곽지역3200 (관리비는 집주인이 부담)
    인터넷 (ViewQuest)39.72
    수도, 가스, 전기요금60-70

    https://www.trip.com/w/CCXfxJIw9R1

  • 송파구 Alternative 얼터네이티브 카페 커피 로스터스

    송파구 Alternative 얼터네이티브 카페 커피 로스터스

    송파구에 있는 로스터스 카페를 다녀왔다. 분위기도 좋고 직접 로스팅을 하는 카페라 그런지 원두향이 가득 풍기는 카페다.

    가게내부

    메뉴

    송파구 송리단길이랑 가까운 카페다. 8호선 송파역 근처에 있었던 걸로 기억. 커피를 좋아한다면 추천하는 카페다. 단 주차공간은 음 많아봐야 3-4개 정도라서 사람이 붐비는 시간대라면 주차하기는 어려울 것 같다.