오랜 만에 다시 시작하는 블로그. 고맙게도 포스팅 안 한지 1년이 넘었는데 하루 평균 방문객 70명이다. 다시 힘내서 포스팅 시작!
오늘 소개할 햄버거 맛집은 Honbo이다.

내부 사진


왼쪽에 계신 분이 사장님인 거 같았다.
메뉴 사진

일단 우리는 햄버거 3개랑 2가지 종류의 감튀 그리고 마지막으로 배추로 감싼 햄버거를 주문했다.


오랜 만에 다시 시작하는 블로그. 고맙게도 포스팅 안 한지 1년이 넘었는데 하루 평균 방문객 70명이다. 다시 힘내서 포스팅 시작!
오늘 소개할 햄버거 맛집은 Honbo이다.
왼쪽에 계신 분이 사장님인 거 같았다.
일단 우리는 햄버거 3개랑 2가지 종류의 감튀 그리고 마지막으로 배추로 감싼 햄버거를 주문했다.
Testing App Launch Time for React Native Sample App – Expo

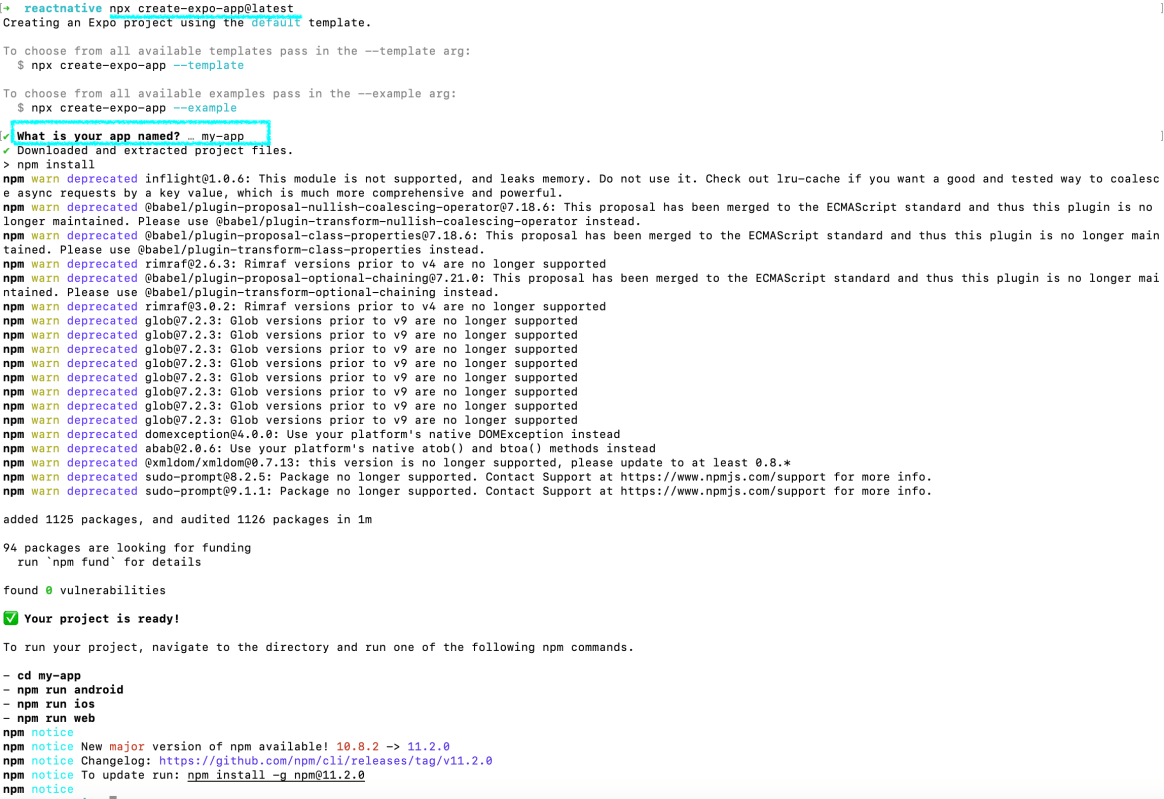
When you create an app using Expo, there are no iOS and Android folder.
npx expo prebuild

Add UI Testing Bundle and write a test cases
@MainActor
    func testExample() throws {
        // UI tests must launch the application that they test.
        let app = XCUIApplication()
        app.launch()

        // Use XCTAssert and related functions to verify your tests produce the correct results.
    }

    @MainActor
    func testLaunchPerformance() throws {
        if #available(macOS 10.15, iOS 13.0, tvOS 13.0, watchOS 7.0, *) {
            // This measures how long it takes to launch your application.
            let measureOptions = XCTMeasureOptions()
            measureOptions.iterationCount = 10
          measure(metrics: [XCTApplicationLaunchMetric()], options: measureOptions) {
                XCUIApplication().launch()
            }
        }
    }

I ran 10 times and it’s average launch time is 0.157s (157ms).
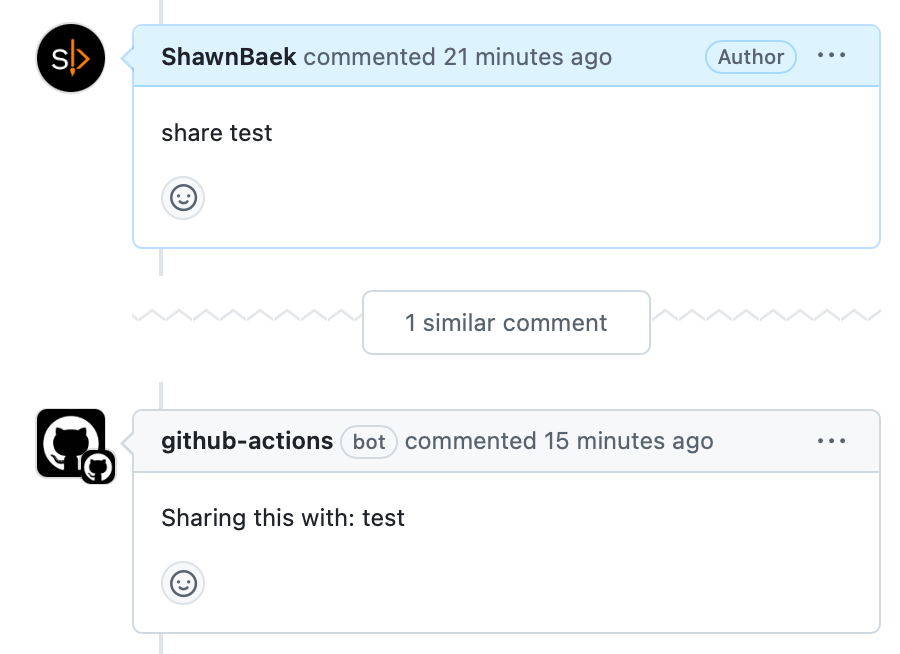
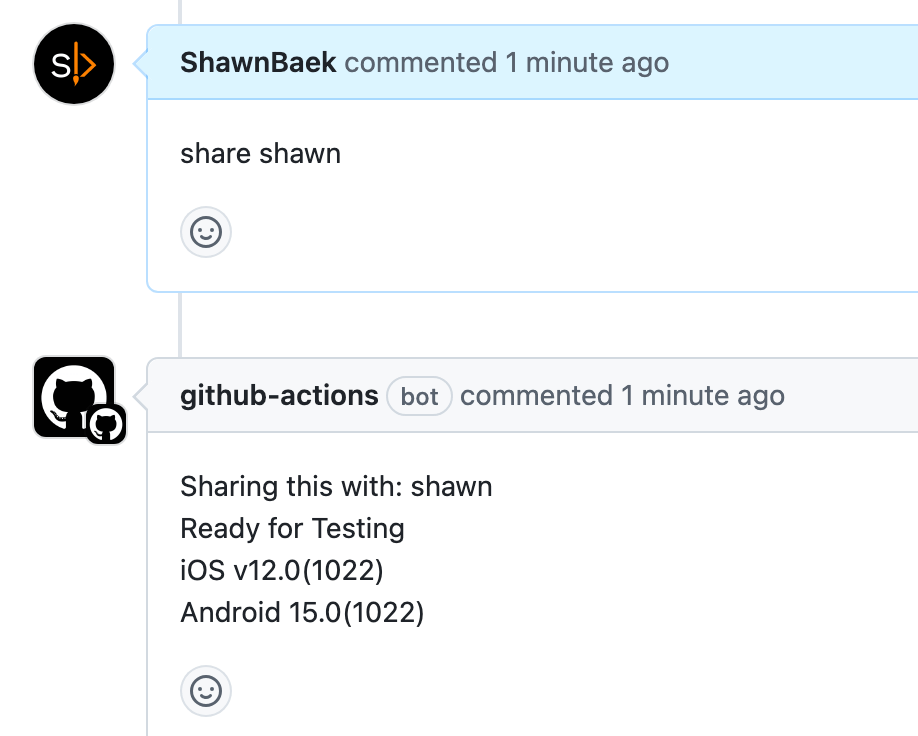
Setting GitHub actions is a headache, and it takes time to run correctly. I’ll share what actions I daily use.

You can define commands to run action
For example, If you want to share something to test, use this action.
And you can leave a comment using github.issues.createComment
This action is very useful. You can integrate third-party services like Slack, WhatsApp, or Linear. Listening share command and trigger action whatever you want to share it.
name: Comment Action
on:
  issue_comment:
    types: [created]
jobs:
  comment_job:
    runs-on: ubuntu-latest
    steps:
      - name: Check Comment Type
        id: check_comment
        uses: actions/github-script@v4
        with:
          github-token: ${{ secrets.GITHUB_TOKEN }}
          script: |
            const comment = context.payload.comment.body.trim();
            console.log(`Received comment: ${comment}`);

            const issueOrPrNumber = context.payload.issue?.number || context.payload.pull_request?.number;
            if (!issueOrPrNumber) {
              throw new Error("Could not determine issue or PR number.");
            }

            let action = '';
            if (comment.startsWith('share')) {
              action = 'share';
            }

            core.setOutput('action', action);
            core.setOutput('comment', comment);
            core.setOutput('issue_or_pr_number', issueOrPrNumber);

      - name: Handle Share Command
        if: steps.check_comment.outputs.action == 'share'
        uses: actions/github-script@v4
        with:
          github-token: ${{ secrets.GITHUB_TOKEN }}
          script: |
            const comment = '${{ steps.check_comment.outputs.comment }}';
            const issueOrPrNumber = '${{ steps.check_comment.outputs.issue_or_pr_number }}';

            if (!issueOrPrNumber) {
              throw new Error("Could not determine the issue or PR number.");
            }

            const splitComment = comment.split(' ');
            if (splitComment.length < 2) {
              throw new Error("Invalid 'share' command format. Expected: 'share <id>'");
            }

            const recipientId = splitComment[1]; // Extract ID after "share"
            const commentBody = `Sharing this with: ${recipientId}`;

            console.log(`Adding a share comment for ID: ${recipientId}`);
            await github.issues.createComment({
              owner: context.repo.owner,
              repo: context.repo.repo,
              issue_number: issueOrPrNumber,
              body: commentBody
            });
There are 2 yml files in workflows
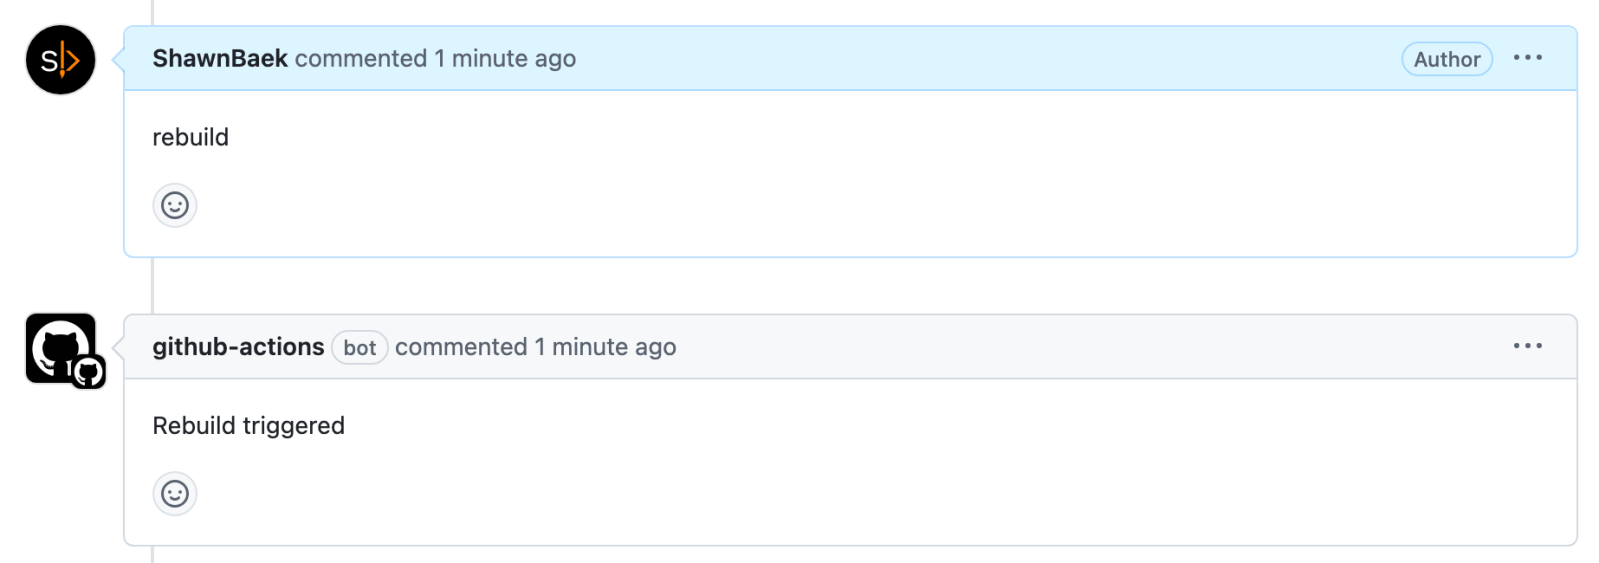
When you get a build failed message, you can rebuild it by leaving a comment.

comment_action.yml
name: Comment Action
on:
  issue_comment:
    types: [created]

jobs:
  comment_job:
    runs-on: ubuntu-latest
    steps:
      - uses: actions/checkout@v4
      - name: GitHub CLI Login
        run: |
          gh auth login --with-token <<< "${{ secrets.GITHUB_TOKEN }}"
      - name: Check Comment Type
        id: check_comment
        uses: actions/github-script@v4
        with:
          github-token: ${{ secrets.GITHUB_TOKEN }}
          script: |
            const comment = context.payload.comment.body.trim();
            console.log(`Received comment: ${comment}`);

            const issueOrPrNumber = context.payload.issue?.number || context.payload.pull_request?.number;
            const isPR = Boolean(context.payload.issue.pull_request);

            if (!isPR) {
              throw new Error("This comment is not associated with a pull request.");
            }

            const { data: pullRequest } = await github.pulls.get({
              owner: context.repo.owner,
              repo: context.repo.repo,
              pull_number: issueOrPrNumber,
            });

            const sourceBranch = pullRequest.head.ref;
            const targetBranch = pullRequest.base.ref;

            console.log(`Source branch: ${sourceBranch}`);
            console.log(`Target branch: ${targetBranch}`);
            if (!issueOrPrNumber) {
              throw new Error("Could not determine issue or PR number.");
            }

            let action = '';
            if (comment === 'rebuild') {
              action = 'rebuild';
            }

            core.setOutput('action', action);
            core.setOutput('comment', comment);
            core.setOutput('issue_or_pr_number', issueOrPrNumber);
            core.setOutput('source_branch', sourceBranch);
            core.setOutput('target_branch', targetBranch);

      - name: Rebuild
        run: |
          echo "🟢 Issue or PR Number: ${{ steps.check_comment.outputs.issue_or_pr_number }}"
          gh workflow run rebuild.yml --ref ${{ steps.check_comment.outputs.target_branch }} -f issue_or_pr_number=${{ steps.check_comment.outputs.issue_or_pr_number }}
        env:
          GITHUB_TOKEN: ${{ secrets.GITHUB_TOKEN }}
build.yml
name: build

on:
  workflow_dispatch:
    inputs:
      issue_or_pr_number:
        description: "The issue or PR number to comment on"
        required: true

jobs:
  reusable_job:
    runs-on: ubuntu-latest
    steps:
      - name: Build
        run: echo "Running workflow"
      - name: Rebuild triggered
        uses: actions/github-script@v4
        with:
          github-token: ${{ secrets.GITHUB_TOKEN }}
          script: |
            const issueOrPrNumber = ${{ github.event.inputs.issue_or_pr_number }};
            console.log(`🟢 Input issue_or_pr_number: ${issueOrPrNumber}`);
            if (!issueOrPrNumber) {
              throw new Error("Could not determine the issue or PR number.");
            }
            const commentBody = `Rebuild triggered`;
            await github.issues.createComment({
              owner: context.repo.owner,
              repo: context.repo.repo,
              issue_number: issueOrPrNumber,
              body: commentBody
            });

build.yml
name: Build
on:
pull_request:
branches:
- master
types:
- opened
- synchronize
- reopened
- edited
jobs:
run_on_pr:
runs-on: ubuntu-latest
steps:
- name: Checkout Code
uses: actions/checkout@v4
- name: Comment on PR
uses: actions/github-script@v4
with:
github-token: ${{ secrets.GITHUB_TOKEN }}
script: |
const issueOrPrNumber = context.payload.pull_request.number;
console.log(issueOrPrNumber);
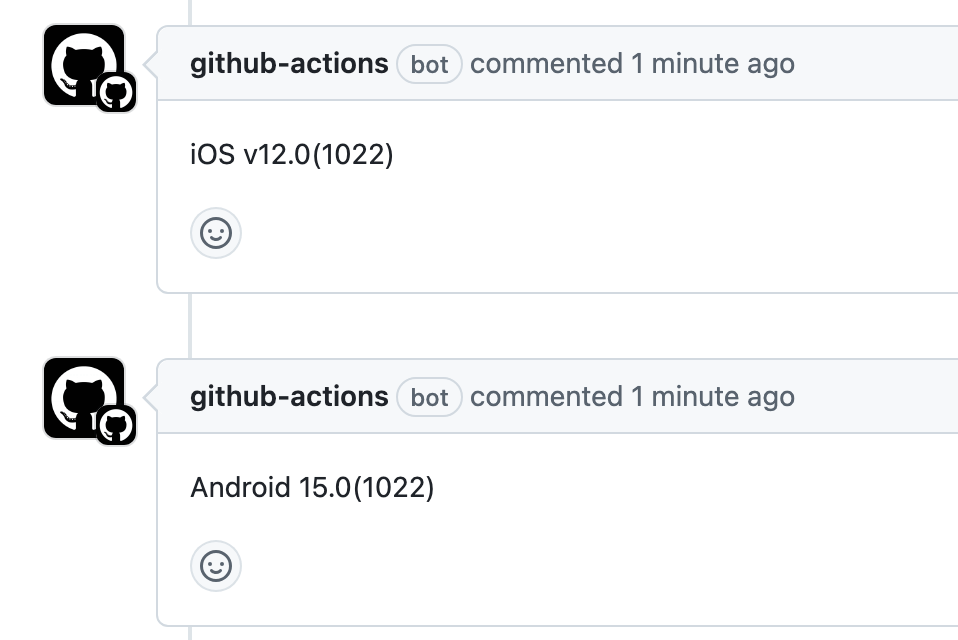
await github.issues.createComment({
owner: context.repo.owner,
repo: context.repo.repo,
issue_number: issueOrPrNumber,
body: "iOS v12.0(1022)"
});
await github.issues.createComment({
owner: context.repo.owner,
repo: context.repo.repo,
issue_number: issueOrPrNumber,
body: "Android 15.0(1022)"
});
comment_action.yml
name: Comment Action
on:
  issue_comment:
    types: [created]

jobs:
  comment_job:
    runs-on: ubuntu-latest
    steps:
      - uses: actions/checkout@v4
      - name: GitHub CLI Login
        run: |
          gh auth login --with-token <<< "${{ secrets.GITHUB_TOKEN }}"
      - name: Check Comment Type
        id: check_comment
        uses: actions/github-script@v4
        with:
          github-token: ${{ secrets.GITHUB_TOKEN }}
          script: |
            const comment = context.payload.comment.body.trim();
            console.log(`Received comment: ${comment}`);

            const issueOrPrNumber = context.payload.issue?.number || context.payload.pull_request?.number;
            const isPR = Boolean(context.payload.issue.pull_request);

            if (!isPR) {
              throw new Error("This comment is not associated with a pull request.");
            }

            const { data: pullRequest } = await github.pulls.get({
              owner: context.repo.owner,
              repo: context.repo.repo,
              pull_number: issueOrPrNumber
            });

            const sourceBranch = pullRequest.head.ref;
            const targetBranch = pullRequest.base.ref;

            console.log(`Source branch: ${sourceBranch}`);
            console.log(`Target branch: ${targetBranch}`);

            core.setOutput('source_branch', sourceBranch);
            core.setOutput('target_branch', targetBranch);
            if (!issueOrPrNumber) {
              throw new Error("Could not determine issue or PR number.");
            }

            let action = '';
            if (comment.startsWith('share')) {
              action = 'share';
            }

            core.setOutput('action', action);
            core.setOutput('comment', comment);
            core.setOutput('issue_or_pr_number', issueOrPrNumber);

      - name: Get Latest Build Comments
        if: steps.check_comment.outputs.action == 'share'
        uses: actions/github-script@v4
        with:
          github-token: ${{ secrets.GITHUB_TOKEN }}
          script: |
            const issueNumber = ${{ steps.check_comment.outputs.issue_or_pr_number }};
            const comment = '${{ steps.check_comment.outputs.comment }}';

            if (!issueNumber) {
              throw new Error("Could not determine the issue or PR number.");
            }

            const splitComment = comment.split(' ');
            if (splitComment.length < 2) {
              throw new Error("Invalid 'share' command format. Expected: 'share <id>'");
            }

            const recipientId = splitComment[1]; // Extract ID after "share"

            // Fetch all comments on the PR
            const comments = await github.issues.listComments({
              owner: context.repo.owner,
              repo: context.repo.repo,
              issue_number: issueNumber,
              per_page: 100,
            });

            console.log("✅ All Comments")
            comments.data.forEach(comment => console.log(`- ${comment.body}`));


            // Filter and find the most recent iOS-related comment
            const latestIOS = comments.data
              .filter(comment => comment.body.startsWith('iOS'))
              .sort((a, b) => new Date(b.updated_at) - new Date(a.updated_at))[0];

            // Filter and find the most recent Android-related comment
            const latestAndroid = comments.data
              .filter(comment => comment.body.startsWith('Android'))
              .sort((a, b) => new Date(b.updated_at) - new Date(a.updated_at))[0];

            if (latestIOS) {
              console.log(`Latest iOS Comment: ${latestIOS.body}`);
              core.setOutput('latest_ios_comment', latestIOS.body);
            } else {
              console.log('No iOS-related comments found.');
            }

            if (latestAndroid) {
              console.log(`Latest Android Comment: ${latestAndroid.body}`);
              core.setOutput('latest_android_comment', latestAndroid.body);
            } else {
              console.log('No Android-related comments found.');
            }
            const commentBody = `Sharing this with: ${recipientId}\nReady for Testing\n${latestIOS.body}\n${latestAndroid.body}`;
            await github.issues.createComment({
              owner: context.repo.owner,
              repo: context.repo.repo,
              issue_number: issueNumber,
              body: commentBody
            });
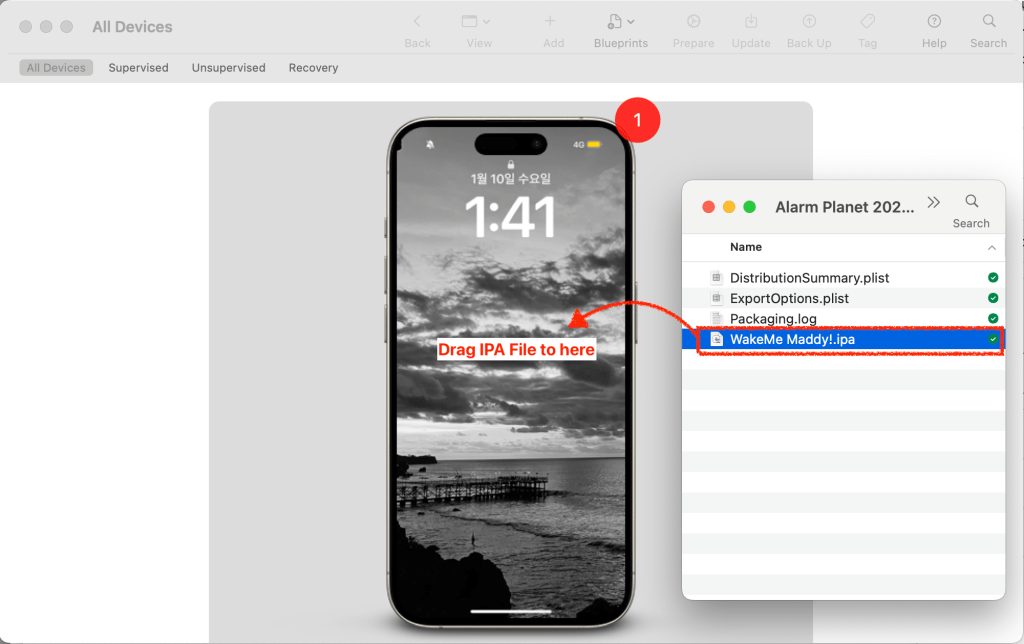
To install IPA file on iPhone device, use Apple Configurator app


Connect your iPhone into Macbook. In the Apple Configurator app, you may see your connected iPhone screen. Drag IPA file into the your iPhone. That’s it
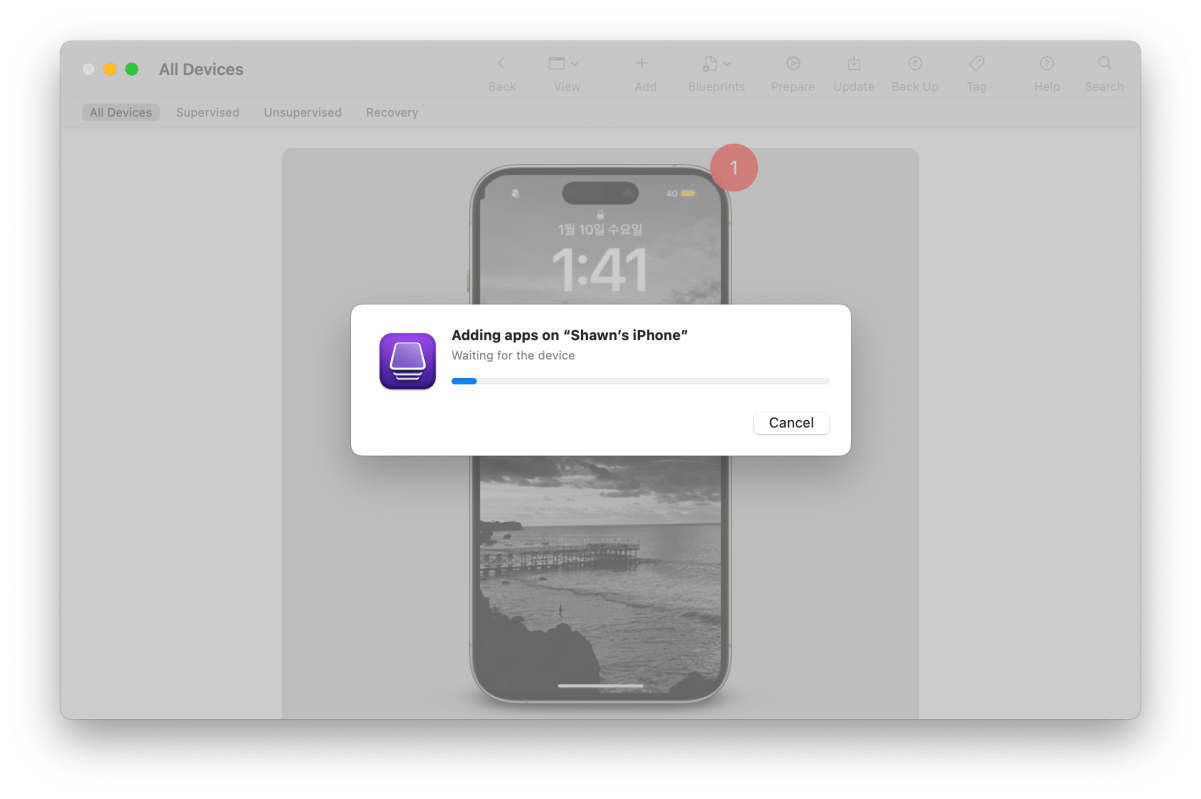
You will see iPA is adding on your iPhone. (Installing)
Security topics are common interview question. I summarized what is Certificate, Provisioning, Code Signing, App Transport Security and CryptoKit.
Use the Security framework to protect information, establish trust, and control access to software. Broadly, security services support these goals:
- Establish a user’s identity (authentication) and then selectively grant access to resources (authorization).
- Secure data, both on disk and in motion across a network connection.
- Ensure the validity of code to be executed for a particular purpose.
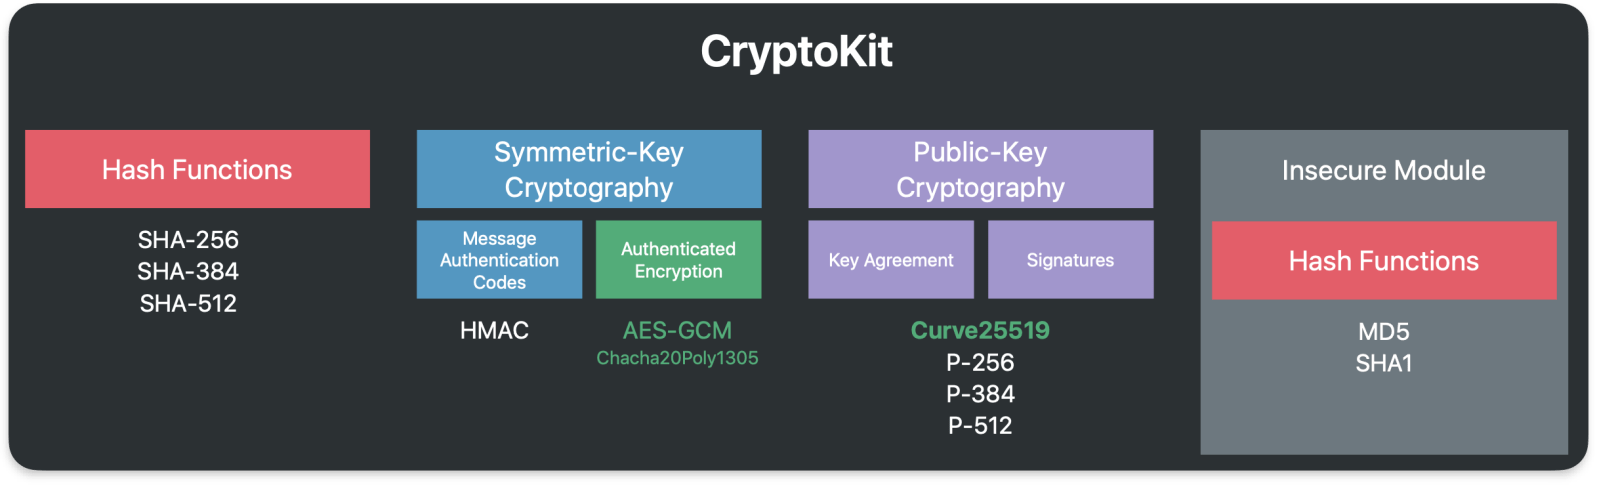
As shown in the image below, you can also use lower level cryptographic resources to create new secure services. Cryptography is difficult and the cost of bugs typically so high that it’s rarely a good idea to implement your own cryptography solution. Rely on the Security framework when you need cryptography in your app.

Digital certificates can be used to securely identify a client or server, and to encrypt the communication between them using the public and private key pair.
A certificate contains a public key, information about the client (or server), and is signed (verified) by a CA.
A certificate and its associated private key are known as an identity. Certificates can be freely distributed, but identities must be kept secure. The freely distributed certificate, and especially its public key, are used for encryption that can be decrypted only by the matching private key. The private key part of an identity is stored as a PKCS #12 identity certificate (.p12) file and encrypted with another key that’s protected by a passphrase. An identity can be used for authentication (such as 802.1X EAP-TLS), signing, or encryption (such as S/MIME).
The certificate and identity formats Apple devices support are:
- Certificate: .cer, .crt, .der, X.509 certificates with RSA keys
- Identity: .pfx, .p12
https://support.apple.com/zh-sg/guide/deployment/depb5eff8914/web


If a certificate has been issued from a CA whose root isn’t in the list of trusted root certificates, iOS, iPadOS, macOS, or visionOS won’t trust the certificate. This is often the case with enterprise-issuing CAs. To establish trust, use the method described in certificate deployment. This sets the trust anchor at the certificate being deployed. For multitiered public key infrastructures, it may be necessary to establish trust not only with the root certificate, but also with any intermediates in the chain. Often, enterprise trust is configured in a single configuration profile that can be updated with your MDM solution as needed without affecting other services on the device.
Root certificates on iPhone, iPad, and Apple Vision Pro
Root certificates installed manually on an unsupervised iPhone, iPad, or Apple Vision Pro through a profile display the following warning, “Installing the certificate “name of certificate” adds it to the list of trusted certificates on your iPhone or iPad. This certificate won’t be trusted for websites until you enable it in Certificate Trust Settings.”
The user can then trust the certificate on the device by going to Settings > General > About > Certificate Trust Settings.
Note: Root certificates installed by an MDM solution or on supervised devices disable the option to change the trust settings.
https://www.apple.com/certificateauthority/
https://support.apple.com/zh-sg/guide/deployment/depb5eff8914/web
")
Certificate Chain
development provisioning profile
A development provisioning profile allows your app to launch on devices and use certain app services during development. For an individual, a development provisioning profile allows apps signed by you to run on your registered devices. For an organization, a development provisioning profile allows apps developed by a team to be signed by any member of the team and installed on their devices.
The development provisioning profile contains:
- A wildcard App ID that matches all your team’s apps or an explicit App ID that matches a single app
- Specified devices associated with the team
- Specified development certificates associated with the team
distribution provisioning profile
A distribution provisioning profile is a provisioning profile that authorizes your app to use certain app services and ensures that you are a known developer distributing or uploading your app. A distribution provisioning profile contains a single App ID that matches one or more of your apps and a distribution certificate. You configure the App ID indirectly through Xcode to use certain app services. Xcode enables and configures app services by setting entitlements and performing other configuration steps. Some entitlements are enabled for an App ID (stored in your developer account) and others are set in the Xcode project. When you export or upload your app, Xcode signs the app bundle with the distribution certificate referenced in the distribution provisioning profile.
https://developer.apple.com/help/account/manage-profiles/edit-download-or-delete-profiles/
Code signing is a macOS security technology that you use to certify that an app was created by you. Once an app is signed, the system can detect any change to the app—whether the change is introduced accidentally or by malicious code.
You participate in code signing as a developer when you obtain a signing identity and apply your signature to apps that you ship. A certificate authority (often Apple) vouches for your signing identity.
Note: In most cases, you can rely on Xcode’s automatic code signing, which requires only that you specify a code signing identity in the build settings for your project. This document is for readers who must go beyond automatic code signing—perhaps to troubleshoot an unusual problem, or to incorporate the
codesign(1)tool into a build system.Benefits of Code Signing
After installing a new version of a code-signed app, a user is not bothered with alerts asking again for permission to access the keychain or similar resources. As long as the new version uses the same digital signature, macOS can treat the new app exactly as it treated the previous one.
Other macOS security features, such as App Sandbox and parental controls, also depend on code signing. Specifically, code signing allows the operating system to:
- Ensure that a piece of code has not been altered since it was signed. The system can detect even the smallest change, whether it was intentional (by a malicious attacker, for example) or accidental (as when a file gets corrupted). When a code signature is intact, the system can be sure the code is as the signer intended.
- Identify code as coming from a specific source (a developer or signer). The code signature includes cryptographic information that unambiguously points to a particular author.
- Determine whether code is trustworthy for a specific purpose. Among other things, a developer can use a code signature to state that an updated version of an app should be considered by the system to be the same app as the previous version.
Limitations of Code Signing
Code signing is one component of a complete security solution, working in concert with other technologies and techniques. It does not address every possible security issue. For example, code signing does not:
- Guarantee that a piece of code is free of security vulnerabilities.
- Guarantee that an app will not load unsafe or altered code—such as untrusted plug-ins—during execution.
- Provide digital rights management (DRM) or copy protection technology. Code signing does not in any way hide or obscure the content of the signed code.
See Also
Read Security Overview to understand the place of code signing in the macOS security picture.
For descriptions of the command-line tools for performing code signing, see the codesign and csreq man pages.

On Apple platforms, a networking security feature called App Transport Security (ATS) improves privacy and data integrity for all apps and app extensions. It does this by requiring that network connections made by your app are secured by the Transport Layer Security (TLS) protocol using reliable certificates and ciphers. ATS blocks connections that don’t meet minimum security requirements.
https://developer.apple.com/documentation/security/preventing-insecure-network-connections

Use Apple CryptoKit to perform common cryptographic operations:
- Compute and compare cryptographically secure digests.
- Use public-key cryptography to create and evaluate digital signatures, and to perform key exchange. In addition to working with keys stored in memory, you can also use private keys stored in and managed by the Secure Enclave.
- Generate symmetric keys, and use them in operations like message authentication and encryption.
Prefer CryptoKit over lower-level interfaces. CryptoKit frees your app from managing raw pointers, and automatically handles tasks that make your app more secure, like overwriting sensitive data during memory deallocation.
Symmetric Key
Public Key

I turned 40 and got layoff on April fools day.
It’s not a success story but I want to share my iOS interview experience with Google, Meta and Amazon.
After I got layoff, I had a lot of time for preparation.
I practice data structures, algorithms, design patterns, and iOS domain.
There are many useful resources. I choose leetcode and Udemy course.
I paid
I like Loony Corn’s course. I learned how to implement common data structures and algorithms.

I posted about basic data structure and algorithms
Is it worth to subscribe it? Yes. It provides questions filter by company. It was very useful.
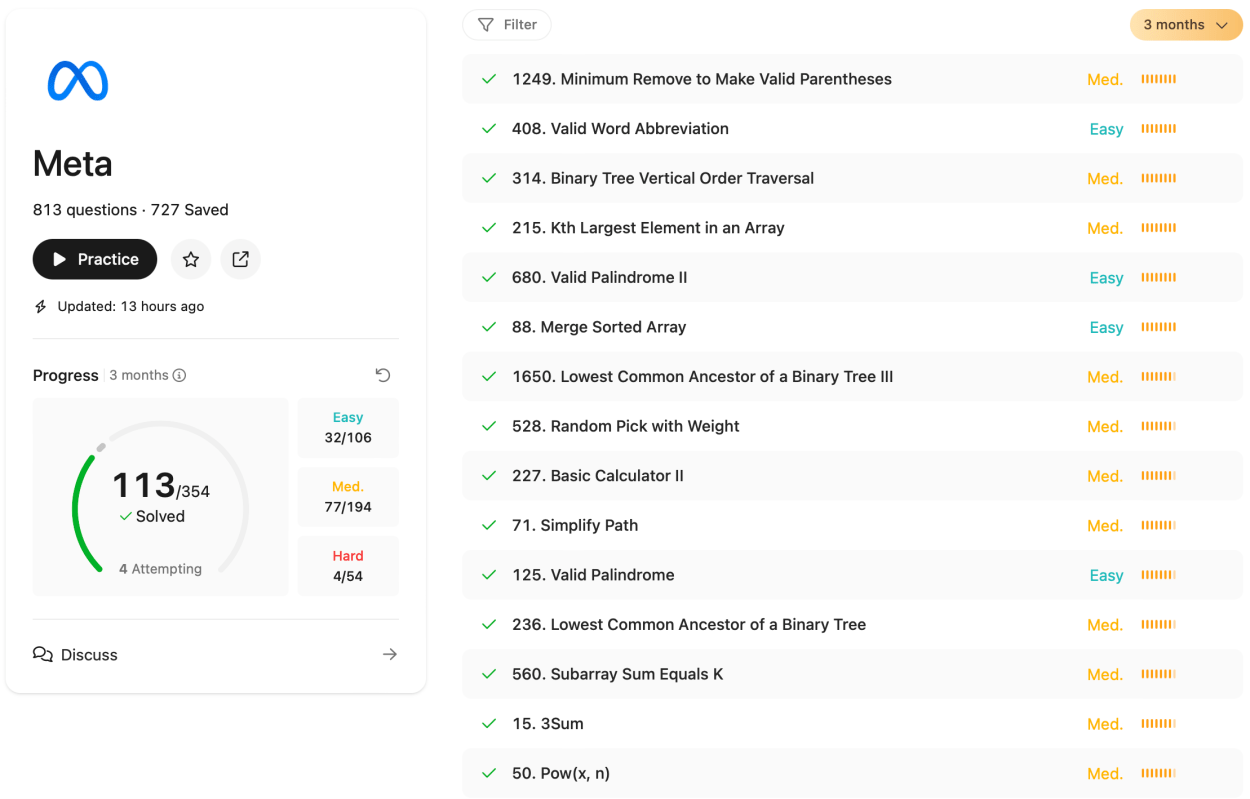
After 50 days, I got top 6.9% of leetcoders solving problems badge

I visit the following sites every day and post articles
Focused topics are
I’ve summarized my work experience and data. I practice the STAR (Situation, Task, Action, Result) method to tell my story

My CV pass the resume screening from Google, Meta and Amazon.
I applied to iOS engineer position without refer. After 1 month, I received email from HR.
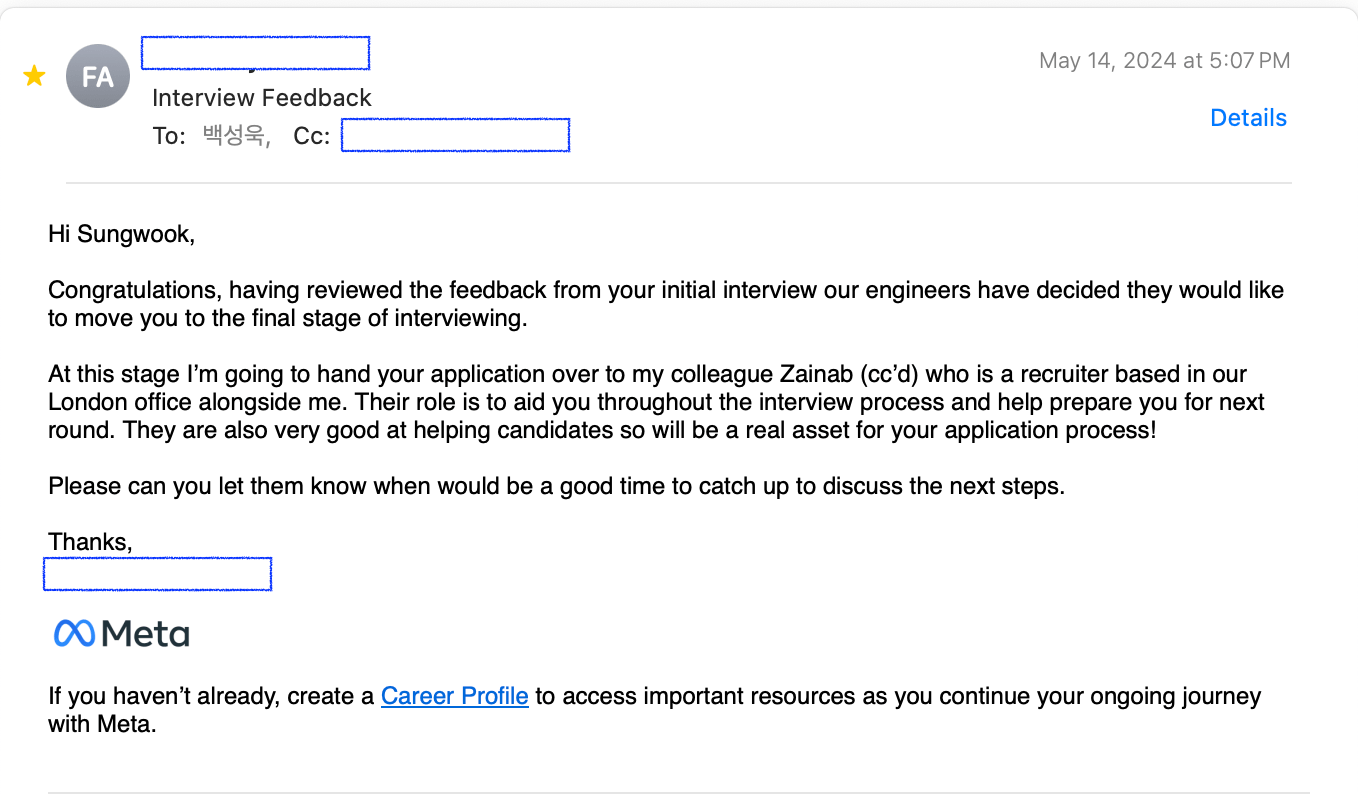
After 1 day of screening interview with engineer, I was invited to final stage.

I was expecting offer at that time…
L5 level Interview process was
In my experience with Meta, I learned a lot from interview. HR and Interviewers are friendly. HR guided me how to prepare iOS interviews. It helped me a lot.
I was lucky because they didn’t ask leetcode hard problems. It was medium level and all the questions I solved before. So I solved all the coding problems but some questions I didn’t optimized well.
I think my behavioral interview didn’t go well because it ended 10 minutes early.
I applied to senior iOS position without refer. After 1.5 month, HR reached me.

After HR conversation, I invited phone screening interview.

After 4 day of phone screening interview, I was invited to final round.
Interview process was
The interview process is very similar to Meta’s. Only difference is all the interview sessions contains Leadership Principle around 15-25 mins.
My experience with Amazon was good. They provided detailed preparation materials for the iOS position.
After 5 days of final interview, HR called me to share feedbacks from interviewers. (I think If you pass the final rounds, they might send an email not a call)
Unlike the interviews with Meta and Amazon, to be honest, I had an interview with Google a few years ago, not in 2024.
Interview process was
In 2020, I was failed at phone screening interview.


My interview experience with Google was good. They used Google Doc for coding interview.
I remember difficulty of coding problem was leetcode medium level.
Initially, I was concerned about my English communication skills. However, I successfully passed the HR screening and technical interviews, and even received positive feedback from behavioral interviews. If you’re worried about your English proficiency, I encourage you not to dwell on it too much. Instead, focus on effectively conveying your experiences, clarifying questions, and demonstrating your passion.
The coding rounds were neither excessively difficult nor too easy – they were of medium difficulty. I recommend practicing basic data structures and algorithms such as Heaps, Trees, Linked Lists, LRU caches, and Graphs. Most FAANG companies don’t require writing compilable code; they’re more interested in your communication skills, problem clarification abilities, approach to breaking down problems, and how you optimize time and space complexity.
For iOS-specific questions, unlike other companies, these tech giants are more interested in mobile system design rather than specific knowledge of the UIKit framework.
For the system design round, I strongly advise practicing extensively. Focus on drawing and explaining high-level components, their interactions, and server communication. Emphasize mobile-side system design.
In behavioral interviews, structure your responses using the STAR format, drawing from your experiences. Share your best stories if possible, and avoid repeating anecdotes in the final stages.
Although I didn’t receive an offer, I hope my experience proves helpful to those considering or preparing for similar interviews.
I’ve also created a GitHub repository to share information about companies that are friendly to native mobile development. If you know of such companies, please feel free to contribute to this resource.

✍️ Note
Core Animation use bitmaps.
Core Animation provides a general purpose system for animating views and other visual elements of your app. Core Animation is not a replacement for your app’s views. Instead, it is a technology that integrates with views to provide better performance and support for animating their content. It achieves this behavior by caching the contents of views into bitmaps that can be manipulated directly by the graphics hardware. In some cases, this caching behavior might require you to rethink how you present and manage your app’s content, but most of the time you use Core Animation without ever knowing it is there. In addition to caching view content, Core Animation also defines a way to specify arbitrary visual content, integrate that content with your views, and animate it along with everything else.
You use Core Animation to animate changes to your app’s views and visual objects. Most changes relate to modifying the properties of your visual objects. For example, you might use Core Animation to animate changes to a view’s position, size, or opacity. When you make such a change, Core Animation animates between the current value of the property and the new value you specify. You would typically not use Core Animation to replace the content of a view 60 times a second, such as in a cartoon. Instead, you use Core Animation to move a view’s content around the screen, fade that content in or out, apply arbitrary graphics transformations to the view, or change the view’s other visual attributes.
Apple Document
Layer objects are 2D surfaces organized in a 3D space and are at the heart of everything you do with Core Animation. Like views, layers manage information about the geometry, content, and visual attributes of their surfaces. Unlike views, layers do not define their own appearance. A layer merely manages the state information surrounding a bitmap. The bitmap itself can be the result of a view drawing itself or a fixed image that you specify. For this reason, the main layers you use in your app are considered to be model objects because they primarily manage data. This notion is important to remember because it affects the behavior of animations.
Apple Document
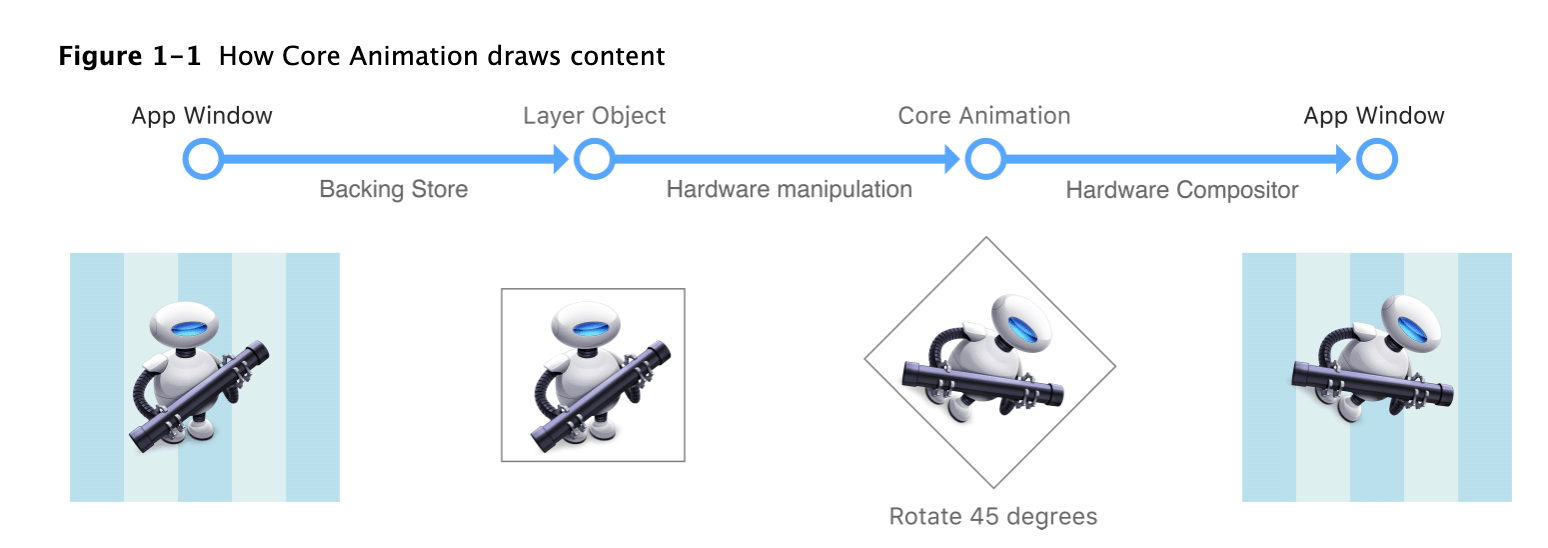
Most layers do not do any actual drawing in your app. Instead, a layer captures the content your app provides and caches it in a bitmap, which is sometimes referred to as the backing store. When you subsequently change a property of the layer, all you are doing is changing the state information associated with the layer object. When a change triggers an animation, Core Animation passes the layer’s bitmap and state information to the graphics hardware, which does the work of rendering the bitmap using the new information, as shown in Figure 1-1. Manipulating the bitmap in hardware yields much faster animations than could be done in software.
Because it manipulates a static bitmap, layer-based drawing differs significantly from more traditional view-based drawing techniques. With view-based drawing, changes to the view itself often result in a call to the view’s
drawRect:method to redraw content using the new parameters. But drawing in this way is expensive because it is done using the CPU on the main thread. Core Animation avoids this expense by whenever possible by manipulating the cached bitmap in hardware to achieve the same or similar effects.Although Core Animation uses cached content as much as possible, your app must still provide the initial content and update it from time to time. There are several ways for your app to provide a layer object with content, which are described in detail in Providing a Layer’s Contents.
Apple Document

Layers Can Be Manipulated in Three Dimensions
Every layer has two transform matrices that you can use to manipulate the layer and its contents. Thetransformproperty ofCALayerspecifies the transforms that you want to apply both to the layer and its embedded sublayers. Normally you use this property when you want to modify the layer itself. For example, you might use that property to scale or rotate the layer or change its position temporarily. ThesublayerTransformproperty defines additional transformations that apply only to the sublayers and is used most commonly to add a perspective visual effect to the contents of a scene.Transforms work by multiplying coordinate values through a matrix of numbers to get new coordinates that represent the transformed versions of the original points. Because Core Animation values can be specified in three dimensions, each coordinate point has four values that must be multiplied through a four-by-four matrix, as shown in Figure 1-7. In Core Animation, the transform in the figure is represented by the
CATransform3Dtype. Fortunately, you do not have to modify the fields of this structure directly to perform standard transformations. Core Animation provides a comprehensive set of functions for creating scale, translation, and rotation matrices and for doing matrix comparisons. In addition to manipulating transforms using functions, Core Animation extends key-value coding support to allow you to modify a transform using key paths. For a list of key paths you can modify, see CATransform3D Key Paths.


Figure 1-8 shows the matrix configurations for some of the more common transformations you can make. Multiplying any coordinate by the identity transform returns the exact same coordinate. For other transformations, how the coordinate is modified depends entirely on which matrix components you change. For example, to translate along the x-axis only, you would supply a nonzero value for the
txcomponent of the translation matrix and leave thetyandtzvalues to 0. For rotations, you would provide the appropriate sine and cosine values of the target rotation angle.Apple
An app using Core Animation has three sets of layer objects. Each set of layer objects has a different role in making the content of your app appear onscreen:
- Objects in the model layer tree (or simply “layer tree”) are the ones your app interacts with the most. The objects in this tree are the model objects that store the target values for any animations. Whenever you change the property of a layer, you use one of these objects.
- Objects in the presentation tree contain the in-flight values for any running animations. Whereas the layer tree objects contain the target values for an animation, the objects in the presentation tree reflect the current values as they appear onscreen. You should never modify the objects in this tree. Instead, you use these objects to read current animation values, perhaps to create a new animation starting at those values.
- Objects in the render tree perform the actual animations and are private to Core Animation.
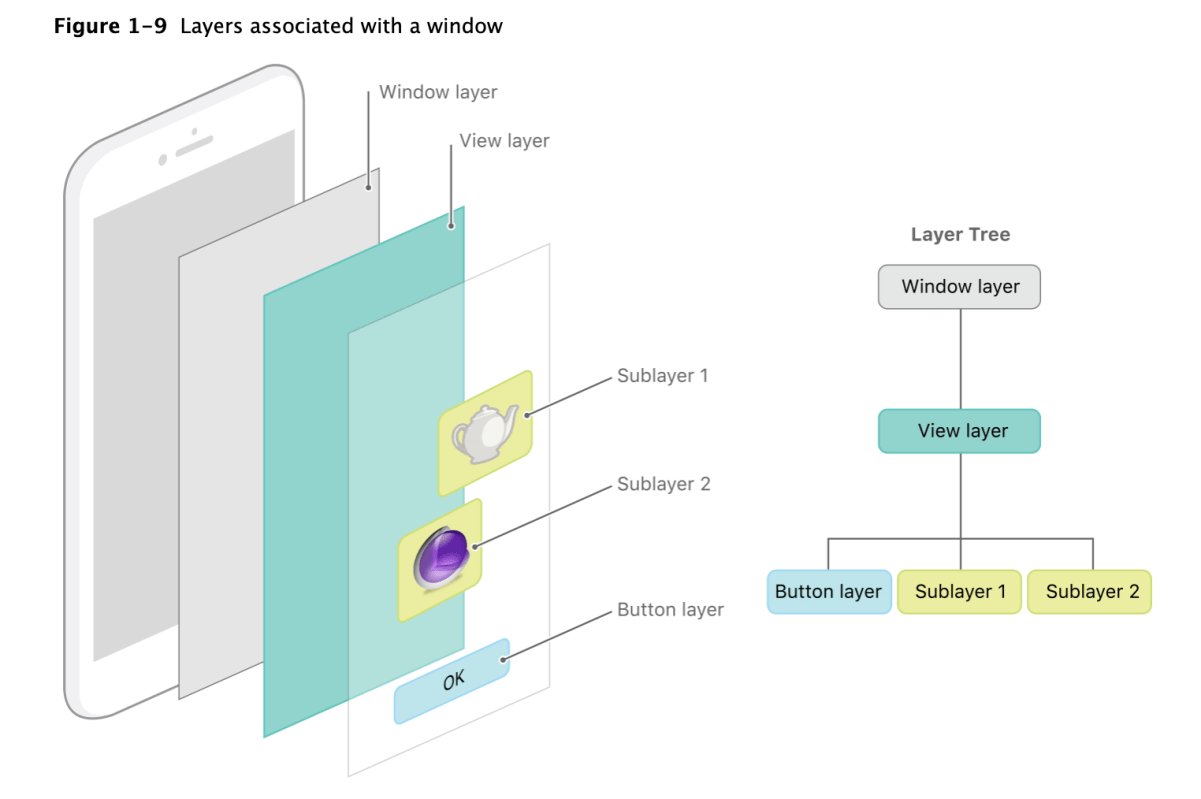
Each set of layer objects is organized into a hierarchical structure like the views in your app. In fact, for an app that enables layers for all of its views, the initial structure of each tree matches the structure of the view hierarchy exactly. However, an app can add additional layer objects—that is, layers not associated with a view—into the layer hierarchy as needed. You might do this in situations to optimize your app’s performance for content that does not require all the overhead of a view. Figure 1-9 shows the breakdown of layers found in a simple iOS app. The window in the example contains a content view, which itself contains a button view and two standalone layer objects. Each view has a corresponding layer object that forms part of the layer hierarchy.
Apple

For every object in the layer tree, there is a matching object in the presentation and render trees, as shown in Figure 1-10. As was previously mentioned, apps primarily work with objects in the layer tree but may at times access objects in the presentation tree. Specifically, accessing the
presentationLayerproperty of an object in the layer tree returns the corresponding object in the presentation tree. You might want to access that object to read the current value of a property that is in the middle of an animation.Important: You should access objects in the presentation tree only while an animation is in flight. While an animation is in progress, the presentation tree contains the layer values as they appear onscreen at that instant. This behavior differs from the layer tree, which always reflects the last value set by your code and is equivalent to the final state of the animation.
Apple
Layers are not a replacement for your app’s views—that is, you cannot create a visual interface based solely on layer objects. Layers provide infrastructure for your views. Specifically, layers make it easier and more efficient to draw and animate the contents of views and maintain high frame rates while doing so. However, there are many things that layers do not do. Layers do not handle events, draw content, participate in the responder chain, or do many other things. For this reason, every app must still have one or more views to handle those kinds of interactions.
In iOS, every view is backed by a corresponding layer object but in OS X you must decide which views should have layers. In OS X v10.8 and later, it probably makes sense to add layers to all of your views. However, you are not required to do so and can still disable layers in cases where the overhead is unwarranted and unneeded. Layers do increase your app’s memory overhead somewhat but their benefits often outweigh the disadvantage, so it is always best to test the performance of your app before disabling layer support.
When you enable layer support for a view, you create what is referred to as a layer-backed view. In a layer-backed view, the system is responsible for creating the underlying layer object and for keeping that layer in sync with the view. All iOS views are layer-backed and most views in OS X are as well. However, in OS X, you can also create a layer-hosting view, which is a view where you supply the layer object yourself. For a layer-hosting view, AppKit takes a hands off approach with managing the layer and does not modify it in response to view changes.
Note: For layer-backed views, it is recommended that you manipulate the view, rather than its layer, whenever possible. In iOS, views are just a thin wrapper around layer objects, so any manipulations you make to the layer usually work just fine. But there are cases in both iOS and OS X where manipulating the layer instead of the view might not yield the desired results. Wherever possible, this document points out those pitfalls and tries to provide ways to help you work around them.
In addition to the layers associated with your views, you can also create layer objects that do not have a corresponding view. You can embed these standalone layer objects inside of any other layer object in your app, including those that are associated with a view. You typically use standalone layer objects as part of a specific optimization path. For example, if you wanted to use the same image in multiple places, you could load the image once and associate it with multiple standalone layer objects and add those objects to the layer tree. Each layer then refers to the source image rather than trying to create its own copy of that image in memory.
For information about how to enable layer support for your app’s views, see Enabling Core Animation Support in Your App. For information on how to create a layer object hierarchy, and for tips on when you might do so, see Building a Layer Hierarchy.
Apple
If you learn more about Core Animation? Visit official document

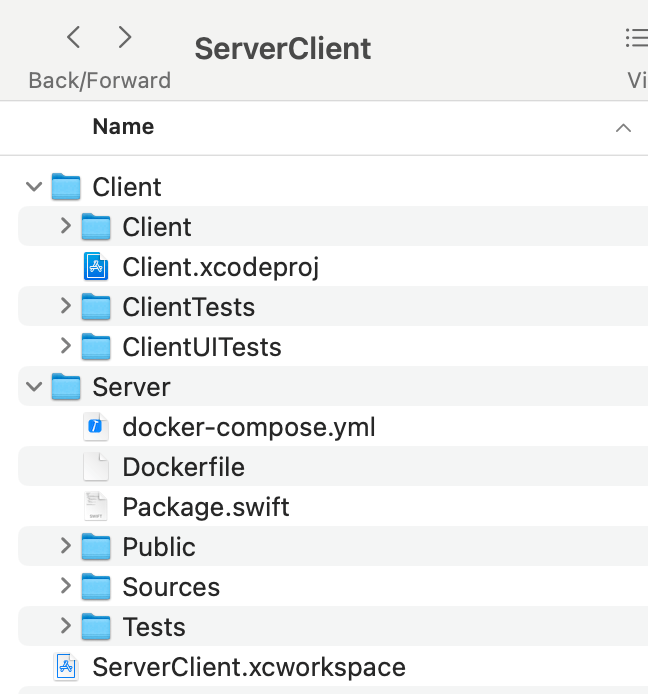
In this post, I’ll share how to build socket application.
I created a workspace and put the Client (SwiftUI) and Server (Vapor)
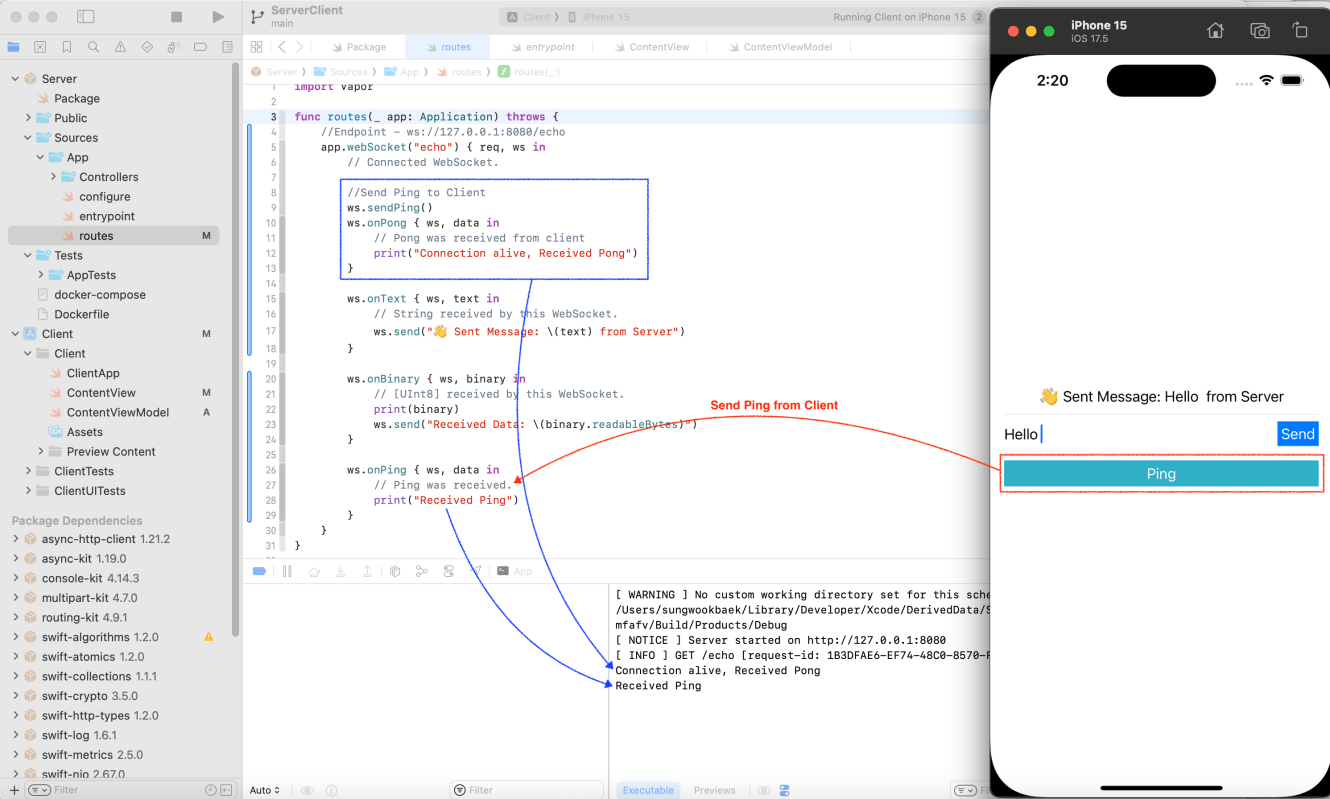
Server code is very simple. It is only 32 lines of code.
import Vapor

func routes(_ app: Application) throws {
    //Endpoint - ws://127.0.0.1:8080/echo
    app.webSocket("echo") { req, ws in
        // Connected WebSocket.

        //Send Ping to Client
        ws.sendPing()
        ws.onPong { ws, data in
            // Pong was received from client
            print("Connection alive, Received Pong")
        }

        ws.onText { ws, text in
            // String received by this WebSocket.
            ws.send("👋 Sent Message: \(text) from Server")
        }

        ws.onBinary { ws, binary in
            // [UInt8] received by this WebSocket.
            print(binary)
            ws.send("Received Data: \(binary.readableBytes)")
        }

        ws.onPing { ws, data in
            // Ping was received.
            print("Received Ping")
        }
    }
}
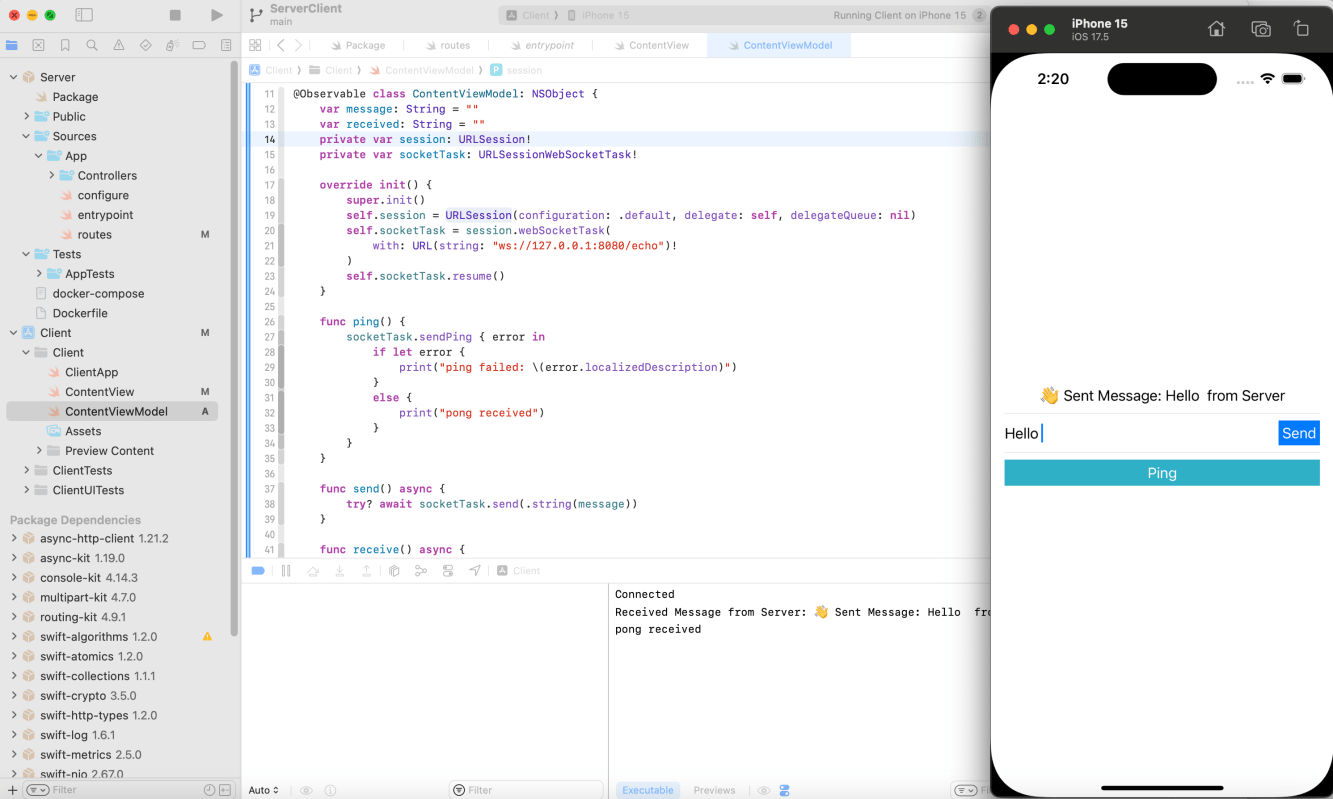
I used URLSessionWebSocketTask.
Here is viewModel logic. This class is @Observale and inherent from NSObject to handle URLSessionWebSocketDelegate.
import SwiftUI
import Foundation

@Observable class ContentViewModel: NSObject {
    var message: String = ""
    var received: String = ""
    private var session: URLSession!
    private var socketTask: URLSessionWebSocketTask!

    override init() {
        super.init()
        self.session = URLSession(configuration: .default, delegate: self, delegateQueue: nil)
        self.socketTask = session.webSocketTask(
            with: URL(string: "ws://127.0.0.1:8080/echo")!
        )
        self.socketTask.resume()
    }

    func ping() {
        socketTask.sendPing { error in
            if let error {
                print("ping failed: \(error.localizedDescription)")
            }
            else {
                print("pong received")
            }
        }
    }

    func send() async {
        try? await socketTask.send(.string(message))
    }

    func receive() async {
        while let message = try? await socketTask.receive() {
            switch message {
            case let .string(receivedMessage):
                print("Received Message from Server: \(receivedMessage)")
                received = receivedMessage
            default:
                break
            }
        }
    }

    func disconnect() {
        socketTask.cancel(with: .goingAway, reason: nil)
    }
}

extension ContentViewModel: URLSessionWebSocketDelegate {
    func urlSession(_ session: URLSession, webSocketTask: URLSessionWebSocketTask, didOpenWithProtocol protocol: String?) {
        print("Connected")
        Task {
            await receive()
        }
    }

    func urlSession(_ session: URLSession, webSocketTask: URLSessionWebSocketTask, didCloseWith closeCode: URLSessionWebSocketTask.CloseCode, reason: Data?) {
        print("Disconnected: \(closeCode)")
    }
}
SwiftUI Code
import SwiftUI

struct ContentView: View {
    @State private var viewModel = ContentViewModel()
    var body: some View {
        VStack {
            Text(viewModel.received)
            Divider()
            HStack {
                TextField(text: $viewModel.message) {
                    Text("Message")
                }
                Button("Send") {
                    Task {
                        await viewModel.send()
                    }
                }.padding(4)
                    .background(.blue)
                    .foregroundColor(.white)
            }
            Divider()
            Button("Ping") {
                viewModel.ping()
            }.frame(
                maxWidth: .infinity,
                maxHeight: 30
            ).background(.teal)
                .foregroundColor(.white)
        }
        .padding()
    }
}

#Preview {
    ContentView()
}
Both client and server can send a ping. When received the ping message then receiver send a pong message automatically. It’s a way to check status of connections.
If you want to more details about WebSocket, check my post

✍️ Note
Some codes and contents are sourced from Udemy. This post is for personal notes where I summarize the original contents to grasp the key concepts (🎨 some images I draw it)
There are 6 types of bit manipulations
If you want to learn more details, visit Apple official documents

To check N-th bit, use checkBit.
func is1Bit(number: Int, at: Int) -> Bool {
    var checkBit = 1
    checkBit <<= at
    var result = number & checkBit
    return result == checkBit

}
let number = 789
String(number, radix: 2)

//index 0, 2, 4, 8, 9 bit is 1
is1Bit(number: number, at: 0)
is1Bit(number: number, at: 2)
is1Bit(number: number, at: 4)
is1Bit(number: number, at: 8)
is1Bit(number: number, at: 9)

//index 1, bit is 0
is1Bit(number: number, at: 1)

var number = 789
func set1Bit(number: inout Int, at: Int) {
    var checkBit = 1
    checkBit <<= at
    String(number, radix: 2)
    String(checkBit, radix: 2)
    number |= checkBit
    String(number, radix: 2)
}
print("Before: \(number)")
set1Bit(number: &number, at: 1)
print("After: \(number)")
Set N-th bit as 1 is very easy.
Input number is 789
When you set bit 1 at index 1, the result will be +2

In Swift, There is convenient API to print binary from Int
Alternative way, we can print all the bit information from right to left using checkBit
func printBitsAndReturn1sBits(_ number: UInt) -> Int {
    var input = number
    //Use unsinged Int, because signed int hold right most bit as signed information
    var checkBit: UInt = 1
    //MemoryLayout returns byte size of Int. It depends on architecture. 4 byte(32 bit) or 8 byte (64 bit)
    //To get bits we need to multiply 8 and -1 (because index starts from 0)
    let bits = MemoryLayout<UInt>.size * 8 - 1
    checkBit <<= bits

    var count = 0
    while checkBit != 0 {
        let rightBit = number & checkBit
        if rightBit == checkBit {
            print("1", terminator: " ")
            count += 1
        }
        else {
            print("0", terminator: " ")
        }
        //Right shift
        checkBit >>= 1
    }
    return count
}
printBitsAndReturn1sBits(789)
Above approach, The time complexity is O(Number of Bit)
We can optimize it by using subtract by 1. It’s time complexity will be O(number of 1’s) -> Assume we ignore print all the bit information. Just focusing on get 1’s count.
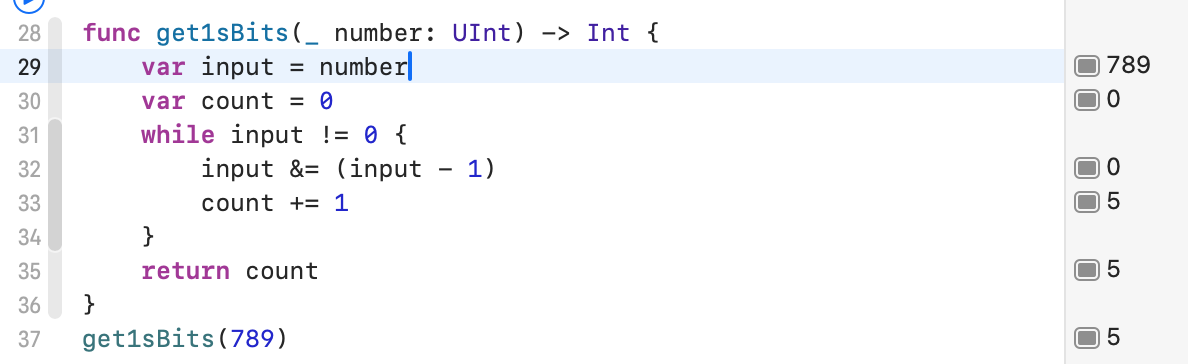

func get1sBits(_ number: UInt) -> Int {
    var input = number
    var count = 0
    while input != 0 {
        input &= (input - 1)
        count += 1
    }
    return count
}
get1sBits(789)

func reversedBit(_ number: UInt) -> UInt {
    var number = number
    print("Input: \(number), Bits: \(String(number, radix: 2))")
    var reversedNumber: UInt = 0
    //Count: Get count of bit of the number, 789 has 10 bit
    var count = String(number, radix: 2).count - 1
    while number != 0 {
        let leftMostBit = number & 1
        reversedNumber = reversedNumber | leftMostBit
        reversedNumber <<= 1
        number >>= 1
        count -= 1
    }
    reversedNumber <<= count
    return reversedNumber
}

let result = reversedBit(789)
print("Ourput: \(result), Bits: \(String(result, radix: 2))")


Did you know Apple provides Sample Code? I learned App Architecture from Apple’s Sample Projects.
In this post, I drew the high level diagram of the Apple’s Sample Code.

Visit Apple Developer’s site and filter by Sample Code
https://developer.apple.com/documentation/uikit

https://developer.apple.com/documentation/uikit/uiscenedelegate/restoring_your_app_s_state
This sample project demonstrates how to preserve your appʼs state information and restore the app to that previous state on subsequent launches. During a subsequent launch, restoring your interface to the previous interaction point provides continuity for the user, and lets them finish active tasks quickly.
When using your app, the user performs actions that affect the user interface. For example, the user might view a specific page of information, and after the user leaves the app, the operating system might terminate it to free up the resources it holds. The user should be able to return to where they left off — and UI state restoration is a core part of making that experience seamless.
This sample app demonstrates the use of state preservation and restoration for scenarios where the system interrupts the app. The sample project manages a set of products. Each product has a title, an image, and other metadata you can view and edit. The project shows how to preserve and restore a product in its DetailParentViewController.
The sample supports two state preservation approaches. In iOS 13 and later, apps save the state for each window scene using NSUserActivity objects. In iOS 12 and earlier, apps preserve the state of their user interfaces by saving and restoring the configuration of view controllers.
For scene-based apps, UIKit asks each scene to save its state information using an NSUserActivity object. NSUserActivity is a core part of modern state restoration with UIScene and UISceneDelegate. In your own apps, you use the activity object to store information needed to recreate your scene’s interface and restore the content of that interface. If your app doesn’t support scenes, use the view-controller-based state restoration process to preserve the state of your interface instead.
By Apple

It uses Singleton DataModelManager.
All the ViewControllers access singleton DataModelManager directly to get data.
The logics are focused on how to save and restore the states using UIStateRestoring.
🌟 Interesting points


https://developer.apple.com/documentation/uikit/uiscenedelegate/supporting_multiple_windows_on_ipad

This project is very simple. Most of the functions are belong to ViewController.
Learned from this project


You must be logged in to post a comment.