Tag: iOS

  • iOS App Launch Time – React Native Sample Project

    Testing App Launch Time for React Native Sample App – Expo

    Create Sample App using Expo

    screenshot 2025 03 26 at 12.20.52e280afam
    screenshot 2025 03 26 at 12.18.32e280afam

    When you create an app using Expo, there are no iOS and Android folder.

    Create iOS and Android folder in Expo Sample Project

    npx expo prebuild

    Setup iOS App Launch Tests

    screenshot 2025 04 05 at 5.04.05e280afpm

    Add UI Testing Bundle and write a test cases

    @MainActor
        func testExample() throws {
            // UI tests must launch the application that they test.
            let app = XCUIApplication()
            app.launch()
    
            // Use XCTAssert and related functions to verify your tests produce the correct results.
        }
    
        @MainActor
        func testLaunchPerformance() throws {
            if #available(macOS 10.15, iOS 13.0, tvOS 13.0, watchOS 7.0, *) {
                // This measures how long it takes to launch your application.
                let measureOptions = XCTMeasureOptions()
                measureOptions.iterationCount = 10
              measure(metrics: [XCTApplicationLaunchMetric()], options: measureOptions) {
                    XCUIApplication().launch()
                }
            }
        }

    Results

    screenshot 2025 04 05 at 5.28.56e280afpm

    I ran 10 times and it’s average launch time is 0.157s (157ms).

  • Useful Github Actions

    Useful Github Actions

    Setting GitHub actions is a headache, and it takes time to run correctly. I’ll share what actions I daily use.

    How to add github actions?

    Add github actions on your branch

    • .github/workflows/xxxx.yml
    github action

    Trigger github action by leaving a comment on PR

    Scenario 1: share new build to someone

    You can define commands to run action

    For example, If you want to share something to test, use this action.

    • share is command
    • test is userId

    And you can leave a comment using github.issues.createComment

    This action is very useful. You can integrate third-party services like Slack, WhatsApp, or Linear. Listening share command and trigger action whatever you want to share it.

    screenshot 2025 01 11 at 6.49.36e280afpm
    name: Comment Action
    on:
      issue_comment:
        types: [created]
    jobs:
      comment_job:
        runs-on: ubuntu-latest
        steps:
          - name: Check Comment Type
            id: check_comment
            uses: actions/github-script@v4
            with:
              github-token: ${{ secrets.GITHUB_TOKEN }}
              script: |
                const comment = context.payload.comment.body.trim();
                console.log(`Received comment: ${comment}`);
    
                const issueOrPrNumber = context.payload.issue?.number || context.payload.pull_request?.number;
                if (!issueOrPrNumber) {
                  throw new Error("Could not determine issue or PR number.");
                }
    
                let action = '';
                if (comment.startsWith('share')) {
                  action = 'share';
                }
    
                core.setOutput('action', action);
                core.setOutput('comment', comment);
                core.setOutput('issue_or_pr_number', issueOrPrNumber);
          
          - name: Handle Share Command
            if: steps.check_comment.outputs.action == 'share'
            uses: actions/github-script@v4
            with:
              github-token: ${{ secrets.GITHUB_TOKEN }}
              script: |
                const comment = '${{ steps.check_comment.outputs.comment }}';
                const issueOrPrNumber = '${{ steps.check_comment.outputs.issue_or_pr_number }}';
    
                if (!issueOrPrNumber) {
                  throw new Error("Could not determine the issue or PR number.");
                }
    
                const splitComment = comment.split(' ');
                if (splitComment.length < 2) {
                  throw new Error("Invalid 'share' command format. Expected: 'share <id>'");
                }
    
                const recipientId = splitComment[1]; // Extract ID after "share"
                const commentBody = `Sharing this with: ${recipientId}`;
    
                console.log(`Adding a share comment for ID: ${recipientId}`);
                await github.issues.createComment({
                  owner: context.repo.owner,
                  repo: context.repo.repo,
                  issue_number: issueOrPrNumber,
                  body: commentBody
                });

    scenario 2: rebuild when the build failed

    There are 2 yml files in workflows

    When you get a build failed message, you can rebuild it by leaving a comment.

    github action
    screenshot 2025 01 11 at 9.56.42e280afpm

    comment_action.yml

    • Get PR Number using github.pulls.get
    • Pass issue_or_pr_number as Inputs to build.yml
    name: Comment Action
    on:
      issue_comment:
        types: [created]
    
    jobs:
      comment_job:
        runs-on: ubuntu-latest
        steps:
          - uses: actions/checkout@v4
          - name: GitHub CLI Login
            run: |
              gh auth login --with-token <<< "${{ secrets.GITHUB_TOKEN }}"
          - name: Check Comment Type
            id: check_comment
            uses: actions/github-script@v4
            with:
              github-token: ${{ secrets.GITHUB_TOKEN }}
              script: |
                const comment = context.payload.comment.body.trim();
                console.log(`Received comment: ${comment}`);
            
                const issueOrPrNumber = context.payload.issue?.number || context.payload.pull_request?.number;
                const isPR = Boolean(context.payload.issue.pull_request);
    
                if (!isPR) {
                  throw new Error("This comment is not associated with a pull request.");
                }
    
                const { data: pullRequest } = await github.pulls.get({
                  owner: context.repo.owner,
                  repo: context.repo.repo,
                  pull_number: issueOrPrNumber,
                });
    
                const sourceBranch = pullRequest.head.ref;
                const targetBranch = pullRequest.base.ref;
    
                console.log(`Source branch: ${sourceBranch}`);
                console.log(`Target branch: ${targetBranch}`);
                if (!issueOrPrNumber) {
                  throw new Error("Could not determine issue or PR number.");
                }
    
                let action = '';
                if (comment === 'rebuild') {
                  action = 'rebuild';
                }
    
                core.setOutput('action', action);
                core.setOutput('comment', comment);
                core.setOutput('issue_or_pr_number', issueOrPrNumber);
                core.setOutput('source_branch', sourceBranch);
                core.setOutput('target_branch', targetBranch);
    
          - name: Rebuild
            run: |
              echo "🟢 Issue or PR Number: ${{ steps.check_comment.outputs.issue_or_pr_number }}"
              gh workflow run rebuild.yml --ref ${{ steps.check_comment.outputs.target_branch }} -f issue_or_pr_number=${{ steps.check_comment.outputs.issue_or_pr_number }}
            env:
              GITHUB_TOKEN: ${{ secrets.GITHUB_TOKEN }}

    build.yml

    • define workflow_dispatch and inputs
    name: build
    
    on:
      workflow_dispatch:
        inputs:
          issue_or_pr_number:
            description: "The issue or PR number to comment on"
            required: true
    
    jobs:
      reusable_job:
        runs-on: ubuntu-latest
        steps:
          - name: Build
            run: echo "Running workflow"
          - name: Rebuild triggered
            uses: actions/github-script@v4
            with:
              github-token: ${{ secrets.GITHUB_TOKEN }}
              script: |
                const issueOrPrNumber = ${{ github.event.inputs.issue_or_pr_number }};
                console.log(`🟢 Input issue_or_pr_number: ${issueOrPrNumber}`);
                if (!issueOrPrNumber) {
                  throw new Error("Could not determine the issue or PR number.");
                }
                const commentBody = `Rebuild triggered`;
                await github.issues.createComment({
                  owner: context.repo.owner,
                  repo: context.repo.repo,
                  issue_number: issueOrPrNumber,
                  body: commentBody
                });

    scenario 3: read latest build success message and share it to someone

    screenshot 2025 01 12 at 12.06.04e280afam

    build.yml

    • Just leave a comment on PR
    name: Build
    
    on:
      pull_request:
        branches:
          - master
        types:
          - opened
          - synchronize
          - reopened
          - edited
    jobs:
      run_on_pr:
        runs-on: ubuntu-latest
        steps:
          - name: Checkout Code
            uses: actions/checkout@v4
          - name: Comment on PR
            uses: actions/github-script@v4
            with:
              github-token: ${{ secrets.GITHUB_TOKEN }}
              script: |
                const issueOrPrNumber = context.payload.pull_request.number;
                console.log(issueOrPrNumber);
    
                await github.issues.createComment({
                  owner: context.repo.owner,
                  repo: context.repo.repo,
                  issue_number: issueOrPrNumber,
                  body: "iOS v12.0(1022)"
                });
    
                await github.issues.createComment({
                  owner: context.repo.owner,
                  repo: context.repo.repo,
                  issue_number: issueOrPrNumber,
                  body: "Android 15.0(1022)"
                });
    screenshot 2025 01 11 at 11.32.18e280afpm

    comment_action.yml

    • await github.issues.listComments
      • default page_num is 30. If your PR have many comments, I suggest you set page_num 100
    name: Comment Action
    on:
      issue_comment:
        types: [created]
    
    jobs:
      comment_job:
        runs-on: ubuntu-latest
        steps:
          - uses: actions/checkout@v4
          - name: GitHub CLI Login
            run: |
              gh auth login --with-token <<< "${{ secrets.GITHUB_TOKEN }}"
          - name: Check Comment Type
            id: check_comment
            uses: actions/github-script@v4
            with:
              github-token: ${{ secrets.GITHUB_TOKEN }}
              script: |
                const comment = context.payload.comment.body.trim();
                console.log(`Received comment: ${comment}`);
            
                const issueOrPrNumber = context.payload.issue?.number || context.payload.pull_request?.number;
                const isPR = Boolean(context.payload.issue.pull_request);
    
                if (!isPR) {
                  throw new Error("This comment is not associated with a pull request.");
                }
    
                const { data: pullRequest } = await github.pulls.get({
                  owner: context.repo.owner,
                  repo: context.repo.repo,
                  pull_number: issueOrPrNumber
                });
    
                const sourceBranch = pullRequest.head.ref;
                const targetBranch = pullRequest.base.ref;
    
                console.log(`Source branch: ${sourceBranch}`);
                console.log(`Target branch: ${targetBranch}`);
    
                core.setOutput('source_branch', sourceBranch);
                core.setOutput('target_branch', targetBranch);
                if (!issueOrPrNumber) {
                  throw new Error("Could not determine issue or PR number.");
                }
    
                let action = '';
                if (comment.startsWith('share')) {
                  action = 'share';
                }
    
                core.setOutput('action', action);
                core.setOutput('comment', comment);
                core.setOutput('issue_or_pr_number', issueOrPrNumber);
    
          - name: Get Latest Build Comments
            if: steps.check_comment.outputs.action == 'share'
            uses: actions/github-script@v4
            with:
              github-token: ${{ secrets.GITHUB_TOKEN }}
              script: |
                const issueNumber = ${{ steps.check_comment.outputs.issue_or_pr_number }};
                const comment = '${{ steps.check_comment.outputs.comment }}';
    
                if (!issueNumber) {
                  throw new Error("Could not determine the issue or PR number.");
                }
    
                const splitComment = comment.split(' ');
                if (splitComment.length < 2) {
                  throw new Error("Invalid 'share' command format. Expected: 'share <id>'");
                }
    
                const recipientId = splitComment[1]; // Extract ID after "share"
                
                // Fetch all comments on the PR
                const comments = await github.issues.listComments({
                  owner: context.repo.owner,
                  repo: context.repo.repo,
                  issue_number: issueNumber,
                  per_page: 100,
                });
    
                console.log("✅ All Comments")
                comments.data.forEach(comment => console.log(`- ${comment.body}`));
    
    
                // Filter and find the most recent iOS-related comment
                const latestIOS = comments.data
                  .filter(comment => comment.body.startsWith('iOS'))
                  .sort((a, b) => new Date(b.updated_at) - new Date(a.updated_at))[0];
    
                // Filter and find the most recent Android-related comment
                const latestAndroid = comments.data
                  .filter(comment => comment.body.startsWith('Android'))
                  .sort((a, b) => new Date(b.updated_at) - new Date(a.updated_at))[0];
    
                if (latestIOS) {
                  console.log(`Latest iOS Comment: ${latestIOS.body}`);
                  core.setOutput('latest_ios_comment', latestIOS.body);
                } else {
                  console.log('No iOS-related comments found.');
                }
    
                if (latestAndroid) {
                  console.log(`Latest Android Comment: ${latestAndroid.body}`);
                  core.setOutput('latest_android_comment', latestAndroid.body);
                } else {
                  console.log('No Android-related comments found.');
                }
                const commentBody = `Sharing this with: ${recipientId}\nReady for Testing\n${latestIOS.body}\n${latestAndroid.body}`;
                await github.issues.createComment({
                  owner: context.repo.owner,
                  repo: context.repo.repo,
                  issue_number: issueNumber,
                  body: commentBody
                });
    screenshot 2025 01 11 at 11.56.50e280afpm
  • How to install IPA file on iPhone device

    How to install IPA file on iPhone device

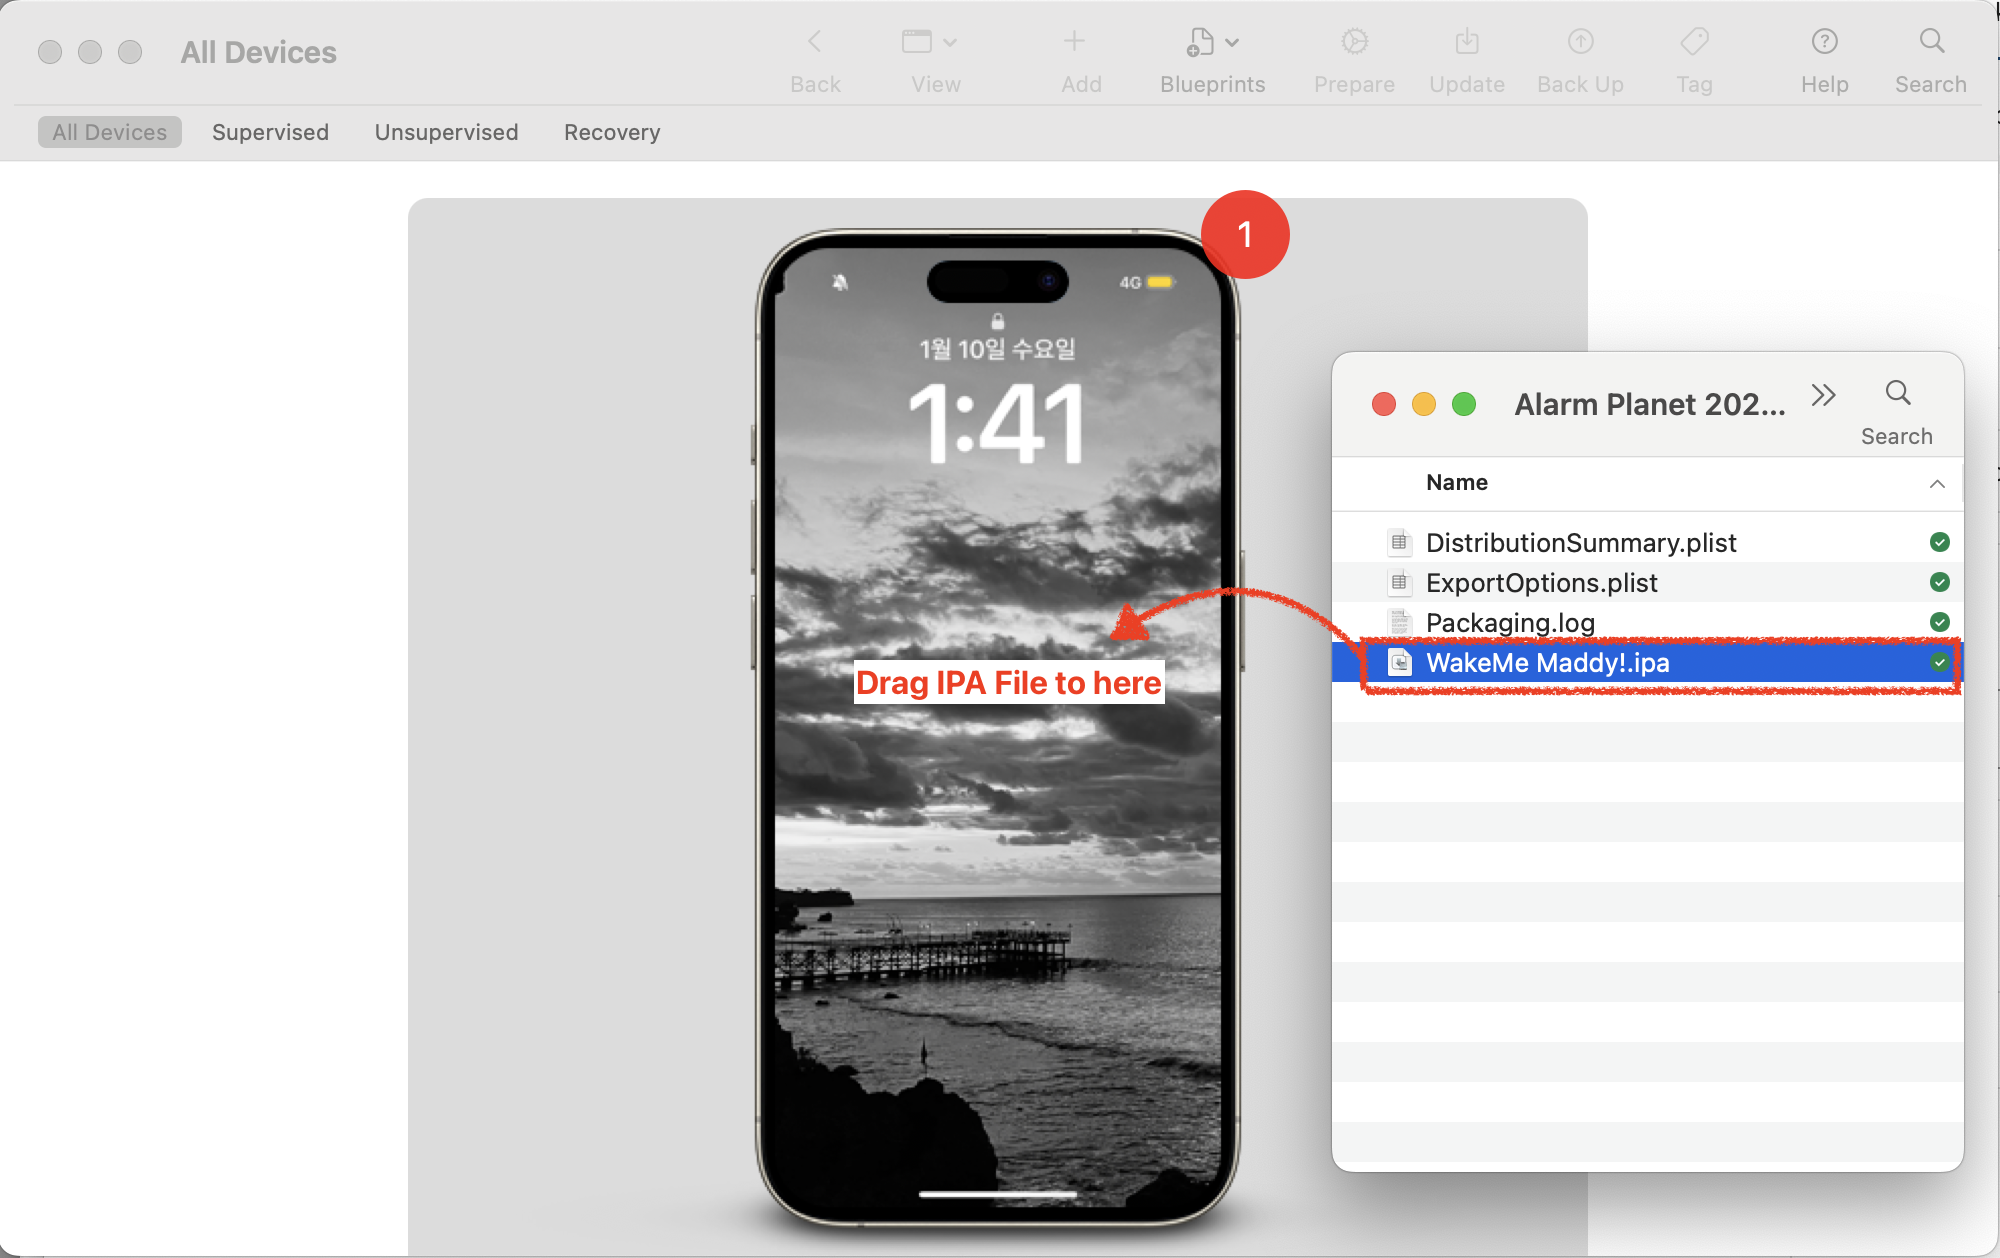
    To install IPA file on iPhone device, use Apple Configurator app

    screenshot 2024 11 01 at 5.42.00e280afpm

    How to use it?

    screenshot 2024 11 01 at 5.46.49e280afpm

    Connect your iPhone into Macbook. In the Apple Configurator app, you may see your connected iPhone screen. Drag IPA file into the your iPhone. That’s it

    screenshot 2024 11 01 at 5.46.08e280afpm

    You will see iPA is adding on your iPhone. (Installing)

  • iOS, Security topics – Certificate, Provisioning, Code Signing, App Transport Security and CryptoKit

    Security topics are common interview question. I summarized what is Certificate, Provisioning, Code Signing, App Transport Security and CryptoKit.

    Overview

    Use the Security framework to protect information, establish trust, and control access to software. Broadly, security services support these goals:

    • Establish a user’s identity (authentication) and then selectively grant access to resources (authorization).
    • Secure data, both on disk and in motion across a network connection.
    • Ensure the validity of code to be executed for a particular purpose.

    As shown in the image below, you can also use lower level cryptographic resources to create new secure services. Cryptography is difficult and the cost of bugs typically so high that it’s rarely a good idea to implement your own cryptography solution. Rely on the Security framework when you need cryptography in your app.

    https://developer.apple.com/documentation/Security

    screenshot 2024 09 08 at 9.01.34e280afpm

    Certificate

    Digital certificates can be used to securely identify a client or server, and to encrypt the communication between them using the public and private key pair.

    A certificate contains a public key, information about the client (or server), and is signed (verified) by a CA.

    A certificate and its associated private key are known as an identity. Certificates can be freely distributed, but identities must be kept secure. The freely distributed certificate, and especially its public key, are used for encryption that can be decrypted only by the matching private key. The private key part of an identity is stored as a PKCS #12 identity certificate (.p12) file and encrypted with another key that’s protected by a passphrase. An identity can be used for authentication (such as 802.1X EAP-TLS), signing, or encryption (such as S/MIME).

    The certificate and identity formats Apple devices support are:

    • Certificate: .cer, .crt, .der, X.509 certificates with RSA keys
    • Identity: .pfx, .p12

    https://support.apple.com/zh-sg/guide/deployment/depb5eff8914/web

    screenshot 2024 09 08 at 8.40.14e280afpm

    Public Key Certificate Flow

    screenshot 2024 09 08 at 8.59.48e280afpm

    Certificate Trust

    If a certificate has been issued from a CA whose root isn’t in the list of trusted root certificates, iOS, iPadOS, macOS, or visionOS won’t trust the certificate. This is often the case with enterprise-issuing CAs. To establish trust, use the method described in certificate deployment. This sets the trust anchor at the certificate being deployed. For multitiered public key infrastructures, it may be necessary to establish trust not only with the root certificate, but also with any intermediates in the chain. Often, enterprise trust is configured in a single configuration profile that can be updated with your MDM solution as needed without affecting other services on the device.

    Root certificates on iPhone, iPad, and Apple Vision Pro

    Root certificates installed manually on an unsupervised iPhone, iPad, or Apple Vision Pro through a profile display the following warning, “Installing the certificate “name of certificate” adds it to the list of trusted certificates on your iPhone or iPad. This certificate won’t be trusted for websites until you enable it in Certificate Trust Settings.”

    The user can then trust the certificate on the device by going to Settings > General > About > Certificate Trust Settings.

    Note: Root certificates installed by an MDM solution or on supervised devices disable the option to change the trust settings.

    https://www.apple.com/certificateauthority/

    https://support.apple.com/zh-sg/guide/deployment/depb5eff8914/web

    PKI (Public Key Infrastructure)

    screenshot 2024 09 08 at 9.15.30e280afpm

    Certificate Chain

    Provisioning

    development provisioning profile

    development provisioning profile allows your app to launch on devices and use certain app services during development. For an individual, a development provisioning profile allows apps signed by you to run on your registered devices. For an organization, a development provisioning profile allows apps developed by a team to be signed by any member of the team and installed on their devices.

    The development provisioning profile contains:

    • wildcard App ID that matches all your team’s apps or an explicit App ID that matches a single app
    • Specified devices associated with the team
    • Specified development certificates associated with the team
    distribution provisioning profile

    distribution provisioning profile is a provisioning profile that authorizes your app to use certain app services and ensures that you are a known developer distributing or uploading your app. A distribution provisioning profile contains a single App ID that matches one or more of your apps and a distribution certificate. You configure the App ID indirectly through Xcode to use certain app services. Xcode enables and configures app services by setting entitlements and performing other configuration steps. Some entitlements are enabled for an App ID (stored in your developer account) and others are set in the Xcode project. When you export or upload your app, Xcode signs the app bundle with the distribution certificate referenced in the distribution provisioning profile.

    https://developer.apple.com/help/account/manage-profiles/edit-download-or-delete-profiles/

    Code Signing

    Code signing is a macOS security technology that you use to certify that an app was created by you. Once an app is signed, the system can detect any change to the app—whether the change is introduced accidentally or by malicious code.

    You participate in code signing as a developer when you obtain a signing identity and apply your signature to apps that you ship. A certificate authority (often Apple) vouches for your signing identity.

    Note: In most cases, you can rely on Xcode’s automatic code signing, which requires only that you specify a code signing identity in the build settings for your project. This document is for readers who must go beyond automatic code signing—perhaps to troubleshoot an unusual problem, or to incorporate the codesign(1) tool into a build system.

    Benefits of Code Signing

    After installing a new version of a code-signed app, a user is not bothered with alerts asking again for permission to access the keychain or similar resources. As long as the new version uses the same digital signature, macOS can treat the new app exactly as it treated the previous one.

    Other macOS security features, such as App Sandbox and parental controls, also depend on code signing. Specifically, code signing allows the operating system to:

    • Ensure that a piece of code has not been altered since it was signed. The system can detect even the smallest change, whether it was intentional (by a malicious attacker, for example) or accidental (as when a file gets corrupted). When a code signature is intact, the system can be sure the code is as the signer intended.
    • Identify code as coming from a specific source (a developer or signer). The code signature includes cryptographic information that unambiguously points to a particular author.
    • Determine whether code is trustworthy for a specific purpose. Among other things, a developer can use a code signature to state that an updated version of an app should be considered by the system to be the same app as the previous version.
    Limitations of Code Signing

    Code signing is one component of a complete security solution, working in concert with other technologies and techniques. It does not address every possible security issue. For example, code signing does not:

    • Guarantee that a piece of code is free of security vulnerabilities.
    • Guarantee that an app will not load unsafe or altered code—such as untrusted plug-ins—during execution.
    • Provide digital rights management (DRM) or copy protection technology. Code signing does not in any way hide or obscure the content of the signed code.
    See Also

    Read Security Overview to understand the place of code signing in the macOS security picture.

    For descriptions of the command-line tools for performing code signing, see the codesign and csreq man pages.

    screenshot 2024 09 08 at 9.32.58e280afpm

    App Transport Security

    On Apple platforms, a networking security feature called App Transport Security (ATS) improves privacy and data integrity for all apps and app extensions. It does this by requiring that network connections made by your app are secured by the Transport Layer Security (TLS) protocol using reliable certificates and ciphers. ATS blocks connections that don’t meet minimum security requirements.

    https://developer.apple.com/documentation/security/preventing-insecure-network-connections

    SSL(Secure Socket Layer)/TLS handshake

    screenshot 2024 09 08 at 1.36.21e280afam

    Apple CryptoKit

    Use Apple CryptoKit to perform common cryptographic operations:

    • Compute and compare cryptographically secure digests.
    • Use public-key cryptography to create and evaluate digital signatures, and to perform key exchange. In addition to working with keys stored in memory, you can also use private keys stored in and managed by the Secure Enclave.
    • Generate symmetric keys, and use them in operations like message authentication and encryption.

    Prefer CryptoKit over lower-level interfaces. CryptoKit frees your app from managing raw pointers, and automatically handles tasks that make your app more secure, like overwriting sensitive data during memory deallocation.

    https://developer.apple.com/documentation/cryptokit/

    image

    Symmetric Key

    • DES (Data Decryption Standard)
    • AES (Advanced Encryption Standard)

    Public Key

    • RSA

    If you want to more about Security, visit this link

  • Socket Programming using Vapor and URLSessionWebSocketTask

    Socket Programming using Vapor and URLSessionWebSocketTask

    In this post, I’ll share how to build socket application.

    Project Structure

    I created a workspace and put the Client (SwiftUI) and Server (Vapor)

    screenshot 2024 07 02 at 2.23.38e280afpm
    screenshot 2024 07 02 at 2.26.00e280afpm

    Server (Vapor)

    Server code is very simple. It is only 32 lines of code.

    import Vapor
    
    func routes(_ app: Application) throws {
        //Endpoint - ws://127.0.0.1:8080/echo
        app.webSocket("echo") { req, ws in
            // Connected WebSocket.
            
            //Send Ping to Client
            ws.sendPing()
            ws.onPong { ws, data in
                // Pong was received from client
                print("Connection alive, Received Pong")
            }
            
            ws.onText { ws, text in
                // String received by this WebSocket.
                ws.send("👋 Sent Message: \(text) from Server")
            }
    
            ws.onBinary { ws, binary in
                // [UInt8] received by this WebSocket.
                print(binary)
                ws.send("Received Data: \(binary.readableBytes)")
            }
            
            ws.onPing { ws, data in
                // Ping was received.
                print("Received Ping")
            }
        }
    }
    

    Client (SwiftUI)

    I used URLSessionWebSocketTask.

    Here is viewModel logic. This class is @Observale and inherent from NSObject to handle URLSessionWebSocketDelegate.

    import SwiftUI
    import Foundation
    
    @Observable class ContentViewModel: NSObject {
        var message: String = ""
        var received: String = ""
        private var session: URLSession!
        private var socketTask: URLSessionWebSocketTask!
        
        override init() {
            super.init()
            self.session = URLSession(configuration: .default, delegate: self, delegateQueue: nil)
            self.socketTask = session.webSocketTask(
                with: URL(string: "ws://127.0.0.1:8080/echo")!
            )
            self.socketTask.resume()
        }
        
        func ping() {
            socketTask.sendPing { error in
                if let error {
                    print("ping failed: \(error.localizedDescription)")
                }
                else {
                    print("pong received")
                }
            }
        }
        
        func send() async {
            try? await socketTask.send(.string(message))
        }
        
        func receive() async {
            while let message = try? await socketTask.receive() {
                switch message {
                case let .string(receivedMessage):
                    print("Received Message from Server: \(receivedMessage)")
                    received = receivedMessage
                default:
                    break
                }
            }
        }
        
        func disconnect() {
            socketTask.cancel(with: .goingAway, reason: nil)
        }
    }
    
    extension ContentViewModel: URLSessionWebSocketDelegate {
        func urlSession(_ session: URLSession, webSocketTask: URLSessionWebSocketTask, didOpenWithProtocol protocol: String?) {
            print("Connected")
            Task {
                await receive()
            }
        }
    
        func urlSession(_ session: URLSession, webSocketTask: URLSessionWebSocketTask, didCloseWith closeCode: URLSessionWebSocketTask.CloseCode, reason: Data?) {
            print("Disconnected: \(closeCode)")
        }
    }
    

    SwiftUI Code

    import SwiftUI
    
    struct ContentView: View {
        @State private var viewModel = ContentViewModel()
        var body: some View {
            VStack {
                Text(viewModel.received)
                Divider()
                HStack {
                    TextField(text: $viewModel.message) {
                        Text("Message")
                    }
                    Button("Send") {
                        Task {
                            await viewModel.send()
                        }
                    }.padding(4)
                        .background(.blue)
                        .foregroundColor(.white)
                }
                Divider()
                Button("Ping") {
                    viewModel.ping()
                }.frame(
                    maxWidth: .infinity,
                    maxHeight: 30
                ).background(.teal)
                    .foregroundColor(.white)
            }
            .padding()
        }
    }
    
    #Preview {
        ContentView()
    }
    

    Let’s run a simple socket application

    Both client and server can send a ping. When received the ping message then receiver send a pong message automatically. It’s a way to check status of connections.

    screenshot 2024 07 02 at 2.20.50e280afpm
    screenshot 2024 07 02 at 2.20.10e280afpm

    If you want to more details about WebSocket, check my post

  • Do you require a server for your iOS app? CloudKit might be the perfect fit for you!

    Do you require a server for your iOS app? CloudKit might be the perfect fit for you!

    Choosing a server can be challenging, especially if you’re not a backend engineer but still need one for your iOS app. You may find yourself in this situation.

    So, Why did I consider CloudKit?

    Well, first off, it’s maintained by Apple and has been around since its introduction at the 2014 WWDC.

    Apple actively uses it for various apps like Photos and Notes, which gives me confidence in its longevity and reliability. Plus, I expect it to receive regular updates from Apple.

    My experience

    Parse.com

    I used Parse (Acquired by Facebook) and contributed to the Parse iOS SDK. I liked it, but Facebook announced its discontinuation.

    Consequently, I had to migrate to alternatives like back4app or Sashido.io, which serve as alternatives to parse.com. While they were good, I encountered issues with the lack of active updates to the iOS SDK. This led me to contribute to its development, but I felt it was a waste of time. I wanted to focus on my app rather than on open-source projects.

    Vapor

    I like Vapor because I can create a server using Swift, which is a significant benefit as an iOS Engineer. Additionally, there are numerous helpful resources available, such as books, YouTube videos, and Udemy courses.

    But why did I consider CloudKit?

    Unlike CloudKit, I would need to implement server logic from scratch, including authentication, deployment, database setup, migration, and data sharing between users.

    My approach

    screenshot 2024 02 12 at 4.14.49e280afpm

    Context

    • I’ve already implemented a server using Vapor to handle authentication. While working on sharing data between users, I researched an easy way to implement the invite/accept feature and found that CloudKit fully supports it.

    The server I implemented using Vapor is deployed on AWS, using ECS with a Load Balancer. Its primary role is handling SignIn/SignUp and supporting user-related features such as changing passwords and usernames. All user information is saved in PostgreSQL.

    For data synchronization across user devices, I utilize NSPersistentCloudKitContainer, which syncs data between CoreData and CloudKit seamlessly. This integration is very convenient and eliminates the need for manual synchronization logic.

    CloudKit also supports invite and accept functionality for sharing data between users, eliminating the need to implement server-side logic for this feature.

    Be aware of CloudKit topics

    Now, returning to Vapor,

    I can access and edit CloudKit’s data using CloudKit Web Service. NSPersistentCloudKitContainer use a special zone called com.apple.coredata.cloudkit.zone. If you’re interested how to access it using CloudKit Web Service, you can check out Reading CloudKit Records for Core Data.

    Public Data

    As for public data storage, I haven’t decided yet where to store it. I’ll update you once I make a decision.

    How about CloudKit costs?

    Currently, the pricing seems like a black box. I can’t find pricing information on the Apple Developer website. That’s why I can’t decide where I should store public data.

    If you want to know AWS costs, see my previous post.

    I captured pricing information by accessing the archived website.

    screenshot 2024 02 12 at 2.15.25e280afpm
    screenshot 2024 02 12 at 2.15.42e280afpm
    screenshot 2024 02 12 at 2.14.45e280afpm

    Overage Fees

    Asset Storage $0.03/GB
    Database Storage $3.00/GB
    Data Transfer $0.10/GB
    Requests per sec $100 per 10 requests
  • Xcode: How to upload dSYM to Firebase Crashlytics

    Xcode: How to upload dSYM to Firebase Crashlytics

    Have you faced the missing dSYM issue? You can fix it by uploading dSYM to firebase.

    Official Document

    Build Setting – Build Options

    Check DWARD with dSYM File

    screenshot 2023 12 20 at 6.18.32e280afpm

    Reorder Build Phase in Xcode

    screenshot 2023 12 20 at 5.55.13e280afpm 1

    Edit Run Script

    screenshot 2023 12 20 at 6.00.44e280afpm
    "${BUILD_DIR%/Build/*}/SourcePackages/checkouts/firebase-ios-sdk/Crashlytics/run"

    Add above command into Run Script

    Add Input Files

    screenshot 2023 12 20 at 6.00.58e280afpm
    ${DWARF_DSYM_FOLDER_PATH}/${DWARF_DSYM_FILE_NAME}
    ${DWARF_DSYM_FOLDER_PATH}/${DWARF_DSYM_FILE_NAME}/Contents/Resources/DWARF/${PRODUCT_NAME}
    ${DWARF_DSYM_FOLDER_PATH}/${DWARF_DSYM_FILE_NAME}/Contents/Info.plist
    $(TARGET_BUILD_DIR)/$(UNLOCALIZED_RESOURCES_FOLDER_PATH)/GoogleService-Info.plist
    $(TARGET_BUILD_DIR)/$(EXECUTABLE_PATH)

    Tap + button at Input Files and Add above paths one by one

    Check dSYM

    screenshot 2023 12 20 at 6.11.38e280afpm

    You can see uploading dsym process in All Messages

    screenshot 2023 12 20 at 6.13.30e280afpm

    Let’s check firebase Crashlytics.

    Crashlytics -> dSYMs

    You can see Uploaded

    • There is a minor issue which is Uploaded dSYM’s version is indicating Unknown

    Conclusion

    screenshot 2023 12 21 at 8.07.39e280afam

    Now I able to see all the crash issue after uploading dSYM (see above screenshot).

  • Swift Compile Optimization Levels Explained – O, Onone, Osize Benchmarks

    Swift Compile Optimization Levels Explained – O, Onone, Osize Benchmarks

    Optimization Level

    Swift compiler has 3 optimization options (link)

    • -O

      • for product code

    • -Onone

      • for development and debugging mode.

    • -Osize

      • for size optimization over the optimizing code


    How to compile swift with optimization level?

    Here is a simple swift code for checking execution time. (main.swift)

    import Foundation
    func sum(from: Int, to: Int) -> Int {
        var result = 0
        for i in from...to {
            result += i
        }
        return result
    }
    
    let startTime = Date()
    let result = sum(from: 1, to: 10000000)
    let endTime = Date()
    
    print("Result: \(result)")
    print("Calculation Time: \(endTime.timeIntervalSince(startTime)) seconds")

    Compiled it with -Onone

    swiftc -Onone main.swift && ./main
    //Result
    Result: 50000005000000
    Time: 1.4896910190582275 seconds

    Compiled it with -O

    swiftc -O main.swift && ./main
    //Result
    Result: 50000005000000
    Time: 0.006083011627197266 seconds

    Results

    -O option is 24,389% faster than -Onone option


    Check SIL file

    swiftc -O main.swift is generating executable file. It is not a human readable file. The optimization process transforms the source code into machine code, which is the binary code that can be executed directly by the computer.

    Do you want to see the intermediate representation of the Swift code generated during the optimization process?

    You can use the -emit-sil flag with the swiftc command. This will output the SIL (Swift Intermediate Language) code generated by the compiler, which is a human-readable representation of the Swift code that has been optimized

    swiftc -O -emit-sil main.swift -o main.sil
    swiftc -Onone -emit-sil main.swift -o main.sil

    908c7 f2128 screenshot2023 04 15at6.09.29pm

    You can see the main.sil file. Let’s open it using TextEdit

    0b60c f50c7 screenshot2023 04 15at6.11.21pm

    Now we can see the details by checking sil file. If you want to learn more about it visit here


    Conclusion

    I wanted to test how Swift’s optimization levels work, so I used the -emit-sil option to generate an SIL (Swift Intermediate Language) file. This file serves as a bridge between the Swift source code and the machine code, and allows the Swift compiler to perform optimizations such as dead code elimination, constant folding, inlining, and loop unrolling. By inspecting and analyzing the SIL file, we can better understand how the Swift compiler is optimizing our code. Additionally, SIL can be used for debugging purposes since it provides a more detailed and low-level view of the generated code compared to the original Swift source

    Notes
    This blog post has been edited using ChatGPT to refine some of the sentences


  • Why Our iOS Team Now Allows Storyboard – Less Code, Faster Compile, Better Preview

    Why Our iOS Team Now Allows Storyboard – Less Code, Faster Compile, Better Preview

    Our UI creation rule was creating a UI programmatically. But recently, we changed it.

    Now our iOS team can create UI depending on their preferred approaches.

    The reason is that there are really good things if you use Storyboard

    • Less Code
    • Compile Time
    • Preview
    • Layout warnings

    Among them, the main reason for making a decision is Compile time.

    Compile Time: Swift vs Storyboard

    Imagine if you need to change the spacing in UIStackView.

    4166c 1epqfvqnf3tep7fema s ja

    The left one is programmatic UI. If you change just one line of code then the swift compiler detects source file changes and will compile it. It may take more time if the source file dependent on other source files.

    The right one is used Storyboard. If you change the spacing in StackView on Storyboard then ibtool compile a storyboard into the multiple nibs(stands for NextStep Interface Build file) at compile time.

    Results: Storyboard compile-time 6.5x faster than Swift

    • Swift: 46.8 seconds
    • Storyboard: 7.2 seconds

    As you can see from the results, compile-time when using the storyboard is much faster than swift file changes.

    7b005 1 4dwt feex5kcczlqg904g
    WWDC2018, Behind the Scenes of the Xcode Build Process

    If you want to know ibtool’s compile options then check man ibtool in /Applications/Xcode.app/Contents/Developer/usr/bin.

    298cd 1k8sex gbcwekxd36yoi rq
    /Applications/Xcode.app/Contents/Developer/usr/bin/
    3fb3b 1iwrvmsxsf12bvcneyenipg
    You can check the Interface Builder document.

    Although there were pros we’ve had some concerns about using Storyboard like below

    • PR Review
    • Conflicts Storyboard/Xib files

    To address these concerns, we need to know about the xib(stands for XML Interface Builder) format.

    xib format

    Storyboard/Xib is a XML format. It means that Human Readable format. I sometimes heard that from iOS Engineers Storyboard/Xib files are hard to review. It’s true compared to reviewing swift code.

    But once familiar with that format You may feel It is easy to review it. Because It looks like HTML format.

    769da 1romijyn5pp69xifthuecha
    The storyboard is an XML document.

    The numbers above the image mean like below

    1. toolVersion

    It means Interface builder tool’s version. It may be changed when you update Xcode. I highly recommend all team members use the latest Xcode version to avoid merge conflicts.

    1. initialViewController

    It indicates the initial view controller’s object id in Storyboard. So If you called an instantiateInitialViewController() then It returns that viewController.

    1. device

    You can use it to preview the layout on Storyboard. Anyone can change it but after checking the layout then I recommend resetting it as your team’s default device (e.g. iPhone X) to avoid merge conflicts.

    1. scenes

    A storyboard can have multiple scenes. A Scene has a ViewController.

    1. segue

    segue is a connection between ViewControllers. It has an id and a destination’s id. If the destination’s id has changed then we need to review it carefully. If there is no ViewController that has the destination’s id then It might be caused a crash at runtime.

    PR review

    I’ll show two examples.

    • Minor changes
    • Major changes (e.g. Layout, objectId, segue, etc)

    Minor Changes

    These changes normally don’t affect your UI. So You can easily review and approve it. It should be fine.

    425dd 1oiqk9iejnzpui4zzgrmcaa
    • toolsVersion / plugin version can be changed automatically when you use a different Xcode version and edited the Interface Builder.
    • rect can be changed when you change the device or move a subview. These small changes should be fine because It uses autolayout.
    • propertyAccessControl(Locking View) is controlled by the developer. I’ll explain it next section.

    Major Changes

    Major Changes will affect layout issues. I’ll show you some examples below.

    625c2 179yhthon9cb1dh9znaqnnq
    Embedded in UIStackView

    If you embedded labels in UIStackView then you have to double-check label’s id is in stackView or not.

    d1934 1e8qkfsdftr5tp dhp wlyw
    Layout Constraint Issue

    An ambiguous=”YES” indicates us there is Layout Issue! So It should be fixed.

    Pull Request Template

    I highly recommend adding a screenshot of the layout in PR. To encourage your teammate to add a screenshot, set a Pull Request Template.

    It is our team’s template.

    Description
    ===

    Screens
    ---

    Links (JIRA / Confluence)
    ---

    Related PR
    ---

    Check Lists
    ---
    - [x] multiple devices
    - [x] confirmed by developer
    c3b95 15jd7ixiiq7wiqnlugnuvvq
    Add a pull_request_template.md in .github/ path

    How to avoid merge conflicts?

    File changes cause merge conflicts. You can avoid it by dealing with file changes carefully.

    By following this rule, merge conflicts are avoided as much as possible.

    • use the latest Xcode.
    • don’t commit the changes if you are not working on that View
    • locking Views in Storyboard and XIB Files you are working on

    If your team is working on the same Storyboard, I highly recommend locking views to prevent unwanted changes.

    21324 1 gtiwzhrj9lyultmkk luq
    Show the Identity Inspector -> Lock

    You can set a lock on any UI Components(Whole Storyboard, UIViewController, UIView, Segue, any UI-related objects like a Constraint) you will be working on. As I mentioned above, propertyAccessControl will be added to the storyboard/xib file when you set a lock.

    073d2 1tzky1ldnxtiljrus fxtlw
    UIViewController is locked

    Lock Image will be shown when you try to change on Locking View.

    Conclusion

    There are cons and pros to using Storyboard/Xib. Productivity is also different depending on the iOS developer’s preferred UI creation approach. But We made a decision to use both. Because we can save compile-time and found a good solution to resolve concerns for using it.

    Also, It is a first-party tool. Apple has developed the IB tool over 34 years. And It is being actively updated come with Xcode.

    • 34 Years Ago In 1988, Interface Builder was released by Apple
    • 15 Years Ago In 2007, XML Interface Builder was released by Apple
    • 11 Years Ago In 2011, Storyboard was introduced at WWDC 2011

    I hope our decision helps you decide to use Storyboard/Xib in your team!

    References

    Locking Views in Storyboard and XIB Files

    What’s New in Storyboards

    Build interfaces with style

    Implementing UI Designs in Interface Builder

    Auto Layout Techniques in Interface Builder

    Behind the Scenes of the Xcode Build Process

  • Swift Struct vs Class – When to Use Structs and Classes in iOS

    Swift Struct vs Class – When to Use Structs and Classes in iOS

    I was asked What is Struct and Class? Could you explain it?

    It’s the most common interview question.

    I summarized the differences between classes and structure when to use it.


    Struct versus Class

    Structure and Enum are value types.

    • It is copied when it’s assigned to a variable or constant, or it’s passed to a function.

    Classes are reference types.

    • Reference types are not copied when they’re assigned to a variable or constant or when they’re passed to a function. Rather than a copy, a reference to the same existing instance is used.

    Structure and Class both can

    • define properties to store values

    • define methods to provide functionality

    • define subscripts to provide access to their values using subscript syntax

    • define initializers to set up their initial state

    • be extended to expand their functionality beyond a default implementation

    • conform to protocols to provide standard functionality of a certain kind

    • Include computed properties.

    Classes have additional capabilities that structures don’t have.

    • Inheritance enables one Class to inherit the characteristics of another.

    • Typecasting enables you to check and interpret the type of a class instance at runtime.

    • Deinitializers enable an instance of a class to free up any resources it has assigned.

    • Reference counting allows more than one reference to a class instance.

    • Identity operators to check whether two constants or variables refer to the same single instance.

      • Identical to (===)

      • Not identical to (!==)

    The structure has additional capabilities that classes don’t have.

    • Memberwise initializers

      • You can use it to initialize the member properties of the new structure instance.


    Choosing between Structures and Classes

    Decide how to store data and model behavior.

    When designing a type, we have to think about whether ownership of a particular instance of this type “has to be shared among different parts of our program, or if multiple instances can be used interchangeably as long as they represent the same value. To share ownership of a particular instance, we have to use a class. Otherwise, we can use a struct.

    Chris Eidhof. “Advanced Swift.”

    Apple’s guide

    • Use structures by default

    • Use structures along with protocols to adopt behavior by sharing implementations.

    • Use classes when you need Objective-C interoperability

    • Use classes when you need to control the identity of the data you’re modeling

    Choose Structures

    • It makes it easier to reason about a portion of your code without needing to consider the whole state of your app. Because structures are valued types-unlike classes-local changes to a structure aren’t visible to the rest of your app unless you intentionally communicate those changes as part of the flow of your app.

    • when you don’t control identity

      • Use structure when you’re modeling data that contains information about an entity with an identity that you don’t control.

      • Local changes to model types like PenPalRecord are useful. For example, an app might recommend multiple different penpals in response to user feedback. Because the PenPalRecord structure doesn’t control the identity of the underlying database records, there’s no risk that the changes made to local PenPalRecord instances accidentally change values in the database.

      • If another part of the app changes my nickname and submits a change request back to the server, the most recently rejected change won’t mistakenly pick up penpal recommendation. Because the myId property is declared as a constant, it can’t change locally. As a result, requests to the database won’t accidentally change the wrong record.

    struct PenPalRecord {
        let myID: Int
        var myNickname: String
        var recommendedPenPalID: Int
    }
    
    var myRecord = try JSONDecoder().decode(PenPalRecord.self, from: jsonResponse)
    • Use structures and protocols to model inheritance and share behavior.

      • Structure can’t inherit from classes. However, the kinds of inheritance hierarchies you can build with class inheritance can also be modeled using protocol inheritance and structures.

      • Protocols permit classes, structures, and enumerations to participate in inheritance, while class inheritance is only compatible with other classes. When you are choosing how to model your data, try building the hierarchy of data types using protocol inheritance first, then adopt those protocols in your structures.

    Choose Classes

    • when you need to control identity (===)

      • Common use cases are file handles, network connections, and shared hardware intermediaries like CBCentralManager.

      • If you share a class instance across your app, changes you make to that instance are visible to every part of your code that holds a reference to that instance.

        • local database connection.