To support HTTPS, We need to create a certificate. I’ll use an AWS certificate.
Add your domain name. e.g., *.yourDomain.com
That’s it. Let’s create Load Balancer
Create AWS Load Balancer
The load balancer connects to the ECS service through a fixed DNS. If you have your domain address, you can register Load Balancer’s DNS as CNAME and use it.
First, select Load Balancing from the list of EC2 services.
This part is essential. Let’s add HTTPS.
Please set up the VPC of the ECS created in the previous post.
I choose the certificate which is made on AWS.
Leave only 0.0.0/0 in Source and delete the ‘::/0’. ‘::/0’ is used by ipv6.
The vapor app uses 8080 as the default port. Let’s set the routing port to 8080.
A health check is a path that periodically checks whether the server is operating correctly. Health Check is straightforward to set up in the Vapor app.
//Set HealthCheck
app.get("health") { req  in
    return "OK"
}
Whether the server is running correctly every 120 seconds, that is, every 2 minutes.
The setting is done. Simple, isn’t it?
Don’t forget to check if the Target Group of Load Balancer is also adequately created.
Create ECS Service
Let’s create a new service that runs on ECS Container. I’ll set a load balancer for it.
The tasks are pending because our server can’t access the RDS. I’ll resolve it by setting the inbound rule for RDS.
Setup inbound of RDS
Now the tasks that run on ECS are working fine.
Setup ‘forward rule’ on Load Balancer
To access your server, You should set up the ‘forward rule’ on LoadBalancer. Do you remember our load balancer listens to two-port? HTTP and HTTPS.
Let’s set up the ‘forward rule.’
Check your Load Balancer. You can see there is two Listener ID.
Set HTTPS, Forward to ECS Clusters load balancing target group.
Set HTTP, Forward to ECS Clusters load balancing target group. (Yes, It’s the same as HTTPS)
That’s all. Now you can access your Vapor Server by using the DNS name. Copy and Pasted it to your web browser and then check whether it can access or not.
Setup your DNS Name, CName on Namecheap.com
Do you have your domain? The last step is to set up your domain with an AWS load balancer and certificates.
Go to AWS Certificate Manager. Check your CNAME and Value.
I’m using NameCheap.com. So If you bought a domain at NameCheap.com, then go to the advance DNS setup at NameCheap.com.
You have to register two CNAME records. One is AWS Certificates the other one is Load Balancer’s DNS.
AWS Certificates
AWS Certificate Manager -> Domain
Load Balancer’s DNS
EC2 -> Load Balancers -> Description -> DNS Name
Conclusion
I introduced how to set up your vapor app using the Load Balancer. There are many steps you have to set up. I don’t think It’s complicated. Once you set it up, then you can easily set up your vapor app next time. I hope you enjoy reading my posts.
This post will write about Docker, AWS ECR, ECS, Fargate, RDS, and Github Action.
Contents
Overview
Getting Start AWS
Step 1. Create AWS Account
Step 2. Create IAM Account
Create Amazon ECR
Create Amazon ECS
Create Amazon RDS
Deploy: Push your Docker Image
Option 1. AWS Command line tool on macOS
Fargate Task Pending Issue!!
Try to access the Vapor app on Web Browser
Option 2. Github Action
MEMO
I’m not a DevOps or backend engineer. Before posting it, I read books about AWS and Server-Side Swift and tutorials and took advice from friends who work as backend engineers.
Overview
To deploy the vapor docker container, I’ll use AWS services.
You can push your docker image to the ECR. And then, ECS pull your docker image by setting the ECR URI. ECS launch docker container on AWS. Also, It has integration with Load Balancer. The Fargate is a task of ECS. It is responsible for offering serverless. You can set memory and CPU for containers.
Getting Start AWS
Step 1. Create AWS Account
If you haven’t an account yet, let’s create a new account.
Now You have an AWS account. This account is called a root account.
Step 2. Create IAM Account
Log in as root account. And then search the IAM at the top of the search bar.
Before creating IAM Account, Let’s make the group for users. I captured all of the steps. You just followed the steps below.
Create Groups
Enter the group name you want to use it.
You created the group. As you can see, there are no Users in the group. Let’s create an IAM account and add it to the group we made.
Create IAM Account
Don’t forget to download .csv file. To access AWS using the CLI tool, you need to set accessKey, secretKey, and console login link.
Now You have an IAM Account. In the AWS document, You should not use the root account for creating the other services. You can use the root account when managing users (IAM service) and billings.
That’s all about the root account’s role. Please log out root account now. And login with an IAM account you created to create an ECR, ECS, Fargate, and RDS services.
If you forgot the accountID(12 digits), you log in as a root account and check your accountID(12 digits).
You will see your 12 digits of account id in the blue box above the screenshot.
Create Amazon ECR
ECR is a repository for Docker Images like Docker Hub. You can push and pull your Docker images and set version tags. The default setting is private, and also you can select a public repository.
Search the ECR at the top of the search bar and create a repository.
Set the repository name you want.
That’s it. Click the Create repository button.
Wait a few seconds. You will see the repository you created. Now You are ready to push your Docker image to the ECR.
Create Amazon ECS
Now You need to create an ECS cluster and task to run your Docker Image in ECR.
Copy your ECR URI. (We will use this URI:latest as an image URI)
Select the ECS Clusters and Click the Get started button.
Paste your ECR URI you copied. e.g., ecrUri:latest
Expand the Advanced Container Configuration. Scroll down to Environment section. Remove the default settings in the blue box above the screenshot.
Enter the task definition name you want.
Create Amazon RDS
To set up a database for your vapor app, You have to create an RDS service database. Search for the RDS keyword at the top of the search bar.
I’ll use PostgreSQL. (Select database you want to use for vapor app)
Set your ECS VPC. The subgroup is automatically updated when you select the VPC.
Create New VPC security group to set the inbound for PostgreSQL default port 5432.
That’s it. You can check the database you create.
Deploy: Push your Docker Image
I’ll show you how to push your Docker image to the ECR. There are two options. Choose the option you like.
# Build image
FROM swift:5.3.2-focal as build

RUN apt-get update -y \
    && apt-get install -y libsqlite3-dev

WORKDIR /build

COPY . .

RUN swift build \
    --enable-test-discovery \
    -c release \
    -Xswiftc -g

# Run image
FROM swift:5.3.2-focal-slim

RUN useradd --user-group --create-home --home-dir /app vapor

WORKDIR /app

COPY --from=build --chown=vapor:vapor /build/.build/release /app
COPY --from=build --chown=vapor:vapor /build/Public /app/Public
COPY --from=build --chown=vapor:vapor /build/Resources /app/Resources

# ARS RDS Environment ARG
ARG AWS_RDS_HOST
ARG AWS_RDS_PORT
ARG AWS_RDS_USER
ARG AWS_RDS_PASS
ARG AWS_RDS_DB

# SignInWithApple Environment ARG
ARG SIWA_ID
ARG SIWA_REDIRECT_URL
ARG SIWA_JWK_ID
ARG SIWA_PRIVATE_KEY
ARG SIWA_TEAM_ID
ARG SIWA_APP_BUNDLE_ID

# Set Environment
RUN echo "SIWA_ID=${SIWA_ID}" > .env.production
RUN echo "SIWA_REDIRECT_URL=${SIWA_REDIRECT_URL}" >> .env.production
RUN echo "SIWA_JWK_ID=${SIWA_JWK_ID}" >> .env.production
RUN echo "SIWA_PRIVATE_KEY=${SIWA_PRIVATE_KEY}" >> .env.production
RUN echo "SIWA_TEAM_ID=${SIWA_TEAM_ID}" >> .env.production
RUN echo "SIWA_APP_BUNDLE_ID=${SIWA_APP_BUNDLE_ID}" >> .env.production

RUN echo "DB_HOST=${AWS_RDS_HOST}" >> .env.production
RUN echo "DB_PORT=${AWS_RDS_PORT}" >> .env.production
RUN echo "DB_USER=${AWS_RDS_USER}" >> .env.production
RUN echo "DB_PASS=${AWS_RDS_PASS}" >> .env.production
RUN echo "DB_NAME=${AWS_RDS_DB}" >> .env.production

USER vapor

# Export Port
EXPOSE 8080

ENTRYPOINT ["./Run"]
CMD ["serve", "--env", "production", "--hostname", "0.0.0.0", "--port", "8080"]
The code is my Dockerfile for the Vapor app. I’ll write the post about server-side swift. In this post, I focused on deploying the Docker Image to AWS. Don’t forget to export 8080.
Option 1. AWS Command line tool on macOS
Install AWS cli tool on macOS
Download the pkg file and install it. You don’t need to set the installation path. Just click the continue button until the installation is completed.
Open the terminal and check the CLI tool.
Deploy the Docker image using the CLI tool.
Let’s create a `deploy.sh` file in the path which has Dockerfile.
Set your containerName and region. You can check these names on Amazon ECR.
Step 1. You can check the access key and secret key in the CSV file of the IAM Account you create.
Step 3. Check your RDS values on the RDS Database settings.
sh ./deploy.sh
Let’s run the deploy script and check the result. There is no issue, and You pushed the Docker image to the ECR successfully.
You can see the image you pushed. If you want to check the command for push image using CLI, click the View push commands above the screenshot.
Fargate Task Pending Issue!!
You pushed the Docker image to the ECR. The ECS Fargate task is automatically started to run the Vapor container. Let’s check the Fargate task’s status. You may find-out the problem. Its status is pending. Why?
You didn’t set the inbound rule for your ECS VPC. Let’s put the inbound rule of the security group on RDS for ECS VPC.
Add custom TCP 5432 PORT. Don’t forget to select the source as your ECS Container Security Group.
Let’s recheck the Fargate task. Its status is updated to Running. You resolve the RDS accessing problem!
You can also check the log in the CloudWatch service. Your server is running now.
Try to access the Vapor app on Web Browser
Let’s check the public IP and access the Vapor app on the Web Browser.
Hmm, You can’t access the server. The problem is that you didn’t allow the 8080 port in the Cluster’s security group.
Let’s resolve this issue.
That’s all. Now You can access the vapor app on Safari. Let’s recheck it.
You resolve the access problem!
Option 2. Github Action
You can also set the deploy Docker Image using Github Action. Let’s set up. Before reading this section, I have to say that the setting of Github Action has one issue. I have almost done it except building Docker Image. If you want to try my setup, let’s keep follow my instruction.
Click the New workflow on your GitHub repository.
I’ll use the Deploy to Amazon ECS template.
In the YML file, You can see the ${{ secrets.KEY }}. This KEY is Secret Environment Variables. You can set the values on your repository Settings tap.
Set the Environment Variable Name and Value.
That’s it.
# This workflow will build and push a new container image to Amazon ECR,
# and then will deploy a new task definition to Amazon ECS, when a release is created
#
# To use this workflow, you will need to complete the following set-up steps:
#
# 1. Create an ECR repository to store your images.
#    For example: `aws ecr create-repository --repository-name my-ecr-repo --region us-east-2`.
#    Replace the value of `ECR_REPOSITORY` in the workflow below with your repository's name.
#    Replace the value of `aws-region` in the workflow below with your repository's region.
#
# 2. Create an ECS task definition, an ECS cluster, and an ECS service.
#    For example, follow the Getting Started guide on the ECS console:
#      https://us-east-2.console.aws.amazon.com/ecs/home?region=us-east-2#/firstRun
#    Replace the values for `service` and `cluster` in the workflow below with your service and cluster names.
#
# 3. Store your ECS task definition as a JSON file in your repository.
#    The format should follow the output of `aws ecs register-task-definition --generate-cli-skeleton`.
#    Replace the value of `task-definition` in the workflow below with your JSON file's name.
#    Replace the value of `container-name` in the workflow below with the name of the container
#    in the `containerDefinitions` section of the task definition.
#
# 4. Store an IAM user access key in GitHub Actions secrets named `AWS_ACCESS_KEY_ID` and `AWS_SECRET_ACCESS_KEY`.
#    See the documentation for each action used below for the recommended IAM policies for this IAM user,
#    and best practices on handling the access key credentials.

on:
  push:
     branches: [ master ]
name: Deploy to Amazon ECS

jobs:
  deploy:
    name: Deploy
    runs-on: ubuntu-latest

    steps:
    - name: Checkout
      uses: actions/checkout@v2

    - name: Configure AWS credentials
      uses: aws-actions/configure-aws-credentials@v1
      with:
        aws-access-key-id: ${{ secrets.AWS_ACCESS_KEY_ID }}
        aws-secret-access-key: ${{ secrets.AWS_SECRET_ACCESS_KEY }}
        aws-region: us-east-2

    - name: Login to Amazon ECR
      id: login-ecr
      uses: aws-actions/amazon-ecr-login@v1

    - name: Build, tag, and push image to Amazon ECR
      id: build-image
      env:
        ECR_REGISTRY: ${{ steps.login-ecr.outputs.registry }}
        ECR_CONTAINER_NAME: ${{ secrets.AWS_ECS_CONTAINER_NAME }}
        IMAGE_TAG: latest
      run: |
        # Build a docker container and
        # push it to ECR so that it can
        # be deployed to ECS.
        docker build \
          --build-arg SIWA_ID=${{ secrets.SIWA_ID }} \
          --build-arg SIWA_REDIRECT_URL=${{ secrets.SIWA_REDIRECT_URL }} \
          --build-arg SIWA_JWK_ID=${{ secrets.SIWA_JWK_ID }} \
          --build-arg SIWA_PRIVATE_KEY=${{ secrets.SIWA_PRIVATE_KEY }} \
          --build-arg SIWA_TEAM_ID=${{ secrets.SIWA_TEAM_ID }} \
          --build-arg SIWA_APP_BUNDLE_ID=${{ secrets.SIWA_APP_BUNDLE_ID }} \
          --build-arg AWS_RDS_HOST=${{ secrets.AWS_RDS_HOST }} \
          --build-arg AWS_RDS_PORT=${{ secrets.AWS_RDS_PORT }} \
          --build-arg AWS_RDS_USER=${{ secrets.AWS_RDS_USER }} \
          --build-arg AWS_RDS_PASS=${{ secrets.AWS_RDS_PASS }} \
          --build-arg AWS_RDS_DB=${{ secrets.AWS_RDS_DB }} \
        -t $ECR_REGISTRY/$ECR_CONTAINER_NAME:$IMAGE_TAG .
        docker push $ECR_REGISTRY/$ECR_CONTAINER_NAME:$IMAGE_TAG
        echo "::set-output name=image::$ECR_REGISTRY/$ECR_CONTAINER_NAME:$IMAGE_TAG"
I modified the YML file refer to our deploy.sh file. When you commit to the master branch, then Github Action is started. Let’s check the results.
Almost steps are done. But The Docker build step is failed.
In the build step, the docker command can’t find the Dockerfile. If you use the `uses: docker/build-push-action@v2` in YML, You can successfully build your Dockerfile. But `uses: docker/build-push-action@v2` is trying to push docker hub, not AWS ECR, even if I set the ECR URI. If you know to resolve this issue, please let me know. I’ll update the Github Action step soon!
In this post, I’ll explain the life cycle of UIViewController.
What happens when you create the UIViewController?
loadView (only once called during the entire life cycles)
viewDidLoad (only once called during the entire life cycles)
viewWillAppear
viewIsAppearing
viewWillLayoutSubviews
viewDidLayoutSubviews
viewDidAppear
And what happens when you dismiss or destroy the UIViewController?
viewWillDisappear
viewDidDisappear
There are many steps of UIViewControllers. Let’s take a look loadView method.
loadView
Every view controller which subclassing the UIViewController has the view. It is the root view of the view controller. The default value is nil, and loadView is called when a view is a nil.
There are three ways to initialize the UIViewControllers.
Use Nib
Use Storyboard
Use Code
You take care of loadView methods. If your view controller uses the Nib or Storyboard, then you should not override this method.
Why?
As I mentioned, You can initialize the UIViewController in different ways. If you use the Nib or Storyboard, the view will be set when loaded from Nib or Storyboard objects.
Nib
The init(nibName:bundle:) will set the view by loading the nib file.
Storyboard
The initiateViewController(withIdentifier:) will set the view. (UIStoryboard object create the view controller and return it to your code)
Code
You should override the loadView method to set the root view of the view controller. You can also put subviews into the root view on this method. Don’t call a super.loadView in the override loadView method.
override func loadView() {
     let rootView = UIView()
     rootView.backgroundColor = .blue
     view = rootView

     //You can also add some more subviews into the view
 }
ViewDidLoad
It is called when the view controller’s view hierarchy is loaded into the memory.
If you are using Storyboard or Nib, You can add, remove subviews on ViewDidLoad methods.
Use this method to add or remove views, modify layout constraints, and load data for your views.
viewWillAppear
This method is called before configuring any animations and adding to the view hierarchy to display. You can set the style of view or set or change the orientation of the status bar. Call a super.viewWillAppear is required.
viewWillLayoutSubviews
When the view controller’s view is changed in its layout or bounds, then the system will call a viewWillLayoutSubviews. Compare to viewDidAppear; It will be automatically called when the view’s frame or bound changed, which means it can be called several times. On the other hand, viewDidAppear called once when the view controller’s view shows on the screen.
Your view controller can override this method to make changes before the view lays out its subviews. The default implementation of this method does nothing.
viewDidLayoutSubviews
This method is called when after layout subViews. It means that the view is updated and lays out their bounds and frames. You can override this method if you need some implementation when after updated views. And You don’t need to call a super.viewDidLayoutSubviews because the default implementation does nothing.
When the bounds change for a view controller’s view, the view adjusts the positions of its subviews and then the system calls this method. However, this method being called does not indicate that the individual layouts of the view’s subviews have been adjusted. Each subview is responsible for adjusting its own layout.
updateViewConstraints
If you use autolayout, You can override this method to update the view’s constraints. This method will be called when you call a view.setNeedsUpdateConstraints().
What happens when you call a setNeedsUpdateConstraint?
viewWillLayoutSubviews
updateViewConstraints
viewDidLayoutSubviews
Here are examples
@IBOutlet weak var buttonTopConstraint: NSLayoutConstraint!

override func updateViewConstraints() {
    //Implement your code in here
    buttonTopConstraint.constant = 100
    //You should call a super.updateViewConstraints at final step
    super.updateViewConstraints()
}
Hmm, I watched the WWDC 15 video about this. I’m not sure should I need to override this function or not. Apple also recommends setting constraints in a place when you need to change it. (e.g., When tapped the button then update the constraint, set a constraint in an IBAction method) If you are facing a performance problem to update the constraints, then you can override updateViewConstraints.
Override this method to optimize changes to your constraints.
It is almost always cleaner and easier to update a constraint immediately after the affecting change has occurred. For example, if you want to change a constraint in response to a button tap, make that change directly in the button’s action method.
You should only override this method when changing constraints in place is too slow, or when a view is producing a number of redundant changes.
Your implementation must be as efficient as possible. Do not deactivate all your constraints, then reactivate the ones you need. Instead, your app must have some way of tracking your constraints, and validating them during each update pass. Only change items that need to be changed. During each update pass, you must ensure that you have the appropriate constraints for the app’s current state.
viewDidAppear
It is called when after all of the views in view controller are onScreen. Call a super.viewDidAppear is required.
viewWillDisappear
It is called the view being removed from the view hierarchy. You can use this function to resign the responder or revert the orientation or style of view set on viewWillAppear or viewDidAppear. Call a super.viewWillDisappear is required.
viewDidDisapper
It is called the view was removed from the view hierarchy. Use this function if you need some tasks when dismissing the view controller. Call a super.viewDidDisappear is required.
In this tutorial, you’ll learn how to separate logics from view and to deal with user input on UITextField by making the calculator app. In this project, users can input the bill and tip, and it automatically displays the result of the total amount and tip amount when entering the bill or tip. You can also learn how to view the number of human-friendly formats.
In the process, you’ll learn:
Designing the calculator app using storyboard and xib
Rendering the xib in storyboard by using IBDesignable and IBInspectable
Dealing with input using the UITextFieldDelegate and NumberFormatter
Reflect the result of the total amount and tip amount using the protocol.
Key Topics
Storyboard
IBOutlet / IBAction
Delegate Pattern
NumberFormatter
Designing the calculator app using storyboard and xib
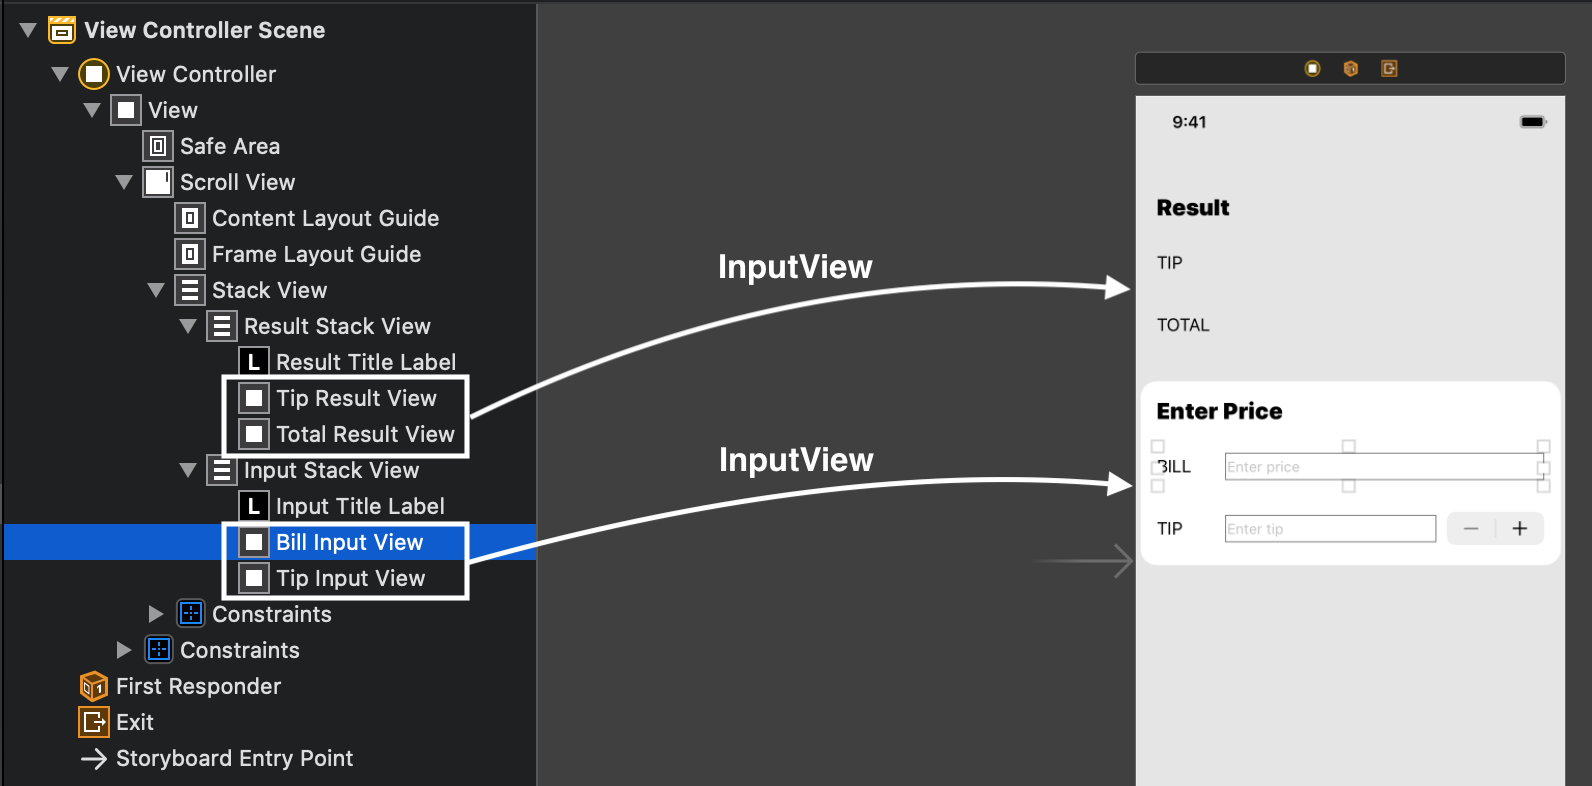
This calculator app has four components, which are two input fields and two result views. As you can see, the elements look similar. Isn’t it? It consists of UILabel, UITextField, and UIStepper. Ok, making the CustomView for a component using xib is the right choice rather than layout the all separated UILable, UITextField, and UIStepper 4 times into the Storyboard.
Let’s create our InputView.
⌘ + N -> Source -> Swift File
⌘ + N -> User Interface -> View
We created the Swift and Xib File. Let’s set up xib.
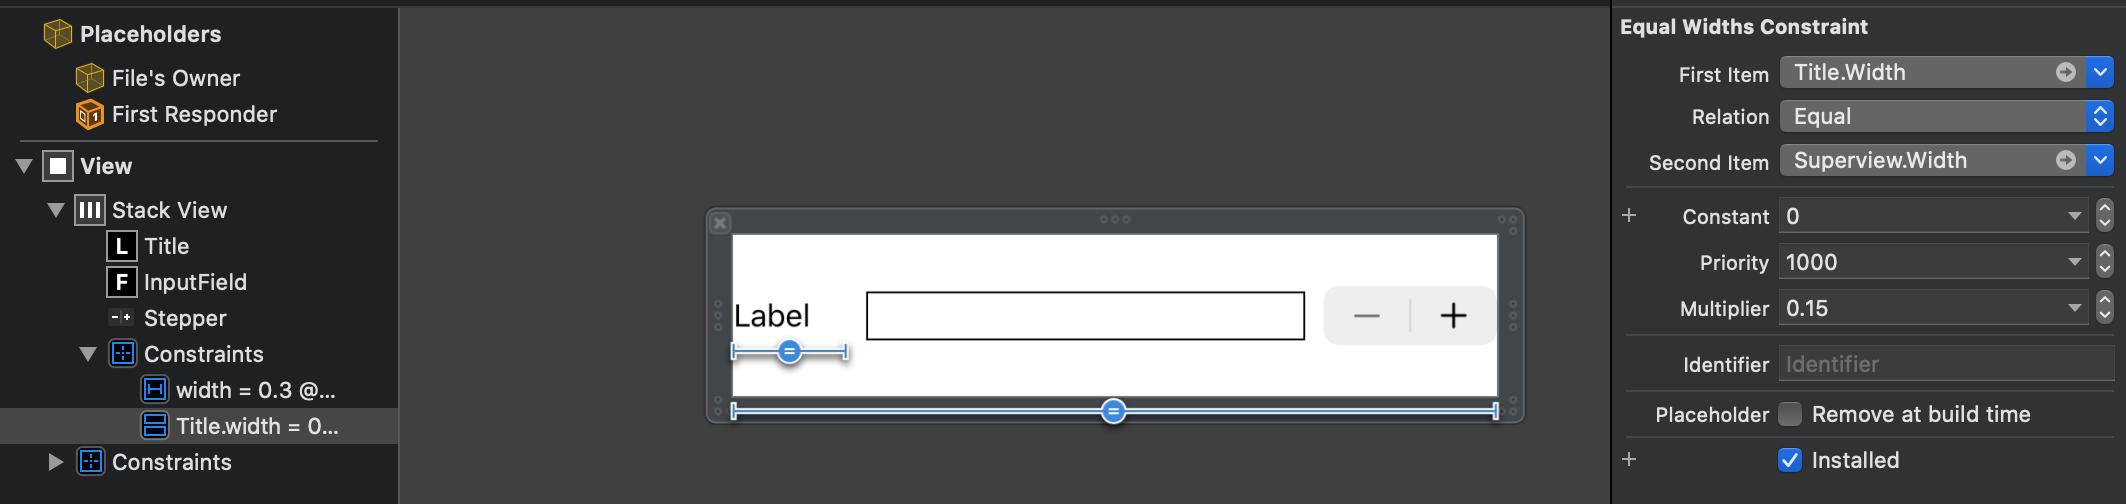
We use the StackView to layout the item horizontally. The UILabel is set by width constraint relative to SuperView’s width and multiply the 0.15, which means UILabel’s width will place 15% of SuperView’s width.
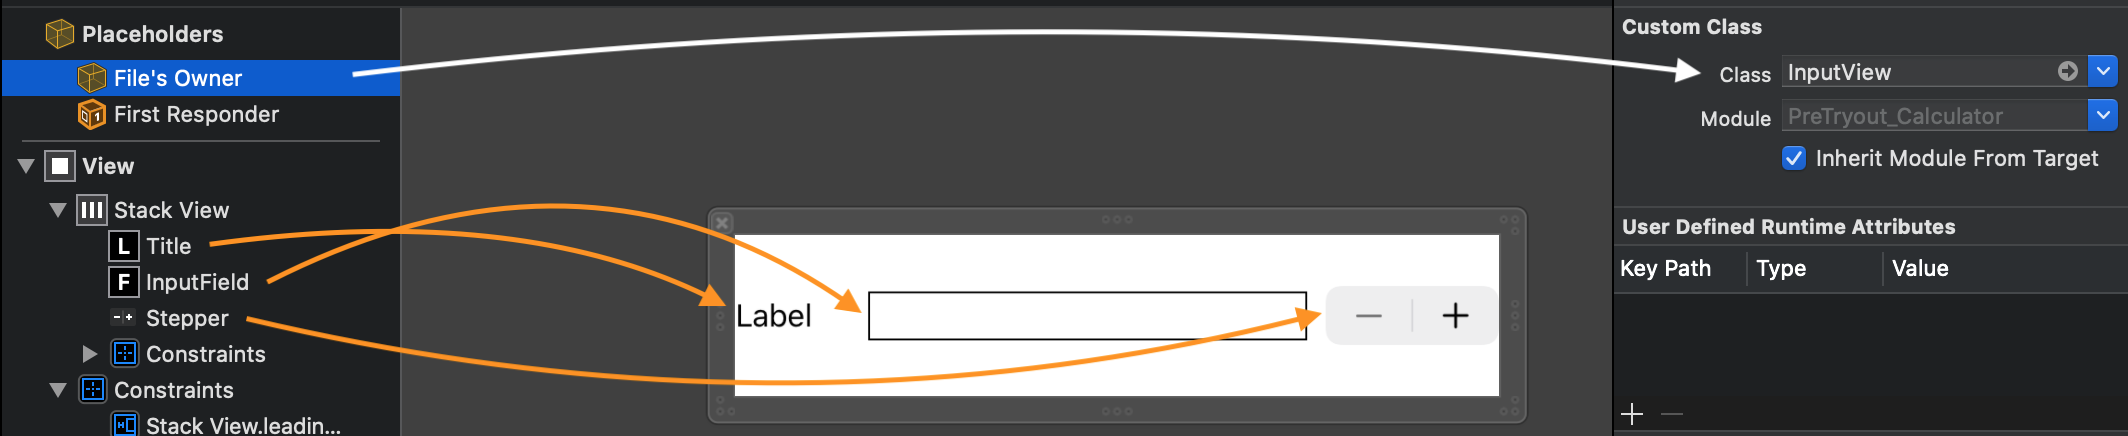
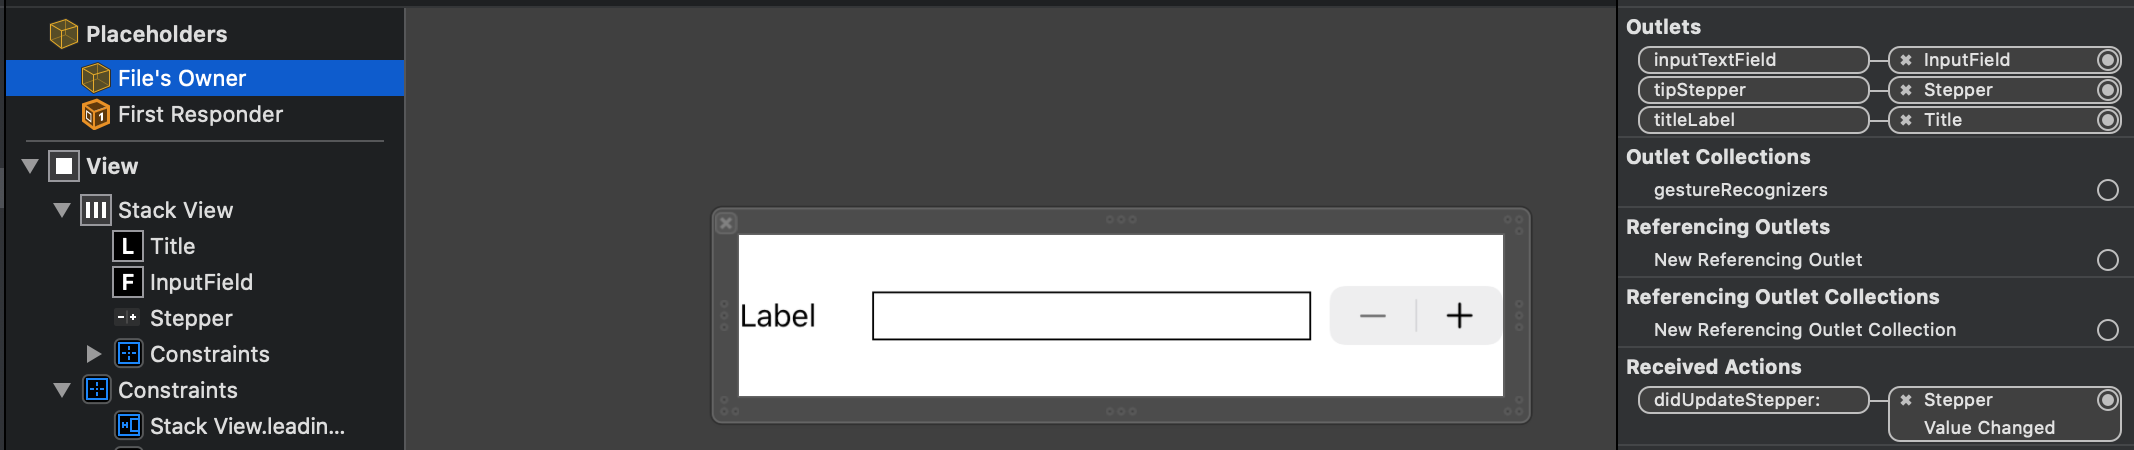
Look at Placeholders. The File’s Owner is pointing to InputView. The IBOutlet and IBAction are also linked to the InputView class.
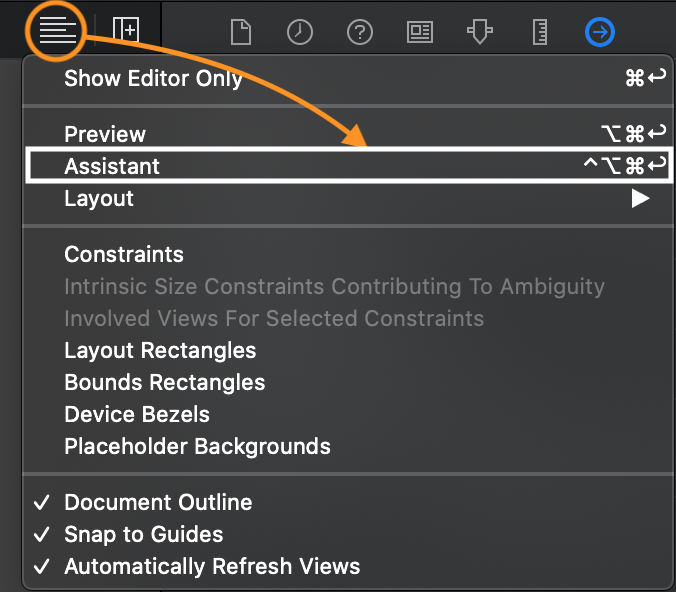
In the InputView.xib, open the Assistant for linking IBOutlet and the IBAction. When you link between xib component and InputView.swift, you will see the result like the image below.
We almost did for setting InputView. Let’s write the code.
import UIKit

@IBDesignable
final class InputView: UIView {
    @IBOutlet weak var titleLabel: UILabel!
    @IBOutlet weak var inputTextField: UITextField!
    @IBOutlet weak var tipStepper: UIStepper!

    override func prepareForInterfaceBuilder() {
        super.prepareForInterfaceBuilder()
    }

//It called when you are using the xib for creating it.
    required init?(coder: NSCoder) {
        super.init(coder: coder)
        setupView()
    }

//It called when you create view programmatically.
    override init(frame: CGRect) {
        super.init(frame: frame)
        setupView()
    }

    private func setupView() {
        guard let nib = loadNib() else {
            return
        }
        nib.translatesAutoresizingMaskIntoConstraints = false
        addSubview(nib)
        NSLayoutConstraint.activate([
            nib.leadingAnchor.constraint(equalTo: self.leadingAnchor),
            nib.trailingAnchor.constraint(equalTo: self.trailingAnchor),
            nib.topAnchor.constraint(equalTo: self.topAnchor),
            nib.bottomAnchor.constraint(equalTo: self.bottomAnchor)
        ])
    }

    private func loadNib() -> UIView? {
        let bundle = Bundle(for: Self.self)
        return bundle.loadNibNamed(String(describing: Self.self), owner: self, options: nil)?.first as? UIView
    }

    @IBAction func didUpdateStepper(_ sender: UIStepper) {
        inputTextField.becomeFirstResponder()
        inputFormatter?.updateTipValue(inputTextField, value: sender.value)
    }
}
In the InputView.swift, We have two init function which is mandatory for making subView. To set subViews, we should load xib from Bundle, which organizes the code and resources in the Bundle directory. Then add subView into the InputView using autolayout.
We use the @IBDesignable to load view on Storyboard. If not, the Storyboard can’t load our view. The @IBAction is aiming for handling the event like a tap, touchdown, and user actions. We linked the action from UIStepper to handle value changed event.
Rendering the xib in storyboard by using IBDesignable and IBInspectable
As we already set @IBDesignable in InputView for displaying the view on the Storyboard. Let’s open the Storyboard to set the views.
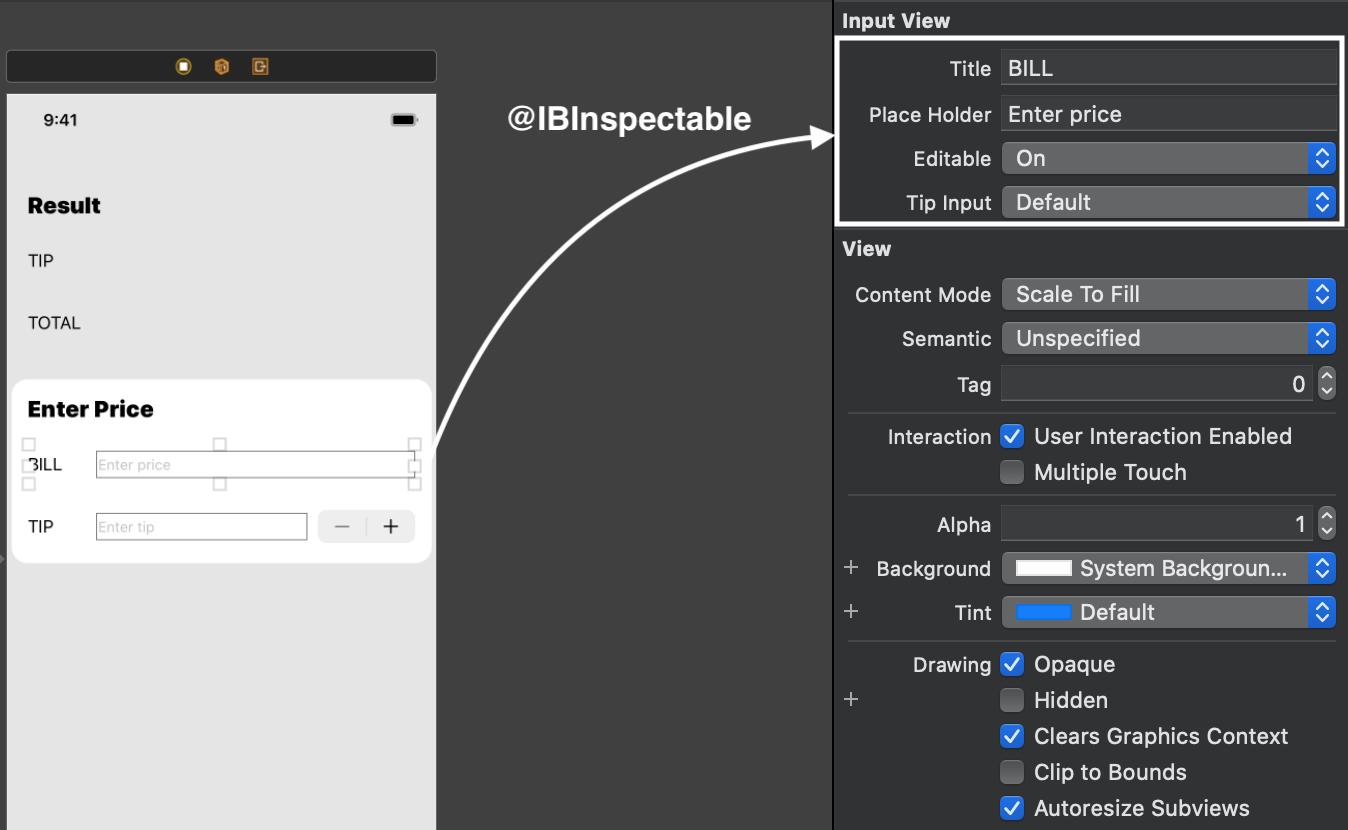
You can see our custom UIView called InputView is rendered on the Storyboard. Now I’ll explain the @IBInspectable for setting details on the Storyboard.
Open the InputView.swift and add the @IBInspectable.
@IBInspectable var title: String? = nil {
        didSet {
            titleLabel.text = title
        }
    }

    @IBInspectable var placeHolder: String? = nil {
        didSet {
            inputTextField.placeholder = placeHolder
        }
    }

    @IBInspectable var editable: Bool = true {
        didSet {
            inputTextField.isEnabled = editable
        }
    }

    @IBInspectable var tipInput: Bool = false {
        didSet {
            if tipInput {
                tipStepper.isHidden = false
            }
        }
    }
After adding the @IBInspectable var in InputView.swift, then open the Storyboard and check the InputView component.
We added the four @IBInspectable, and you can set the values on the Storyboard. When you set the value, then It will reflect the value and rendering again.
Dealing with input using the UITextFieldDelegate and NumberFormatter
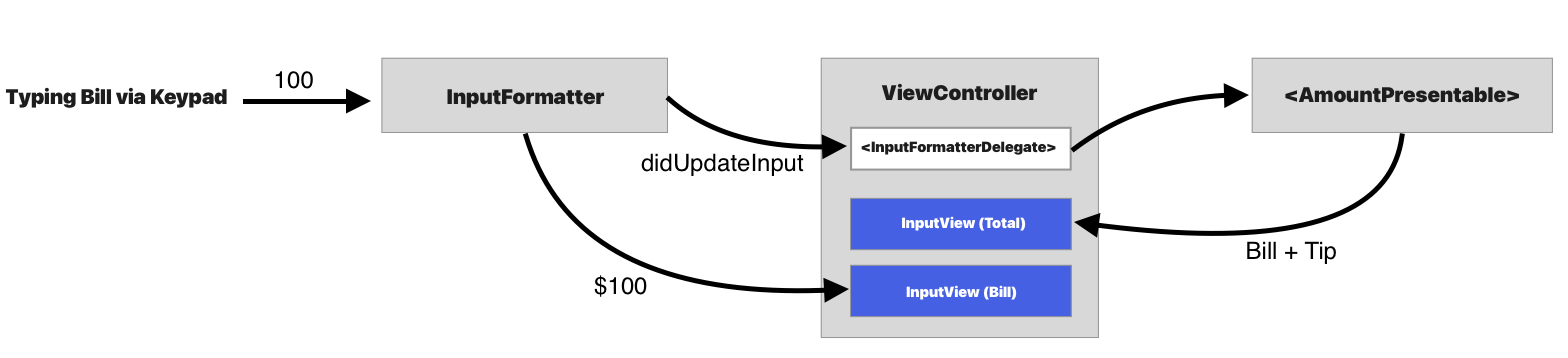
We will create the InputFormatter class to handle input from the keypad. To separating the logic from View, It handles the InputView’s UITextField event bypassing the delegate.
class InputFormatter: NSObject {
    enum InputType {
        case tip
        case bill
    }

    private var inputType: InputType = .bill

    private lazy var formatter: NumberFormatter = {
        let formatter = NumberFormatter()
        formatter.maximumFractionDigits = 0
        if self.inputType == .bill {
            formatter.numberStyle = .currency
            formatter.currencyCode = Locale(identifier: "en-US").currencyCode
        }
        else if self.inputType == .tip {
            formatter.numberStyle = .percent
            formatter.multiplier = 1
        }
        return formatter
    }()

    override init() {
        super.init()
    }

    convenience init(type: InputType) {
        self.init()
        inputType = type
    }

    private func setupKeyboardType(_ textField: UITextField) {
        textField.keyboardType = .numberPad
    }
}

extension InputFormatter: UITextFieldDelegate {
    func textFieldShouldBeginEditing(_ textField: UITextField) -> Bool {
        if textField.keyboardType == .default {
            setupKeyboardType(textField)
        }
        return true
    }

    func textField(
        _ textField: UITextField,
        shouldChangeCharactersIn range: NSRange,
        replacementString string: String
    ) -> Bool {
        guard let text = textField.text else {
            return true
        }
        if let formattedString = convertFormattedString(text, replacementString: string) {
            textField.text = formattedString
        }
        return false
    }
}
}
This class has convenience init to handle inputType, whether tip or bill. For the tip, the NumberFormatter’s number style is percent to display the number with percentage symbol. For the bill, It will display the number with a currency symbol.
Look at the UITextFieldDelegate functions. I handle the input stream from the number keypad and convert it for a human-readable format using the convertFormattedString function, which uses the NumberFormatter. (I attached full source code in this article. You can check it the function)
Let’s take a look above function. In this function, we can check the input string from the ‘replacementString’ parameter. It will be number because we set the keyboard type as numberPad. To use NumberFormatter to convert all input, we should return false to set the textField.text.
class ViewController: UIViewController {
    @IBOutlet weak var resultStackView: UIStackView!
    @IBOutlet weak var resultTitleLabel: UILabel!
    @IBOutlet weak var tipResultView: InputView!
    @IBOutlet weak var totalResultView: InputView!

    @IBOutlet weak var inputStackView: UIStackView!
    @IBOutlet weak var inputTitleLabel: UILabel!
    @IBOutlet weak var billInputView: InputView!
    @IBOutlet weak var tipInputView: InputView!

    override func viewDidLoad() {
        super.viewDidLoad()
        resultStackView.setCustomSpacing(40, after: resultTitleLabel)
        inputStackView.setCustomSpacing(40, after: inputTitleLabel)
        billInputView.delegate = InputFormatter(type: .bill)
        tipInputView.delegate = InputFormatter(type: .tip)
    }
}
The ViewController code is pretty simple. You can just set the delegate in viewDidLoad.
Reflect the result of the total amount and tip amount using the protocol
We are almost done. The final step reflects the result of an amount when entered bill or tip automatically. To do that, let’s create an AmountPresentable protocol and InputFormatterDelegate.
We added the InputFormatterDelegate in InputFormatter and then conformed it in ViewController. It will let ViewController when detecting a typing event.
To calculate the total amount and tip amount, We add AmountPresentable protocol.
protocol AmountPresentable {
    var billValue: NSNumber { get }
    var tipValue: NSNumber { get }
    var tipPercentage: NSNumber { get }
    var formatter: NumberFormatter { get }

    func updateTipAmount(assign to: InputView)
    func updateTotalAmount(assign to: InputView)
    func updateStepperValue(assign to: InputView)
}

extension AmountPresentable {
    func updateTipAmount(assign to: InputView) {
        let tipAmount = formatter.string(from: self.tipValue)
        to.inputTextField.text = tipAmount
    }

    func updateStepperValue(assign to: InputView) {
        to.tipStepper.value = tipPercentage.doubleValue
    }

    func updateTotalAmount(assign to: InputView) {
        let totalValue = billValue.doubleValue + tipValue.doubleValue
        let totalAmount = formatter.string(from: NSNumber(value: totalValue))
        to.inputTextField.text = totalAmount
    }
}
This protocol binds to InputView to display the amount. It is called in the ViewController in the didUpdateAmount function. Let’s conform to the AmountPresentable on ViewController.
class ViewController: UIViewController, AmountPresentable {
    var billValue: NSNumber = 0
    var tipValue: NSNumber = 0
    var tipPercentage: NSNumber = 0
    //…

    override func viewDidLoad() {
        super.viewDidLoad()
    //…
        billInputView.delegate = InputFormatter(type: .bill, delegate: self)
        tipInputView.delegate = InputFormatter(type: .tip, delegate: self)
    }
}

extension ViewController: InputFormatterDelegate {
    func didUpdateInput(_ type: InputFormatter.InputType, number: NSNumber) {
        if type == .tip {
            tipValue = NSNumber(value: billValue.doubleValue * (number.doubleValue * 0.01))
            tipPercentage = number
        }
        else if type == .bill {
            billValue = number
            tipValue = NSNumber(value: billValue.doubleValue * (tipPercentage.doubleValue * 0.01))
        }
        updateTipAmount(assign: tipResultView)
        updateTotalAmount(assign: totalResultView)
        updateStepperValue(assign: tipInputView)
    }
}
That’s all. When received the didUpdateInput function, then update the amount by using AmountPresentable. It enables us to reflect the amount during the enter the bill or tip.
Conclusion
We learned how to use Storyboard and Xib, UITextField, and Delegate patterns. We can improve our code logic if we use the combine framework, but It only supports iOS 13.0. If you understand this project and how delegation and protocol works, you can also quickly adapt the combined framework. I hope you enjoy this post. Thank you!
In this post, I’ll share useful English resources for Software Engineer. I struggled to express my thought to someone. It’s always challenging me. I decided to find English books focused on the Software Industry because There are many useful sentences for software engineers. It helps me a lot and saves me time.
Top 50 Software Engineer Personal Interview Questions & Answers
I highly recommend this book. In this book, there are great examples of answers to personal interview questions. You can pick a sentence and rephrase it for your stories.
Cracking the Behavioral Interviews: for Software Engineers
It’s similar to Knowledge Powerhouse. The author is a co-founder of TechMockInterview.com. In this book, 28 questions and answers. The answers are very detailed and useful sentences to express your software engineer careers.
Express Publishing published a series of career paths. It’s one of the career path books focused on the Software Engineering domain. I highly recommend it. It looks like side by side book. There are many useful chapters to learn Business English for Software Engineer.
I highly recommend it. You can learn how to use STAR(Situation, Tasks, Action, Result) strategies to express your story in this course. Also, Terry answered my questions very friendly.
Unlike Pass your job interview in English, It’s more focused on business English for daily life in the office. I learnt how to communicate with colleagues during meetings, business trips, etc.
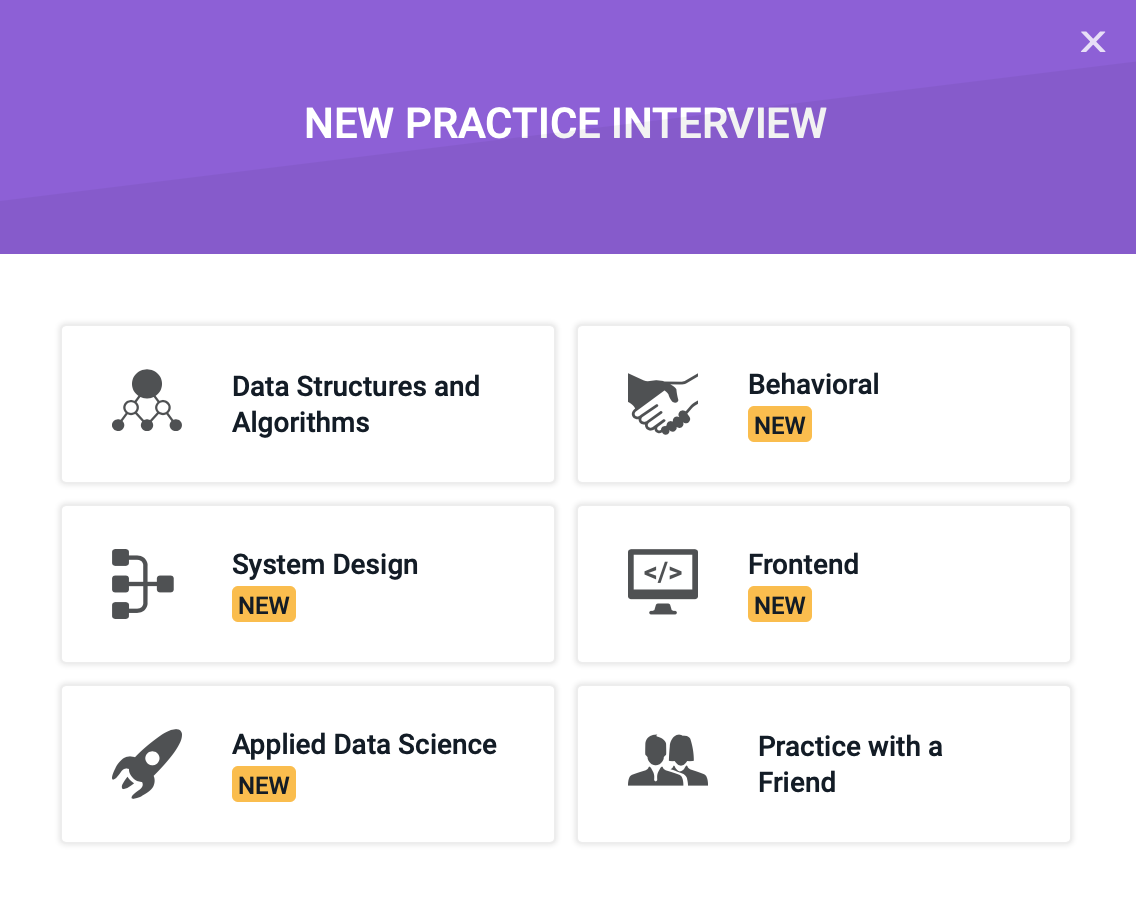
PRAMP is a free service for practicing a mock interview for software engineers. You can not only practicing coding interviews but also behavior interviews. There is no limit to practices. You can also get feedback from your interviewer for free.
Learn English from Conference
There are many conferences for Software Engineers. Pick your favorite conference and watch and repeat it a lot. You can learn how to give a speech to your thought.
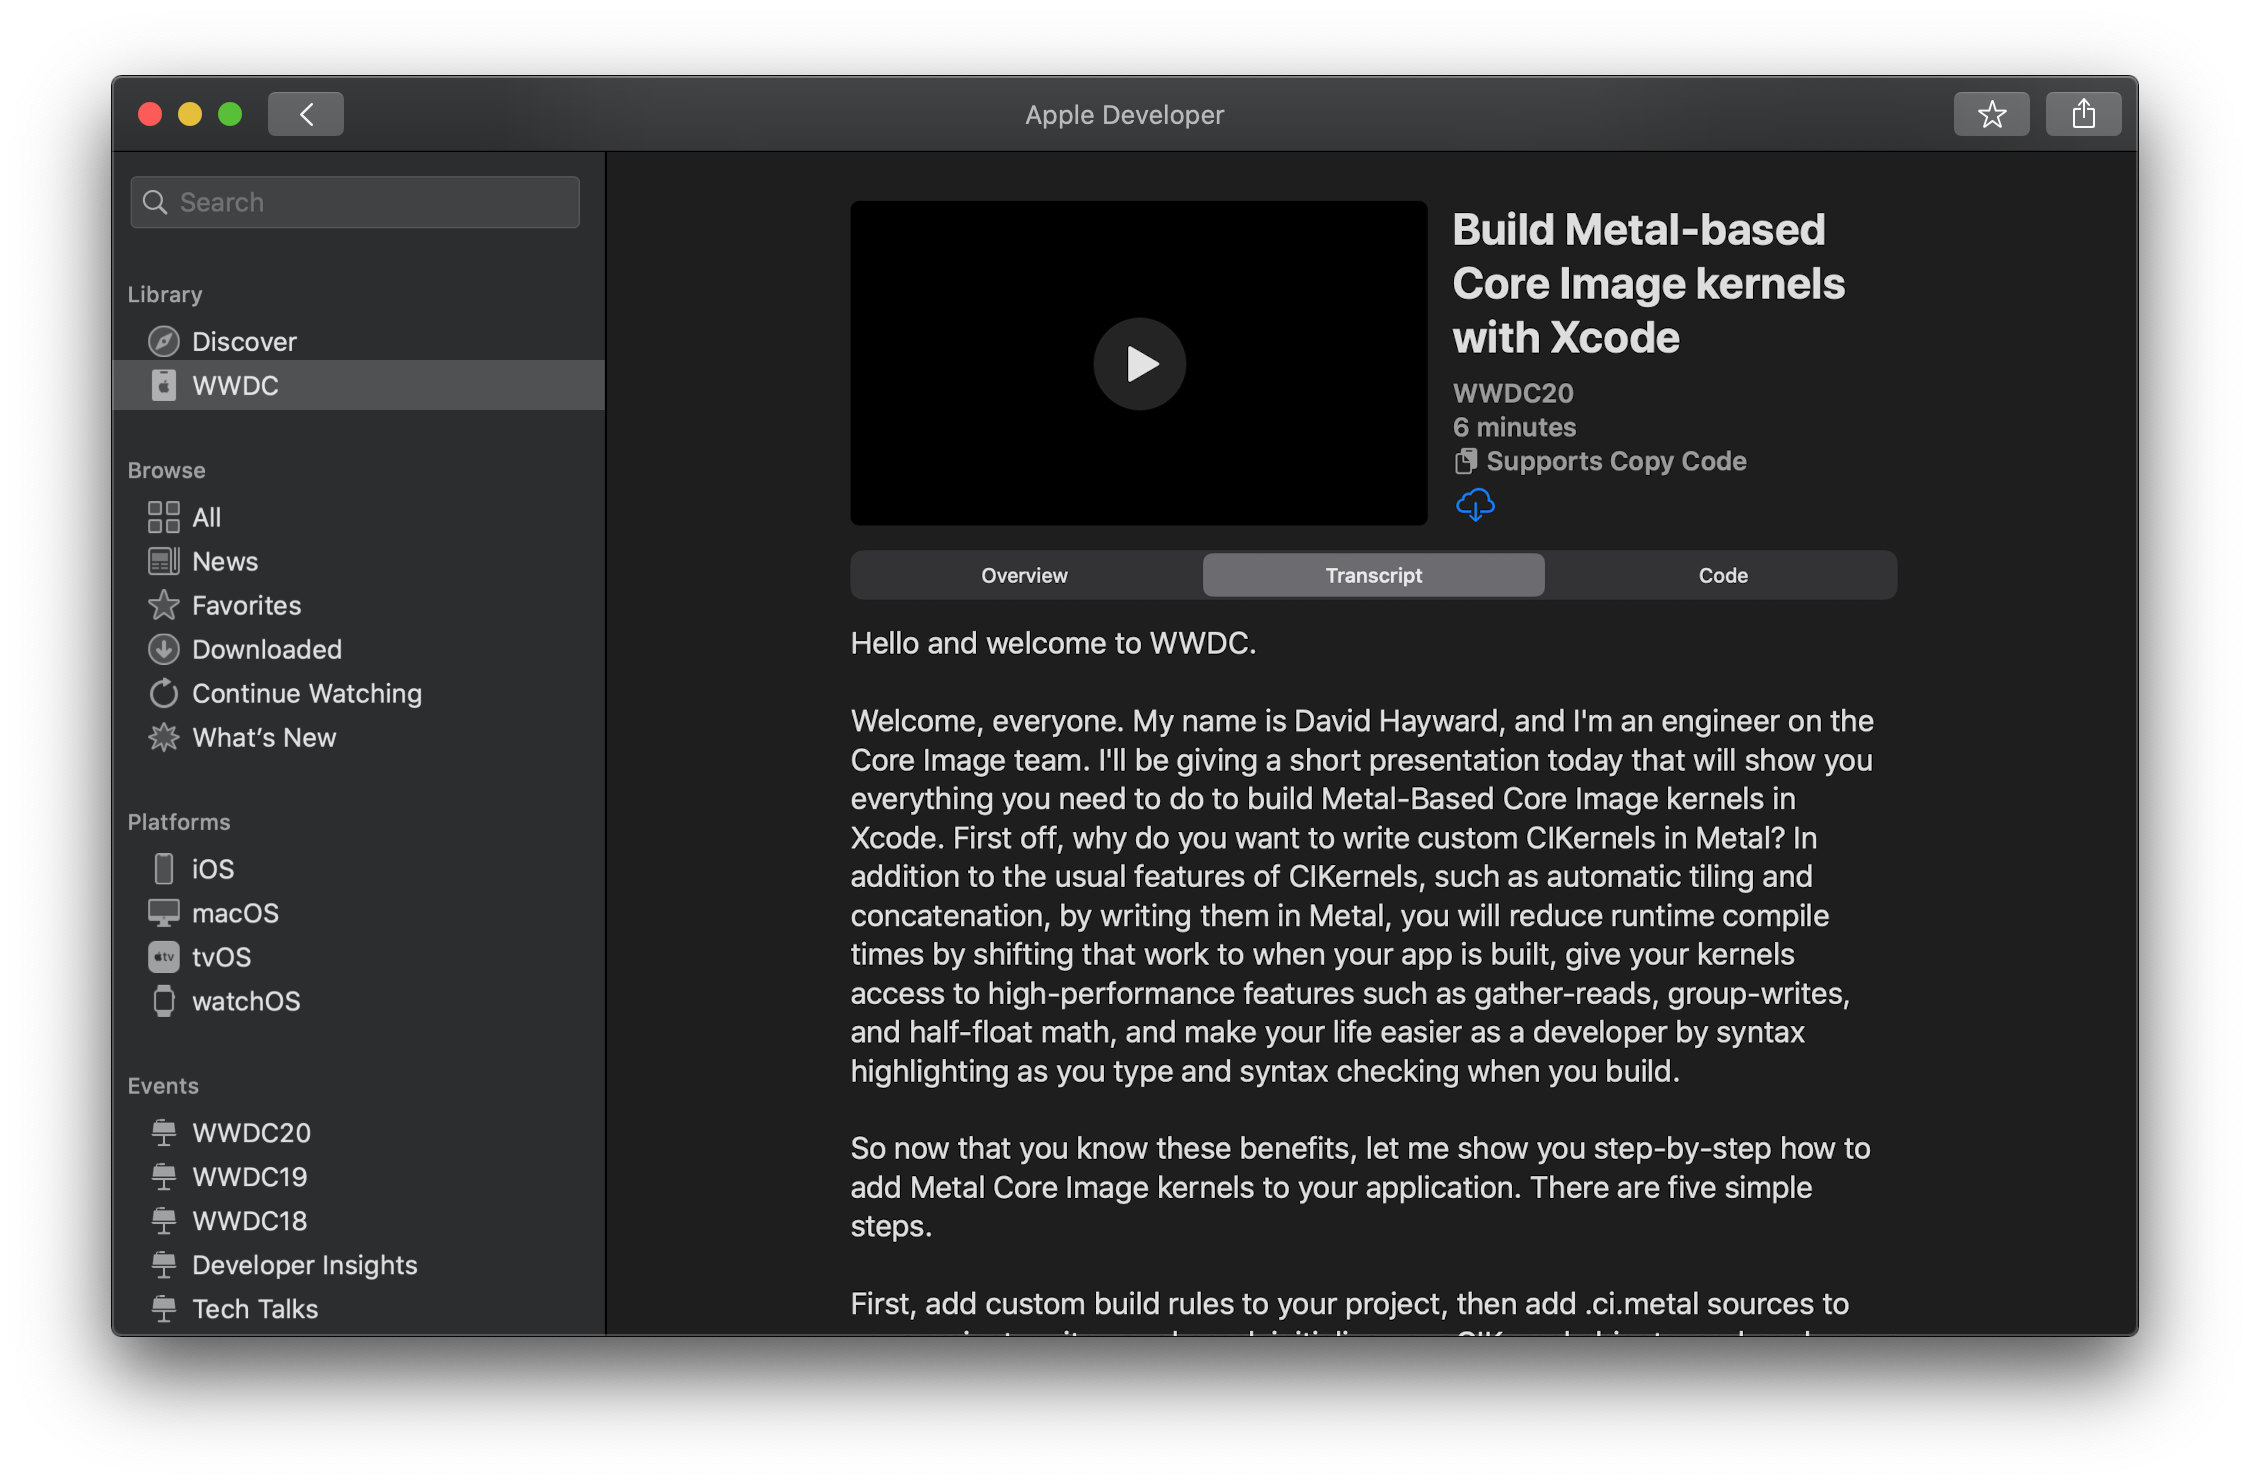
As an iOS engineer, WWDC is such a great conference in the year for me. Apple delivered a WWDC application. In this app, You can watch all the videos, and it provides the transcriptions!
Conclusion
For ESL software engineer, English is the most challenging. But I have to learn English to expand my career in the tech industries. I’m a native Korean and living in Seoul for over 30 years. I have never lived outside of Korea. Although it is challenging to access English, as I introduced you, I believe that you can learn English if you have the will through various media. Even if I am not good at English, I continue to run blogs in English to expand my career and to communicate with English-speaking engineers by sharing my knowledge.
내가 찾아간 곳은 브루클린 지점이고 여기는 예약이 필수이기 때문에 한국에서 미리 예약을 하고 찾아갔다. 예약은 피터루거 홈페이지에서 하면 된다.
피터루거 스테이크 하우스
이날은 스테이크를 먹는다는 생각에 들떴었는지 사진을 생각보다 많이 안찍었다. 1층 로비에 들어가면 대기할 수 있는 Bar 같은 공간이 있고 간단한 음료나 술을 주문해서 먹을 수 있다. 나는 저녁 8시인가로 예약을 했었는데 그날 일정이 생각보다 빨리 끝나서 예약했던 시간보다 1시간 정도 더 빨리 도착했다.
종업원한테 예약시간 보다 조금 빨리 왔다고 말했더니 조금만 기다리라고 말하더니 한 10분 지났을까? 자리 마련했다고 들어오라고 했다.
피터루거 스테이크 메뉴
식전으로 나온 빵, 맛있었지만 스테이크로 배를 채워야 되니까 자제했다.
드디어 메인 메뉴 스테이크가 나왔다. 나는 T본 스테이크를 시켰고 미디엄 웰던으로 주문했다. 입에서 살살 녹는 맛이었다. 진짜 진심 맛있었다!
스테이크는 굽기에 따라서 미디엄웰던이면 고기위해 흰색 소를 올려두고 레어로 주문하면 빨간색 소를 스테이크위에 올려서 가져온다. 피터루거는 미디엄 웰던이 보통 다른 스테이크 레스토랑의 미디엄 레어 정도 굽기인 것 같다.
일단 고기가 엄청 두껍고 질긴 부분이 하나도 없었다. 스테이크를 먹다보면 힘줄 같은 것때문에 질긴 부분이 있을 수 있는데 피터루거 스테이크는 그런 부위가 전혀 없었다.
직원들의 친절도에 대한 이야기가 후기에 보면 다녀온 사람마다 다른것 같은데 우리가 갔던날 직원들은 다들 엄청 친절했었다. 그리고 토마토도 스테이크랑 참 잘 어울리는 조합이었다.
영어는 새해마다 목표로 삼고 있지만 정작 내 실력은 매년 그대로다. 나는 회사에서 영어 학원비를 지원해주고 있어서 일대일 수업을 진행하고 있고 개발 관련 자료들도 대부분 영어로 되어있기 때문에 영어에 노출되는 환경에 있기는 하다. 버그 트랙킹 시스템이나 코드 리뷰 그리고 이메일 등등도 모두 영어로 쓰는 환경에서 매일 일하고 있지만 신기하게 영어 실력이 늘지 않는다.
구글 번역기와 그래머리 문법 검사기에 의존해서 영어문장을 힘들게 작성하다보니 진지하게 왜 영어 실력이 늘지 않는지 고민해보기 시작했다.
일단 내가 당장 업무 하는데 필요한 표현법을 익히는 것부터 공부하기로 시작했고 여러가지 검색결과 몇가지 괜찮은 책들과 사이트를 찾았다.
Knowledge PowerHouse
Knowledge Powerhouse에서 발간한 책들은 다른 영어책들과는 다르게 개발관련 질문과 답변으로 구성되어 있는 책이다. 내가 이책을 정말 추천하는 이유중에 하나는 개발자가 사용하는 영어 표현들이 거의 다 들어있다. 기본적으로 인터뷰 준비를 목적으로 발간된 책이기는 하지만 질문에 대한 답변 예제가 정말 구체적으로 나와있기 때문에 회화 연습에 큰 도움이 되는 책이라고 생각한다. (단순히 이런 질문에는 이런 걸 주의해서 대답하라는 식으로 쓰여있는 책이 아니다. 문장의 시작부터 마무리하는 부분까지 상세한 예문들로 가득하다.)
책의 구성은 이런식이다.
지금까지 진행했던 프로젝트 중에서 가장 기억에 남는 프로젝트는 무엇인가요?
저에게 가장 기억에 남는 프로젝트는 우리 회사의 쇼핑검색 기능에 사용자가 좋아할 만한 아이템들을 추천해주는 기능을 개발한 것입니다. 블라블라~~ 그래서 저는 이 프로젝트가 가장 기억에 남아있고 ~를 통해 제 실력도 성장시킬 수 있었던 좋은 경험이었습니다.
위와 같이 답변이 단순히 한 두문장으로 끝나지 않고 아주 구체적으로 서술되어있다.
PRAMP
PRAMP는 Practice Makes Perfect 라는 뜻이라고 한다. 이 서비스는 개발자들을 1:1로 매칭 시켜서 서로 피어 인터뷰를 볼 수 있도록 중계해주는 사이트이다. 이 서비스의 가장 큰 매력은 무료라는 점이다. 기본적으로 3번 무료로 Mock Interview를 볼 수 있고 해당 서비스에 친구를 5명정도 가입시키면 무제한으로 무료로 사용할 수 있다.
코딩 인터뷰부터 Behavioral Interview 등등 연습하고 싶은 인터뷰를 선택하고 일정을 잡으면 된다. 모의 인터뷰가 진행되기 전에 내가 상대방에게 질문할 리스트를 메일로 보내주고 인터뷰가 시작되면 누가 먼저 인터뷰를 볼 지 정하고 진행하게 된다. 인터뷰가 끝나면 서로 피드백도 자세하게 적어주기 때문에 나의 부족한 점이 무엇인지 알 수 있게 된다.
특히 나는 Behavioral Interview가 회화연습에 큰 도움이 된다고 생각한다. 내가 하고 있는 일을 영어로 표현하는 연습을 할 수 있으며 상대방이 나의 영어 표현이 어떤지 피드백을 주기 때문에 부족한 부분을 개선할 수 있다. 나는 모의 인터뷰때마다 녹음을 해놓고 상대방이 내가 한 질문에 어떻게 영어로 대답하는지 다시 들어보고 딕테이션 등을 하면서 공부하고 있다. 거의 대부분 영어를 네이티브로 쓰는 개발자들로 매칭이 되기 때문에 무료로 영어공부하는 느낌이다.
WWDC
애플의 개발자 행사인 WWDC는 매년 대규모 세션으로 진행되고 있으며 모든 동영상은 대부분의 언어 자막을 지원한다. 웹으로도 볼 수 있지만 맥, 아이폰 용 앱이 동영상을 다운로드해서 오프라인으로 볼 수 있기 때문에 공부하는 데 더 편리하다. 특히 자막보기 기능이 있어서 애플의 개발자들이 발표를 할 때 영어로 어떻게 표현을 하는 지 볼 수 있어서 도움이 많이 된다.
마치며
영어도 코딩이랑 마찬가지로 자주 쓰고 활용해야 실력이 늘 것 같다는 생각이 강하게 들었다. 당연하지만 지금까지 나의 영어공부는 수업듣고 복습정도만 했지 실제로 누군가와 영어로 대화를 해보고 써먹지 않았었다. 개발관련 지식을 습득할때와 마찬가지로 직접 부딛혀보면서 공부를 해보려고 한다. 외국에서 살면 외국인 동료와 매일 대화라도 할 수 있는데 한국에 있는 경우 사실 외국인과 대화를 할 기회가 거의 없다.
PRAMP와 같은 서비스가 이런 갈증을 해소시켜주었다. 영어로 대화하는 상대가 소프트웨어 개발자들이며 그들과 알고리즘과 프로젝트를 주제로 이야기를 할 수 있다. 그것도 무료라는 점이다. 매년 제자리 걸음하고 있는 나의 영어 실력을 이젠 정말 끝내고 싶은 마음이다.


You must be logged in to post a comment.